By Michael Rinaldi
Every Friday or so, Michael Rinaldi hosts an informal Q&A on Facebook. The concept is simple: Michael calls out a specific theme on Thursday, and people ask questions in relation to that theme, to which he replies, often looking at pictures of models from those asking questions and taking this as a base for answering. These posts are a great source of knowledge, and an excellent source for precise feedback, so I try to at least read through them, and I sometimes post questions of my own when time allows.
Last Friday I did post a question about photography, and Michael responded in his usual elaborate way. Among his reply was a pretty cool step-by-step guide about editing pictures in Photoshop, and I thought that I should do something to prevent this level of knowledge to get lost into the void of the internet. Hence this post.
Michael has kindly agreed to let me reproduce the SBS part in full. The relevant part of my question for what follows went like this:
I shoot raw and then get [my pics] into Photoshop. Tried a number of presets and adjustments but here I’m mostly experimenting left and right. It’s not based on any particular knowledge and my approach is eyeball mk1. I clean up the background a little to get less noise on the white, but I work on uncalibrated screens so I usually end up spotting varying results on different machines.
Here’s Michael’s response in full. Note that Michael is using pictures of my recently completed T-34 project. and as he notes, these pics were already extensively edited. I will try the whole technique on my next project.
I use PS for editing, and using one of JV’s T-34 photos, here is the basic SBS of editing that I do. Note, if I do not show a PS feature being used, then that means I am not using it (such as the Brightness/Contrast).
Regarding shooting RAW — I stopped doing that a few years back. One, it’s time-consuming, and two (mostly this) the in-camera Hi-res JPG settings do a fantastic job today and make life easier and more efficient. Yes, you can tune the RAW settings and do batches, etc. But I found it only works over a handful of images from each session, took longer to do and implement and the in-camera settings were often better to start with. This change happened after the D50/90 series, and Nikon had made huge strides on their JPG settings (I would assume image Canon is similar, I’m just not knowledgable enough to when and what series to use).
Also, I am editing a previously edited photo, so it is not 100% perfect, however, I feel there was definitely room for improvement. Here is my version of JV’s photo with caption notes on the SBS process. It actually goes very quickly, about 2-5mins per image most of the time. And lastly, this is typical for most models BUT winter whitewash finishes are the hardest against white backgrounds, btw.
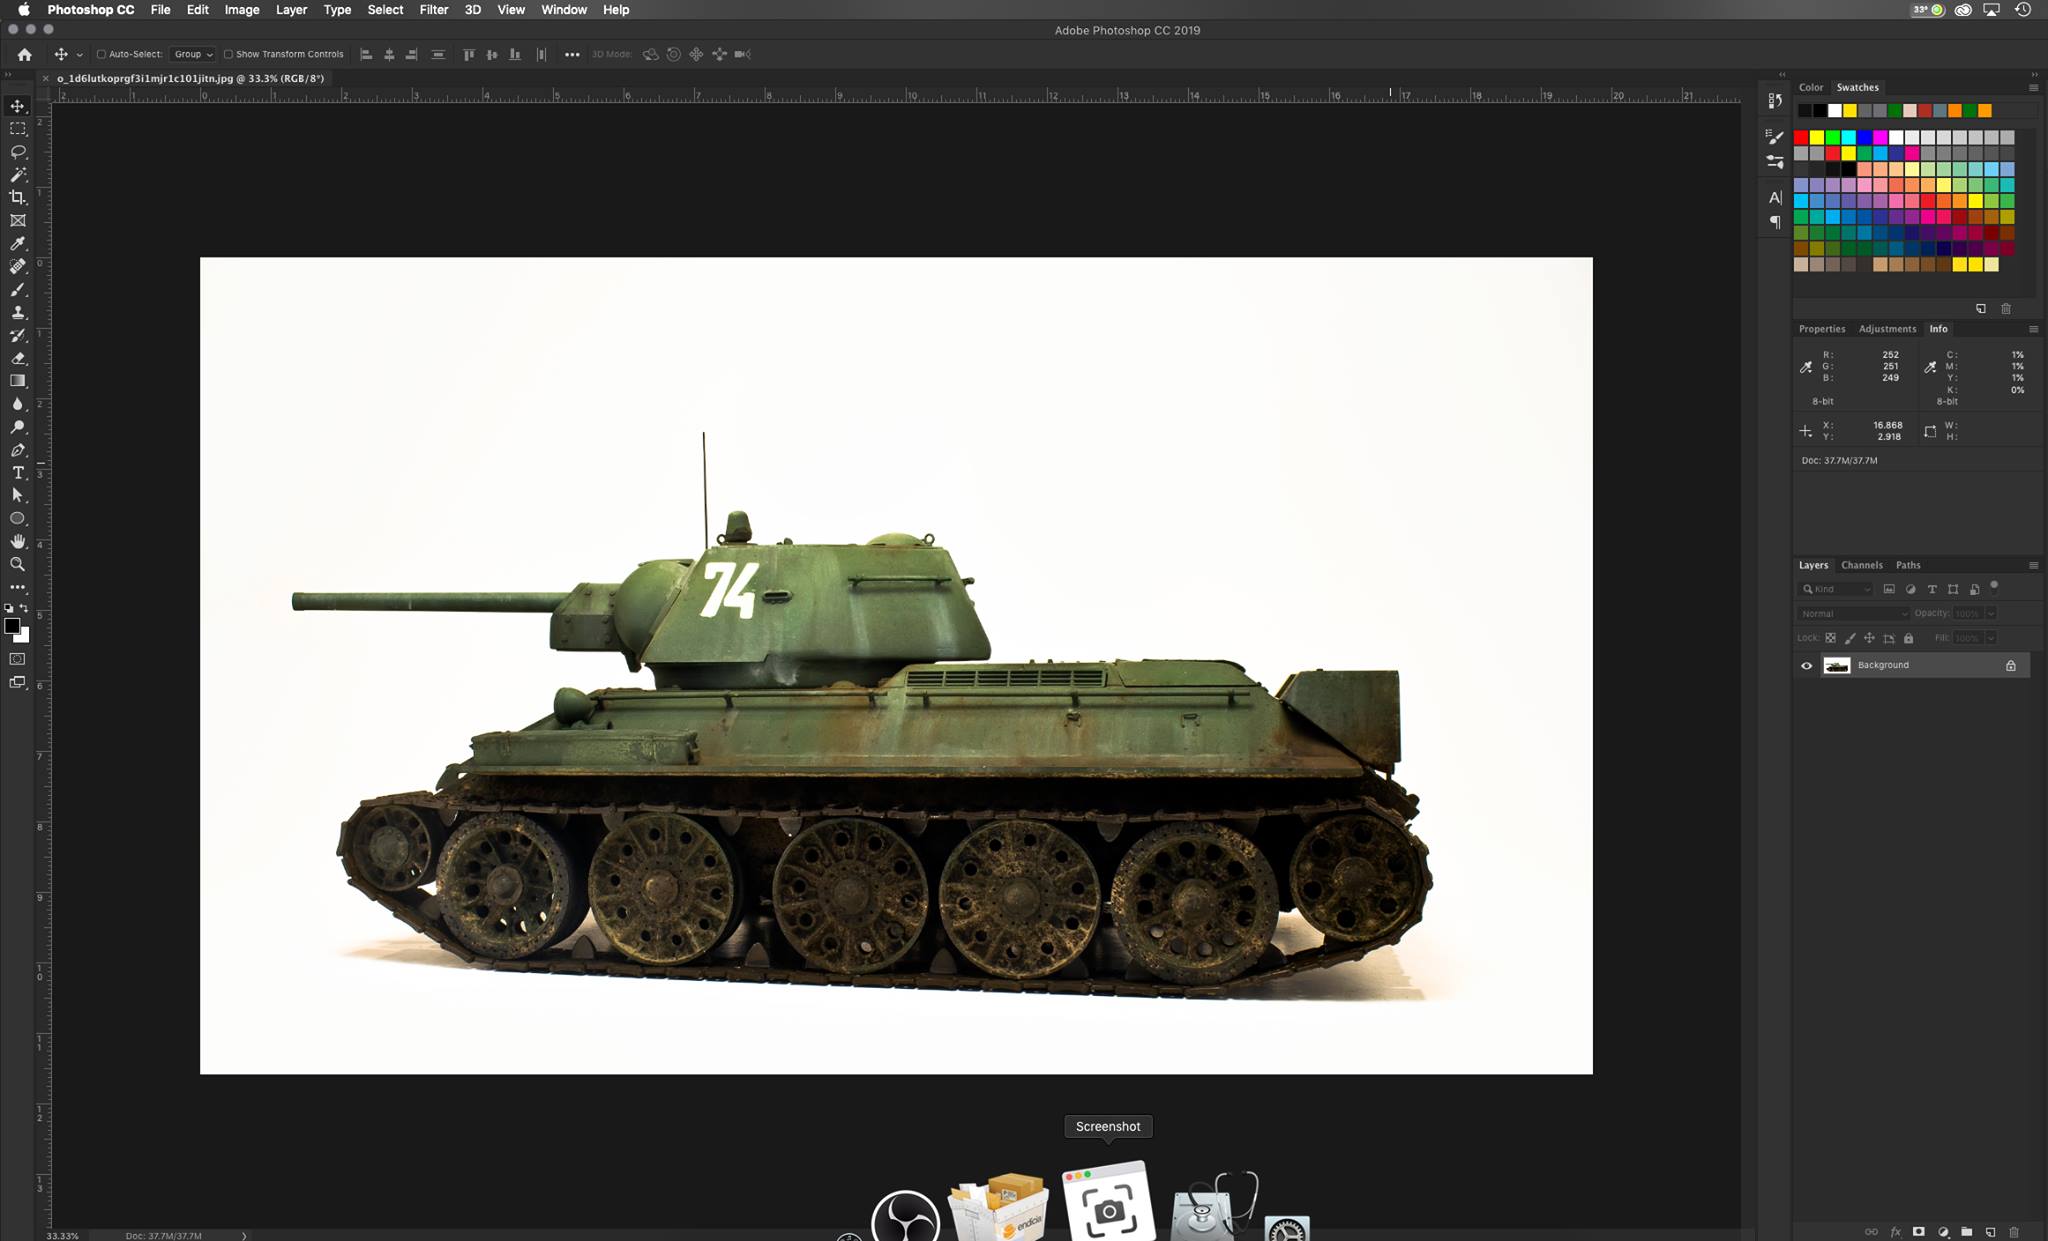
The first image is the before and after, you should see the white background, and image color better with more accurate shadow rendering. Your target goal is neutral grey shadows, and tinted shadows are the easiest way to see if your color is off.
Before & After Shot

Step 1 – Getting Started
Open Info tab (seen on the far right of image) and move cursor on white background, the CMYK are used to identify color (which we will remove).
Step 2 – White Balance
I move the cursor down over the edges of the shadows, note the jump in the CMYK numbers in the Info window. This is how I can tell which color is too strong and needs adjusting. The goal is equal CMYK shadow numbers = neutral grey color.
When White Balance is accurately set, this equals a relatively accurate photo representation of what is on the bench. The model matches the photos of the model under those lights. Since we share photos mostly, this is the important criteria for most modelers.

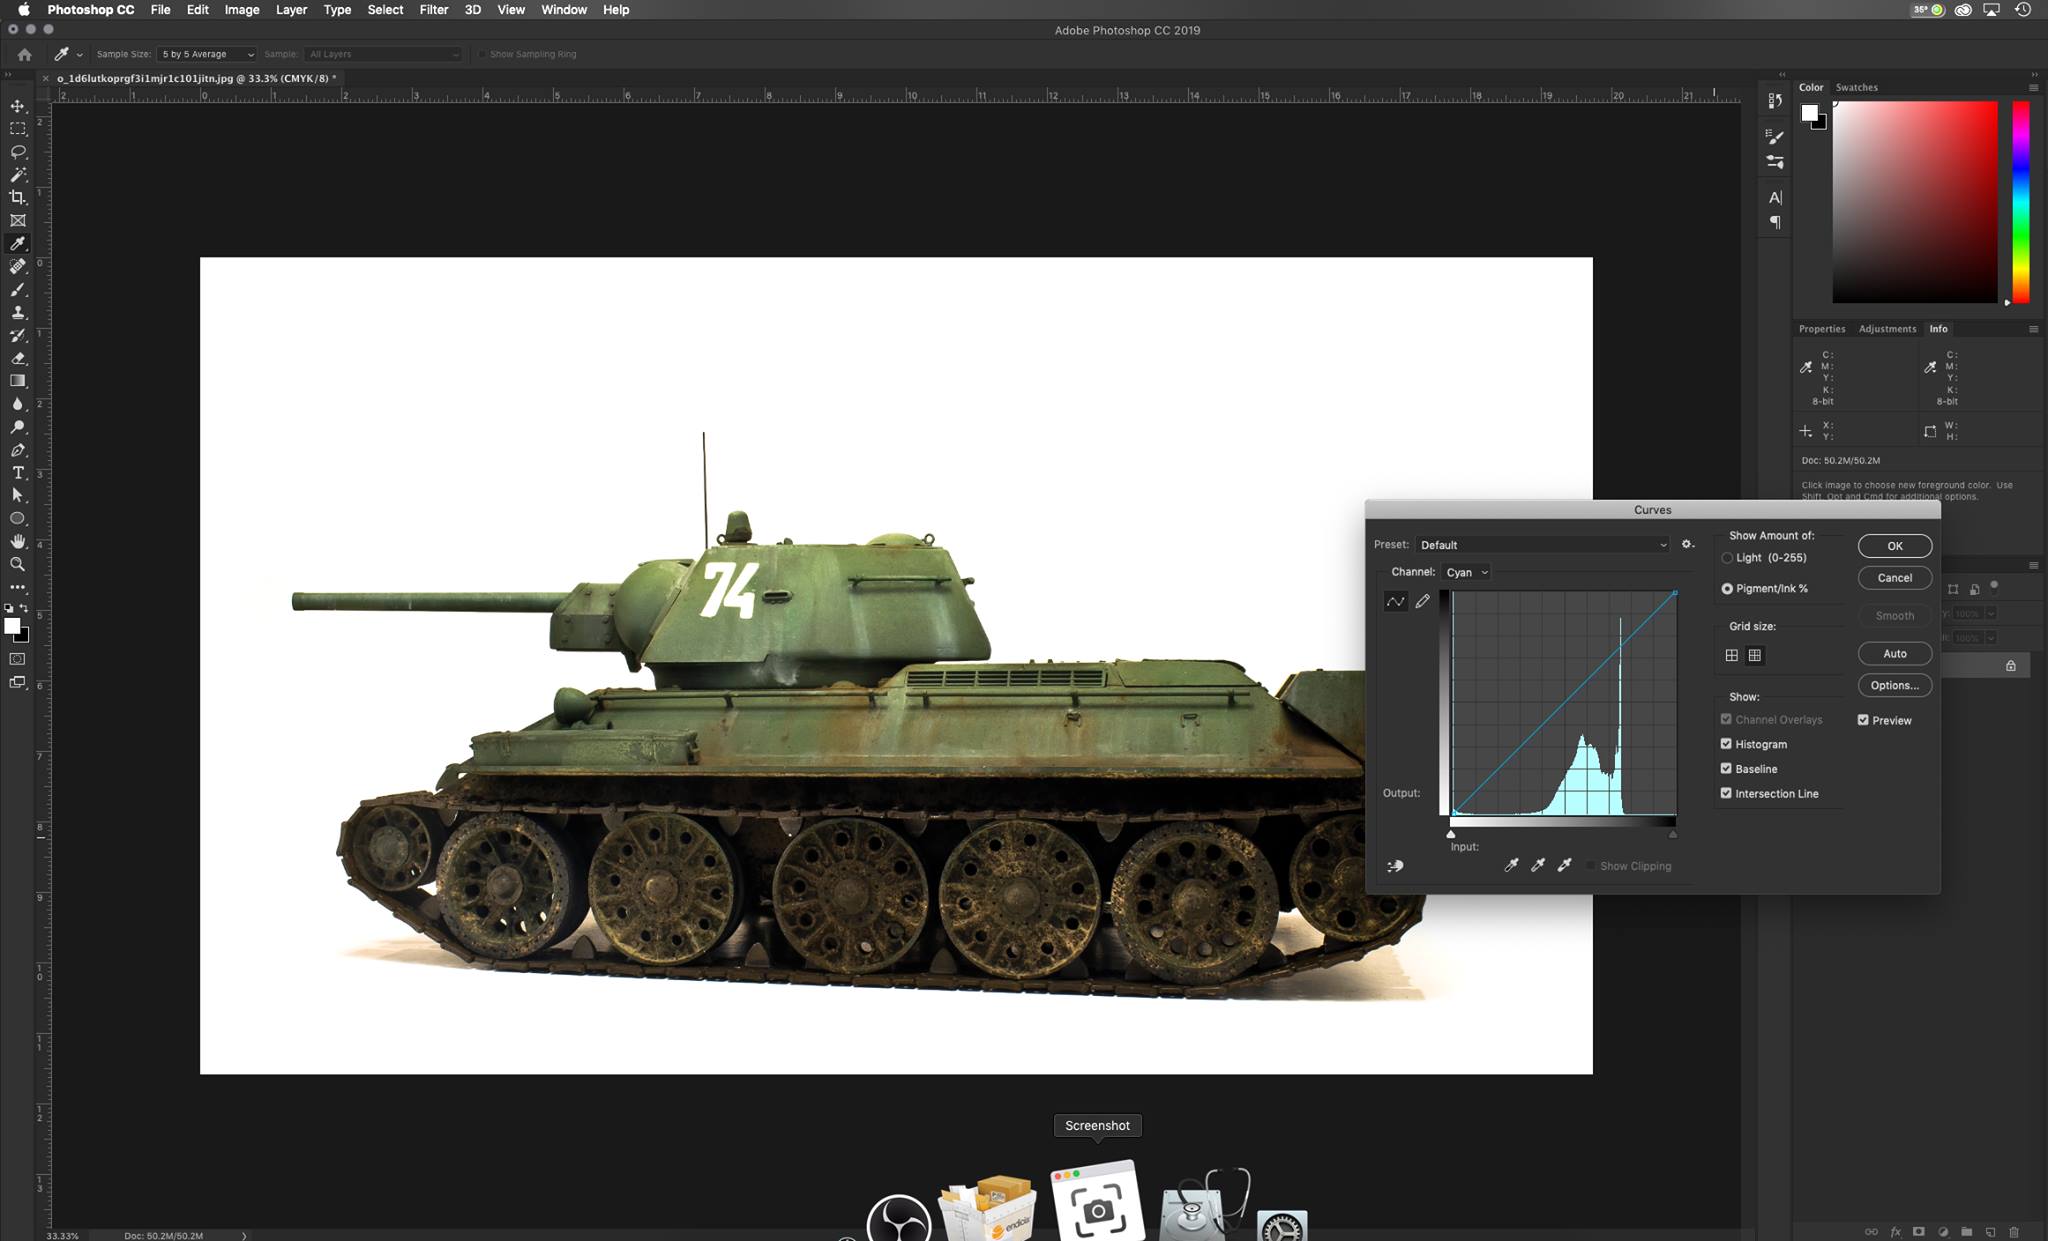
Step 3 – Adjusting Curves
Open Curves window, note the grey range in the graph, we use this to get a jump on making the background pure white.

Step 4 – Contrast
Make slight adjustments to clean the white, and brighten the darker shadows on the model. (Note the slider markers and their location relative to the above image).
The overall image is good, but the lower hull area is so dark that we need to brighten it slightly. This is superior to using Brightness/Contrast scale, which can look fake very quickly (or at least NOT what the model actually looks like).

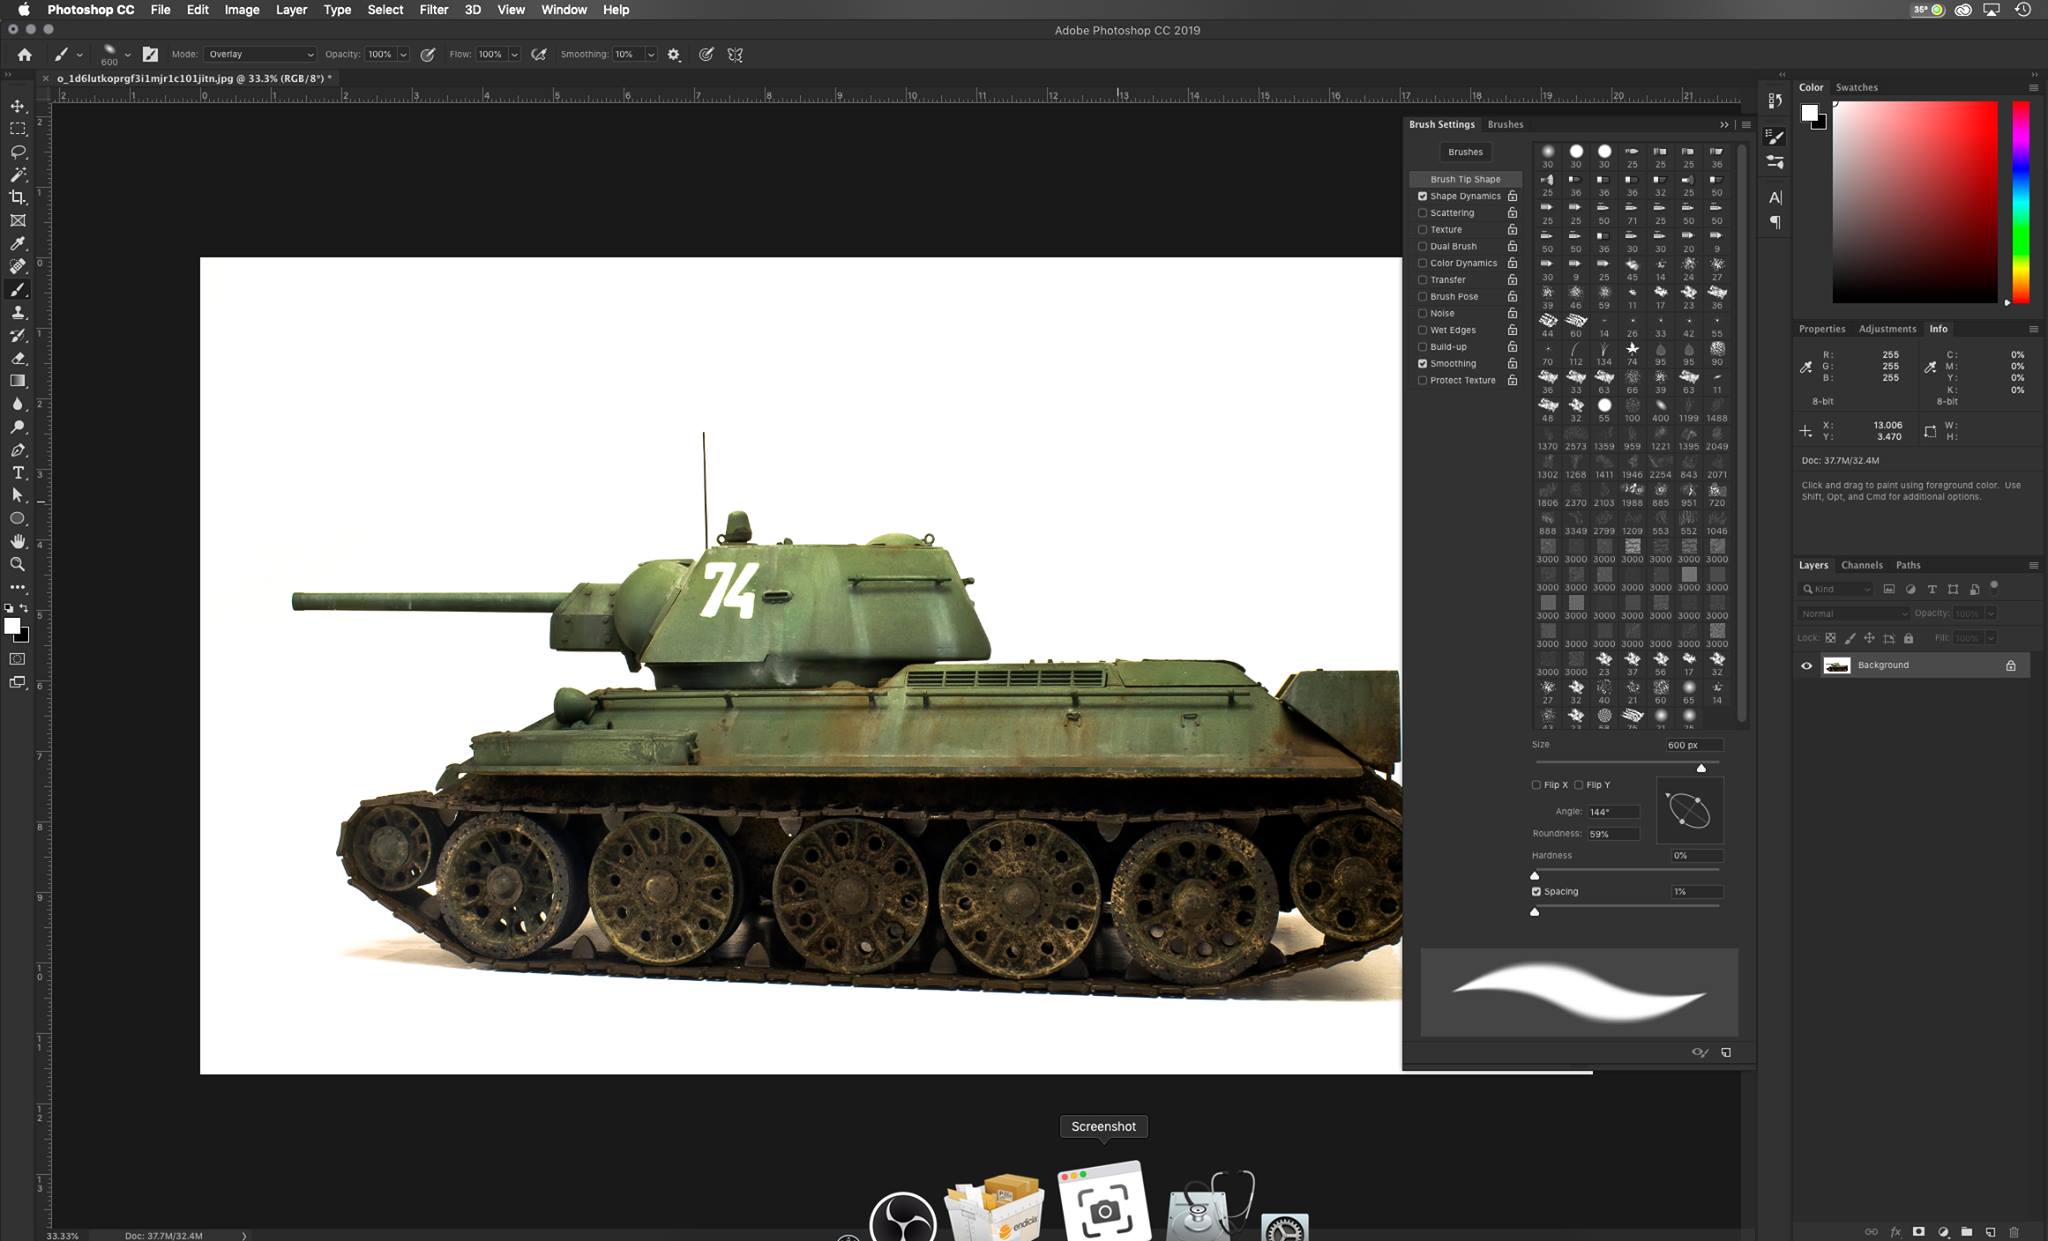
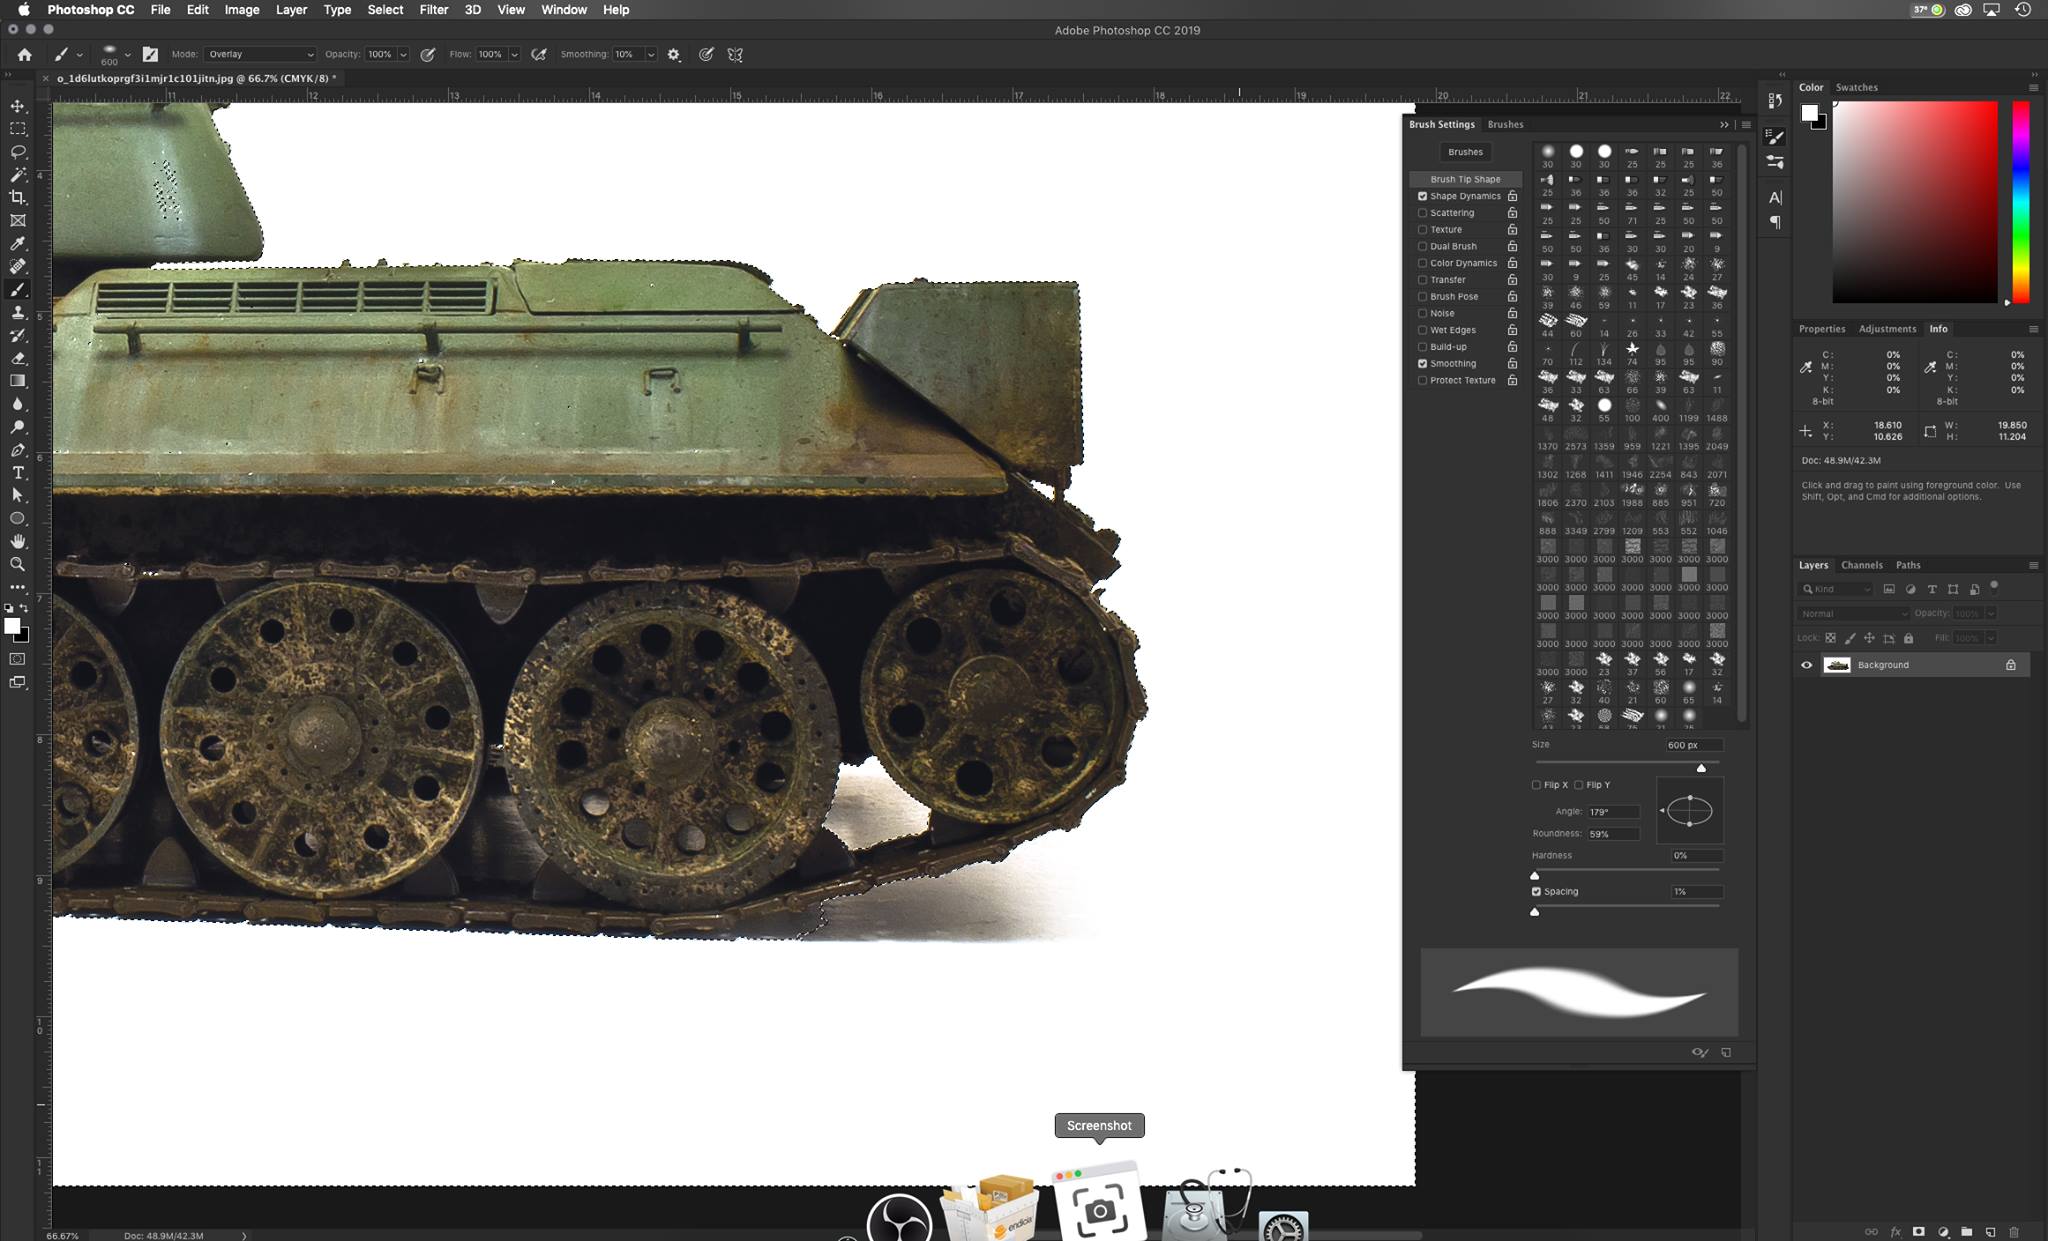
Step 5 – Background Cleanup
Next Open the Brush menu, and use a soft oval brush with pure white color selected (use the quick select Black & White color swatch on the left menu of the screen). Afterwards, move the cursor around the white areas while the CMYK numbers in the Info tab to see any residual color remains in white areas and then erase it via the brush to ensure all is pure white.
Note – you can skip this step for non-white or black backgrounds, and instead use the Stamp/Clone tool to remove dust and lint from the paper as a means to clean things up.
Step 6 – Color Balance 1 (Saturation)
With the background basically done, let’s focus on the color balance working in the shadow area as our guide. It’s more efficient and accurate to switch the image to CMYK for this purpose. (Note – the image above is still in RGB mode, even though we are looking at CMYK numbers. It doesn’t make a lot of difference if you start in CMYK mode either. Your choice.)
Switch the image to CMYK, then open the Hue/Saturation in Image > Adjustments. I slide the Saturation left to -10 to counter the brighter color from the previous edits. This keeps the image stable and looking natural.

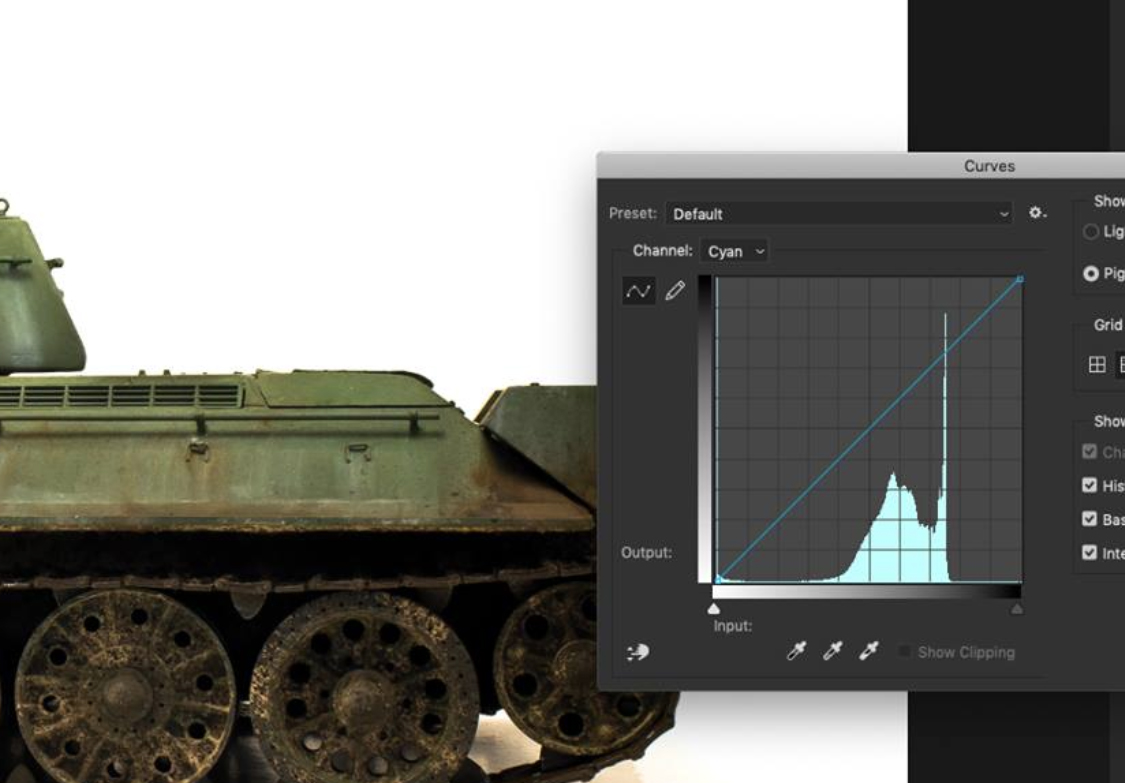
Step 7 – Color Balance 2 (Shadows)
Now focus on the shadow color, use the Curves window to continue the color correction. Choose one color at a time and adjust the lower left slider to remove the residual color (seen in the shadow). I start with Cyan, then adjust Magenta, and then Yellow. You will see the shadow color tint change as it happens.
For example — If the Cyan number in the shadow is around 3 or 4, then move the slider from the lower left corner, horizontally along the edge until it’s at the 3/4 position. This effectively makes the number in the image a 0, which is what we want to remove. You will then do this with Magenta, and Yellow, which should even things out. The goal is similar low numbers for each color. It works the same as mixing paint, 3 drops of each primary color should make a grey.
If things are higher, say all the CMY numbers are similar around 10-15, then adjust them so they are all around 2-3 or lower (within reason as you can see the results happen live). Each photo is a little different, but series images should be similar so you will get into a rhythm when editing large numbers of them.
Note – It’s easiest to move the left slider along the lower edge. Going vertical with changes the colors too much.
Remember – the primary goal is to create a neutral grey shadow tone (this equals an overall color balanced image). This is also a fine-tuning process, and where most of the time is spent since there is some back and forth required.
These are guidelines, not an exact science. Plus, the image out of the camera has to be pretty good to start with, otherwise other techniques are required, taking more time and/or re-shooting can happen too. (A real problem when SBS processes are being shown).
After this, you’ll see that the shadow is more neutral and the yellowish/orange tint is greatly reduced.
Step 8 – Composition Adjustment
Now, I take a minute to fine tune the composition with the Cutting tool. Flip the color selector swatch on the left side so White is the background color, and then re-trim the image. It felt too much white was above the tank, and I moved the tank slightly to the right, so it’s more centered (I find this looks better for Blog posting format).

Step 9 – Shadow Cleanup 1
Almost done, just need to clean up the shadow a bit more. The sharp lines of the shadow are distracting, so I soften them a little to look more natural using the brush tool.
To do this — I use a quick-mask type of process with Select > Color Range and click the white space. (Note, there are a few ways to make masks in PS, this is just one I comfortable with and works great for images with similar backgrounds). This creates an active section around the model, (the background is actually being selected, not the model), and then switch to the Magic Wand tool, (and while holding Shift key down, to make an additional selection), continue to click on the shadow under the model to grab those areas as well. (You should see the overall active selection tighten up to the tracks, as a result).
While the Selection is active, go to Select > Modify > Expand input 1 pixel, then Select > Modify > Feather input 1 pixel. This moves the selection tighter to the model with a touch of feathered edge ensuring the demarcation line is not hyper-sharp (otherwise, you will see it in a photo, it will look fake and or like a cutout).
The goal is a simple active selection around the model because I am going to gently airbrush the shadow edges with white color to soften this transition to look more natural and less like a scale model photo.
It’s less complicated then it sounds… once you do this a couple of times, it’s super easy, Now select the Brush tool again, make sure it’s on white color and ever so gently feather the shadow edges. With a mouse, one click is something like 25% opacity, so use the mouse sparingly and go gentle with it. Don’t just click and hold and move it around. That will go straight to 100% opacity and because the Brush tool has a range of adjustments, (you can study this in any PS google search on the Brush tool settings) we can tune this area very effectively and efficiently.
It is similar to using an actual airbrush, and think about it as laying down thin layers of white paint.
Note – depending on your PS skill levels, I recommend making a new Layer and airbrush inside that. In this way, you can preserve the base image. Sometimes you need to erase the white and redo if it goes over the model and so forth, and having it on its own layer allows you to undo easily with harming the model itself. Remember, you are working in the white space (not on the model) and the layer is cheap insurance against a mistake.

Step 9 continued
Here is the airbrushing and selection part up close. Note the shadow color and softer transition between the white background and the shadow compared to the first photo above.
By default of the shadow color correction efforts above, the image is also color corrected, therefore, by applying these above steps across multiple images from the same photo session you can fine tune and make all the image consistent and print worthy pretty fast. You should be able to edit 10-20 images per hour when this goes well.
By shooting at night, you can shoot over time as the model happens and the colors should be consistent for as long as need be. This is how to maintain proper color accuracy in hobby publishing on a simple, low-cost, and efficient level.
The problem you will all have from here on out is when modelers post photos of their work and the color is bouncing all over the place from image to image, you can’t unsee that. You’re welcome… 😉
The End – Final Image

Thank you Mike!
See also
Those interested in Michael Rinaldi’s work should check out the following:
Rinaldi Studio Press
RSP Facebook Page (Q&A sessions live there)
My reviews of Michael’s Tank Art Books:
