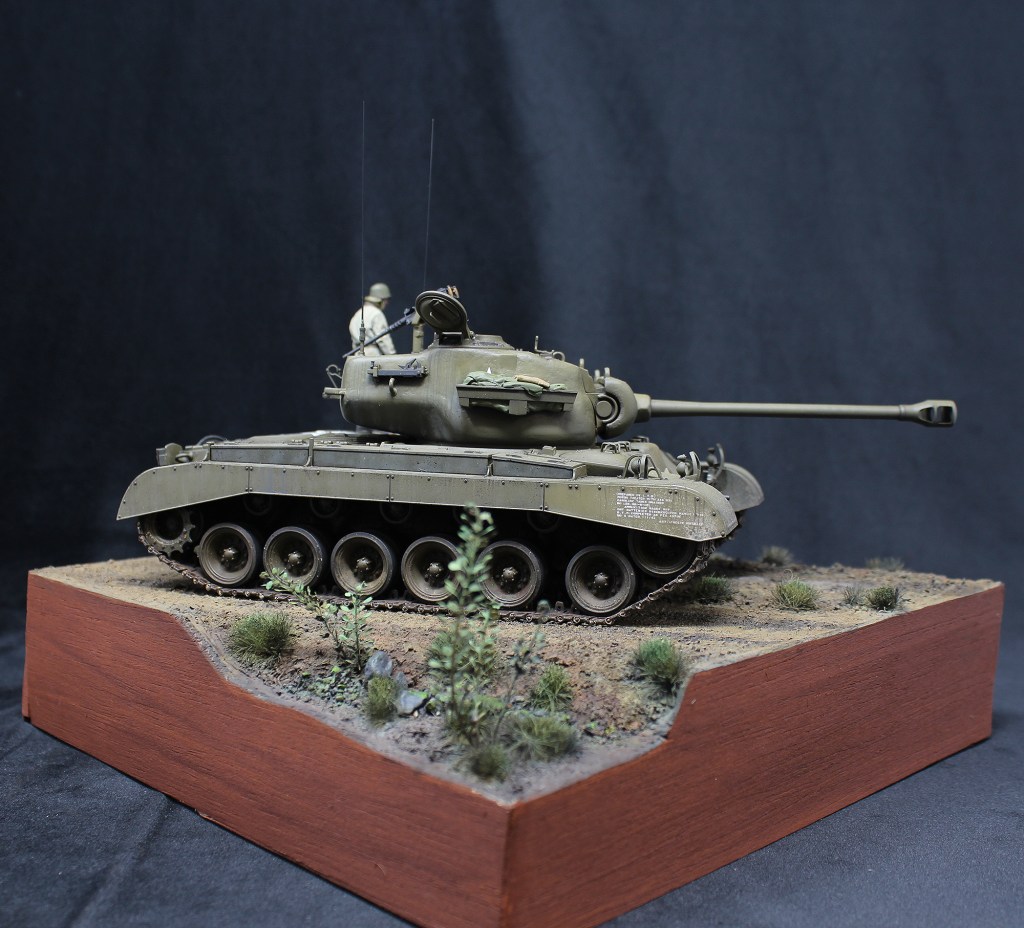
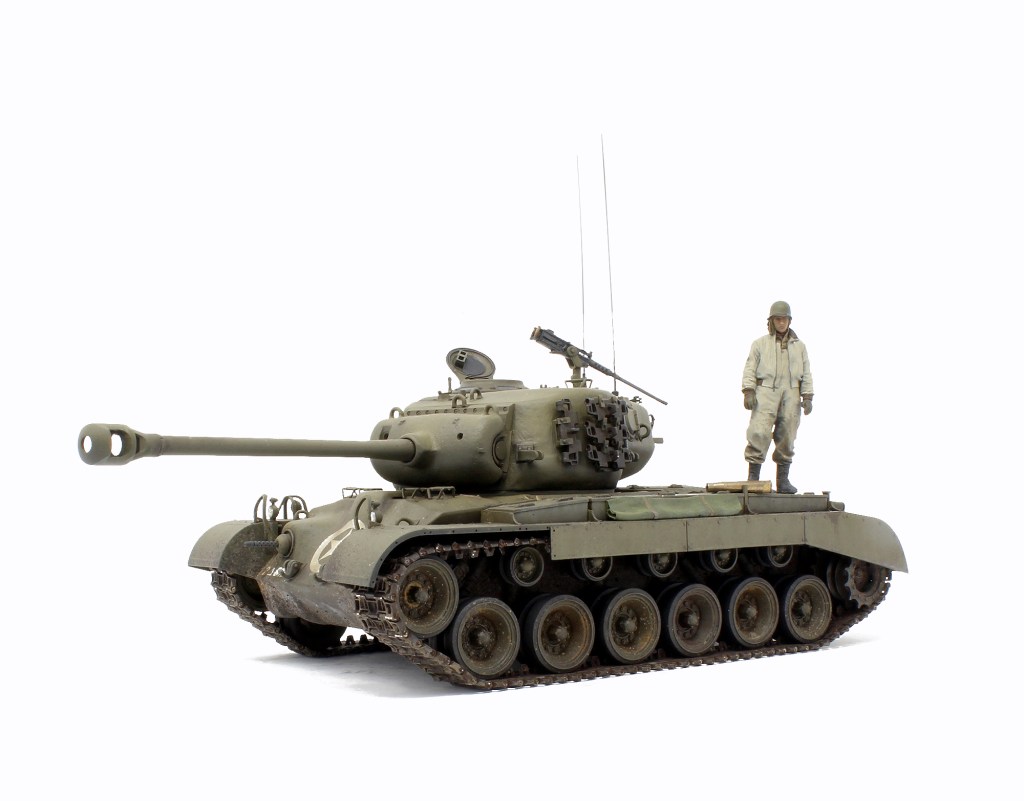
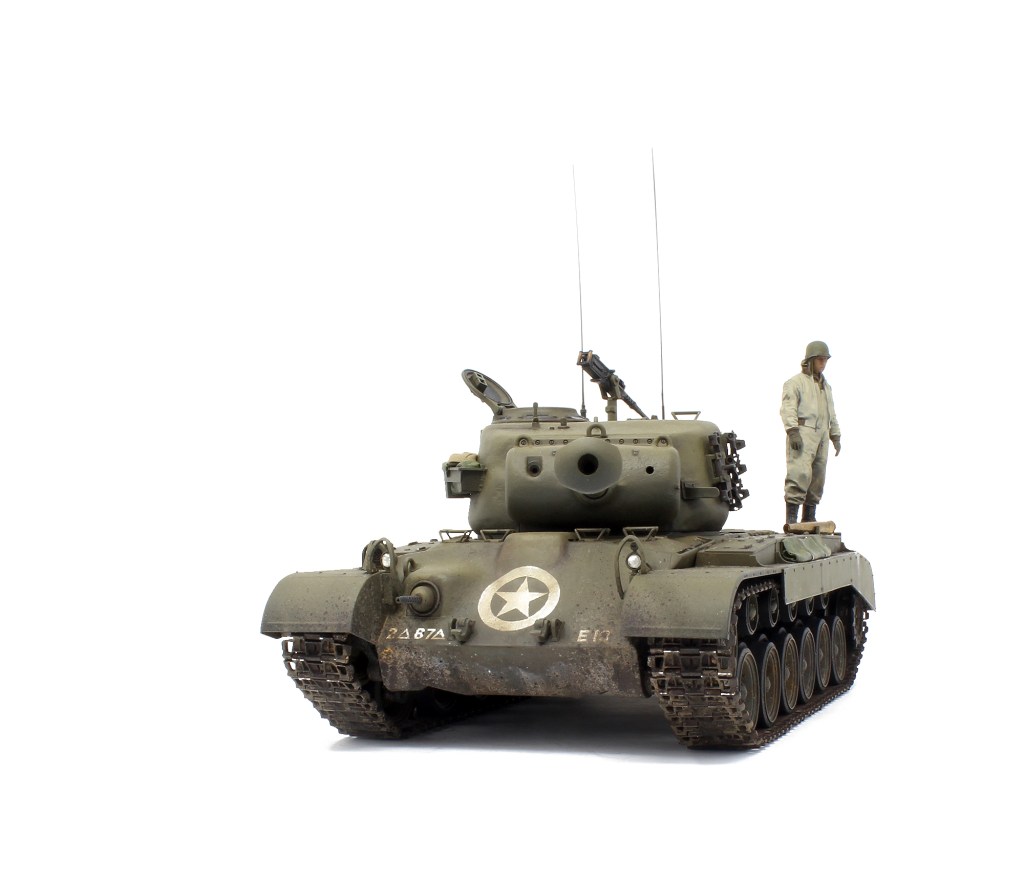
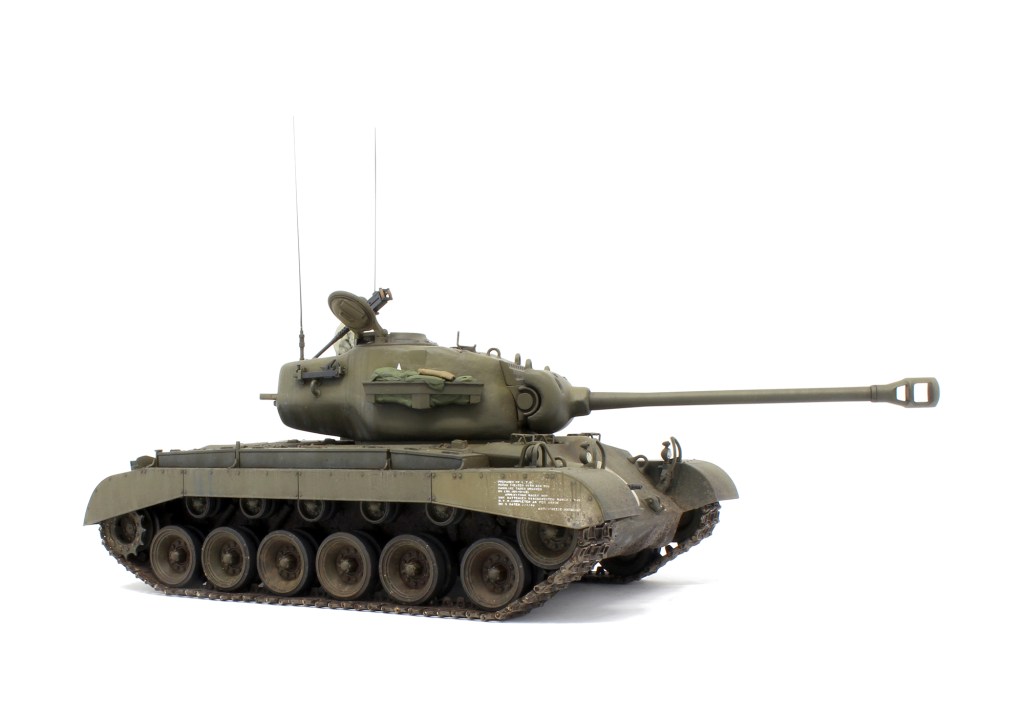
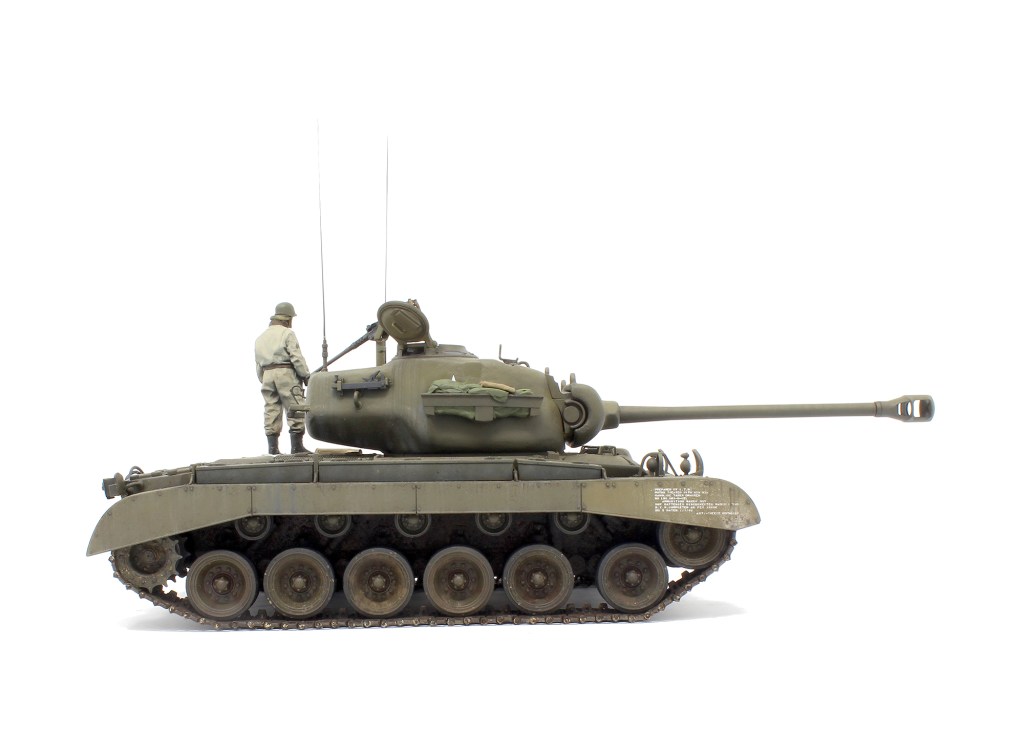
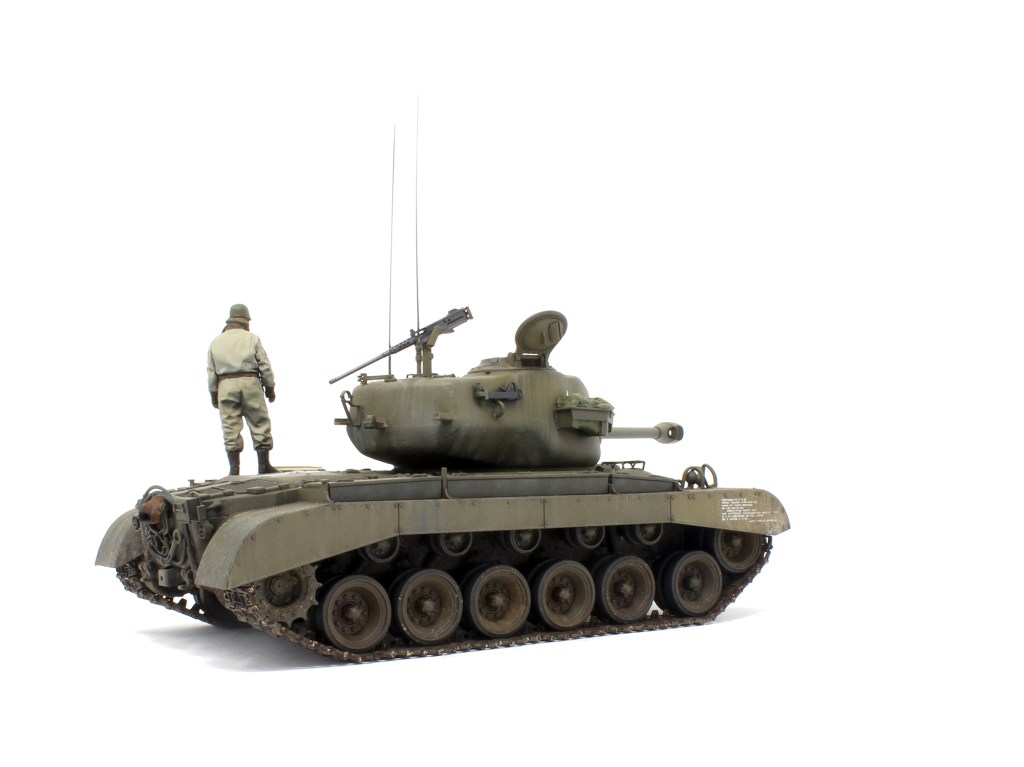
This kit was started a good while ago and, for some reason, stayed aside, almost completely built, for a few years. I decided on a hunch to get it done – with a base, no less. The kit was built mostly out-of-box, with some added cast texture, metal tracks, a beautiful Alpine Figure, and some minor enhancements like the commander’s hatch inner surface.
There’s nothing much to say about the kit itself, apart from the fact that the workable suspension did not particularly convince me and took some extra work to get reasonably well-aligned roadwheels. Other than that, it’s your usual Tamiya experience (i.e.: it fits well and assembles easily).
Finishing was done on top of a coat of Mr. Surfacer’s black primer. I went with AK’s Real Color range (Olive Drab 9/22 and Olive Drab Faded). Then I used Ammo Shader for a faint bit of ambient occlusion effect, a wash using Mig’s P220 Dark Wash, and finished with a variety of AK’s enamel weathering products together with Ammo Starship Bay Sludge’s Oilbrusher.
One this I realize is that the pictures don’t really show all the subtle shading, distress, and texture I’ve put into it. It’s either my lack of photography skill or that the effects in questions are too subtle. I’ll have to check that out for the next project, some of the stuff I’ve put on there is just not visible.
The base was made with a block of foam and veneer, some pigments, a mixture of water resin, rocks, and various grass and small shrub stems I had picked around my house years ago.
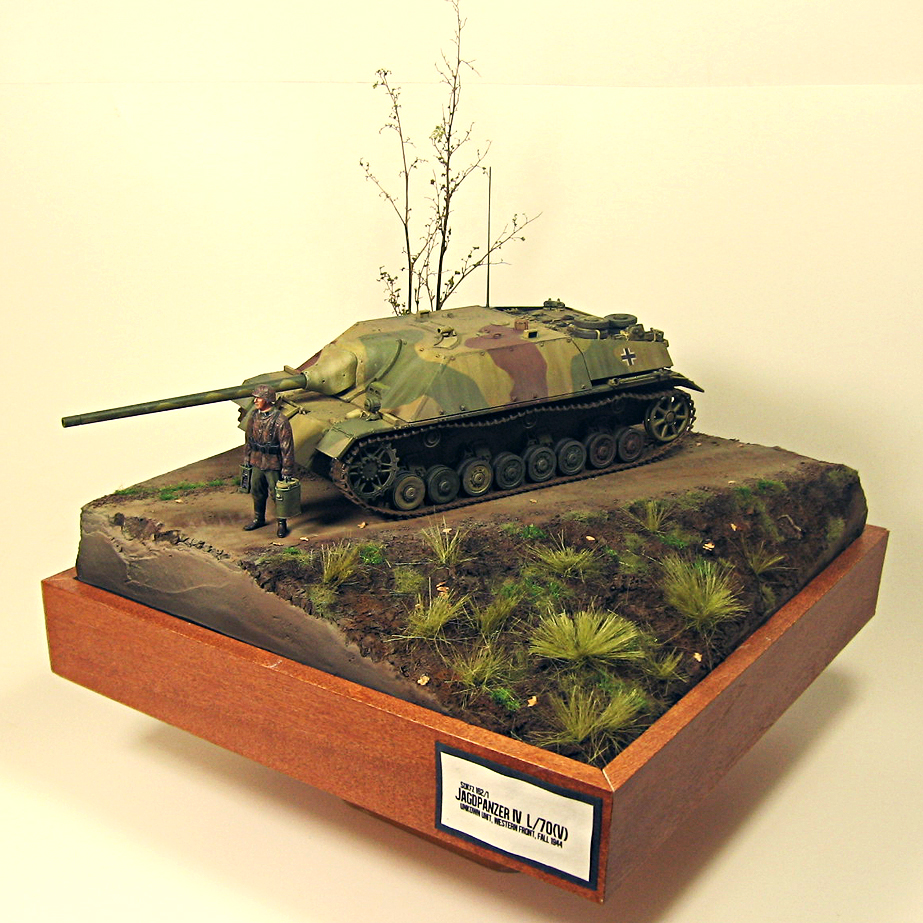
I had very little experience with bases before this project, with exactly two, made a long time ago, and which weren’t very exciting: Dragon’s excellent StuG III G early (with another Alpine figure) and the equally excellent Jagdpanzer IV(V). Right now, I’m having a hunch to redo this one entirely, now that I have a little more experience and skills.
Sidenote: I think the shrub stems seen on the StuG III scene are from the same bunch I used on the M26 vignette. Goes to show picking random stuff is often useful in the long run 🙂
Another project to chalk on 2023, and most certainly the last for this year!
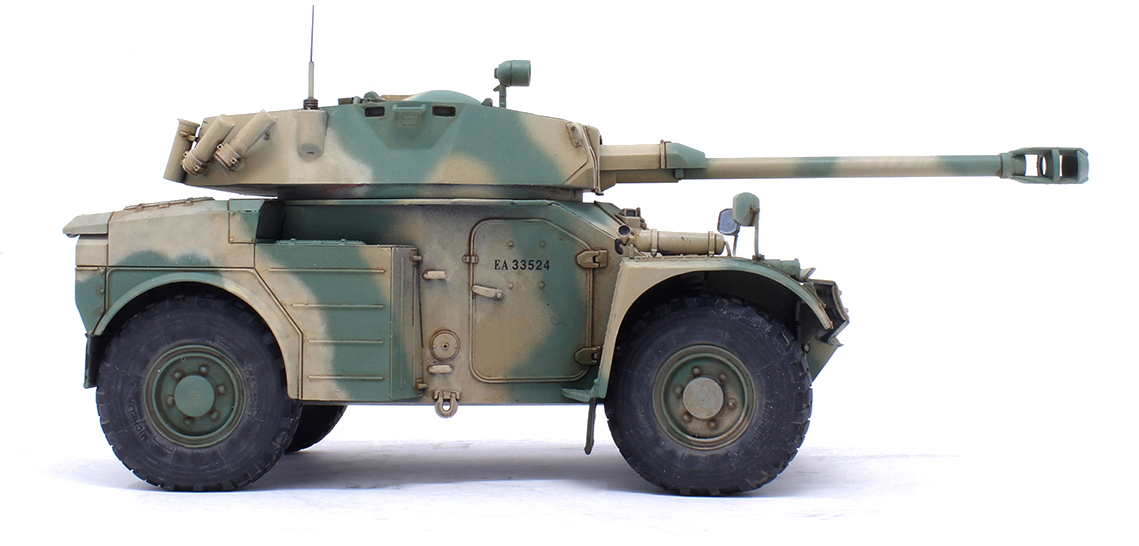
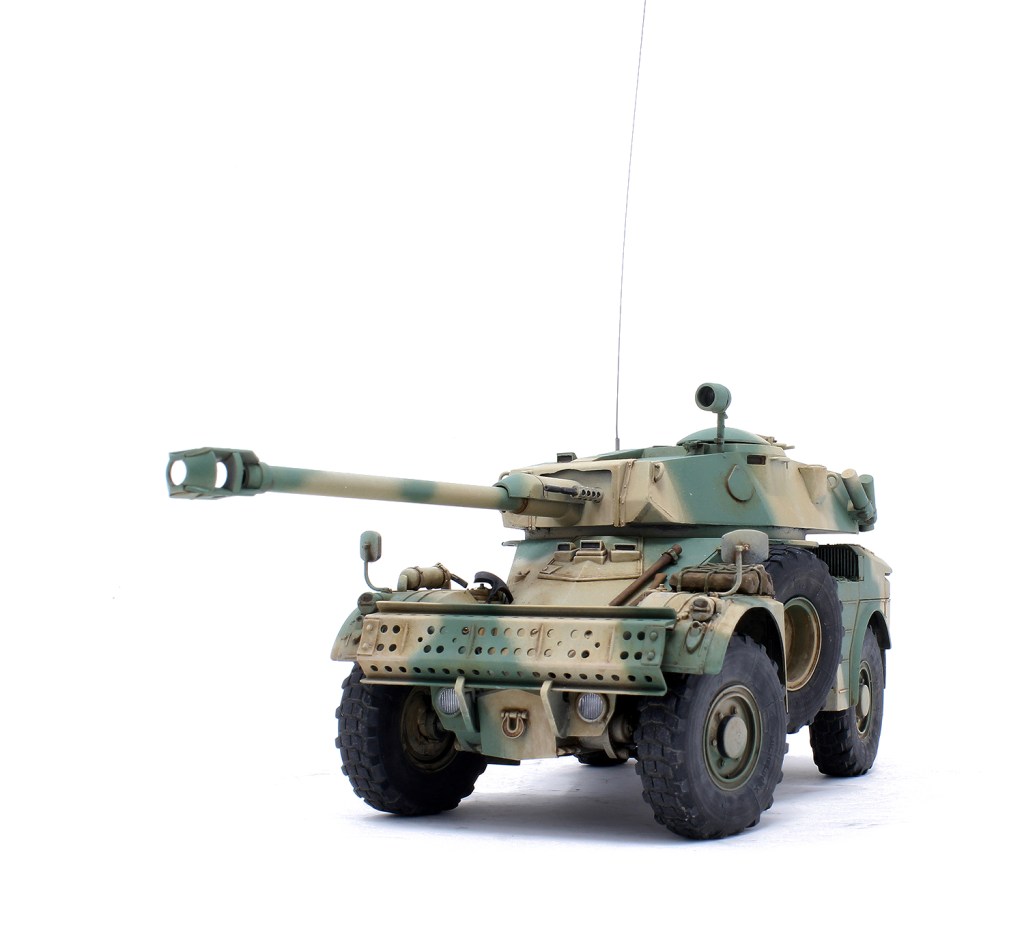
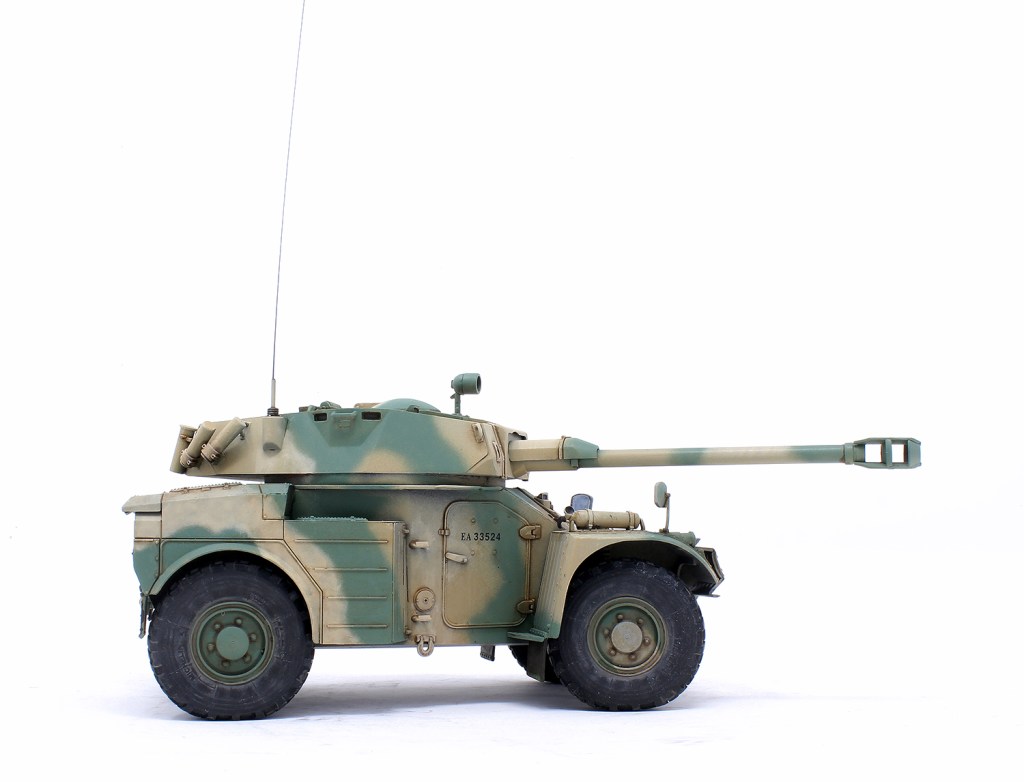
This is a quick post-summer, get-back-into-it OOB project. It’s Takom’s AML-90 with DEF.Model sagged wheels. It ain’t Takom’s best, to be sure, but it’s a pretty cool little subject that was perfect for my purpose. I do regret not giving it a little more love on the construction side to get some of the details a bit more character (like the searchlight’s sleeve that is soooo thick!).
Painting went as follow:
Primed with Mr. Hobby black primer;
Base coat consisting of a custom mix of AK Interactive 3rd Gen:
4 parts AK11351 Wood base;
3 parts AK11343 MERDC Sand;
1 part AK11337 no6 Earth Yellow;
Green consists of a custom mix of Vallejo:
3 parts Model Air 71.126 IDF/IAF Green;
1 part Model Color 70920 German Uniform ;
Weathering was kept to a rather basic minimum:
Tamiya Panel Line (Brown);
Slight distressed overpaint with base color remixes.
References
Takom AML-90 #2077. DEF Model Sagged Wheels #DW35098.
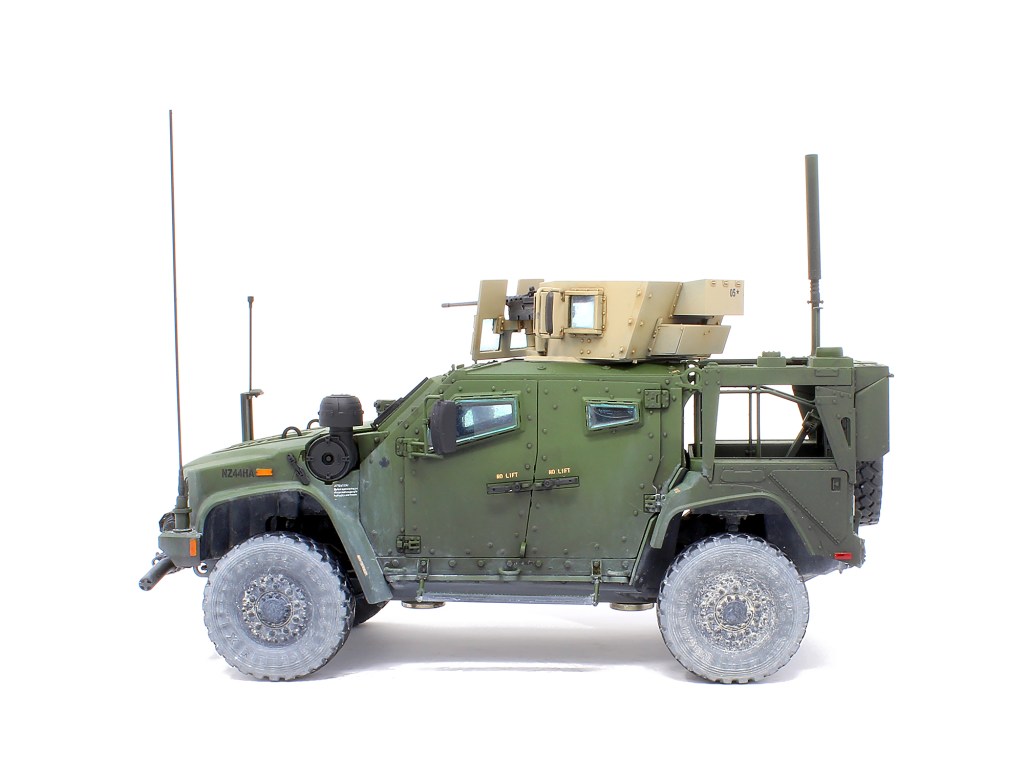
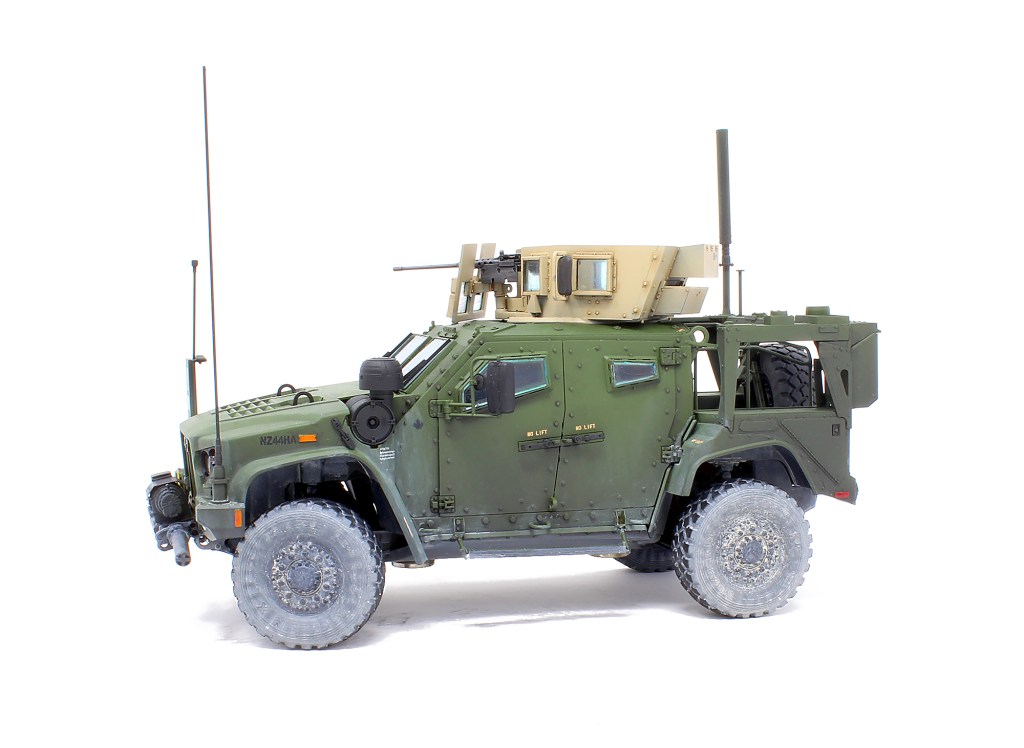
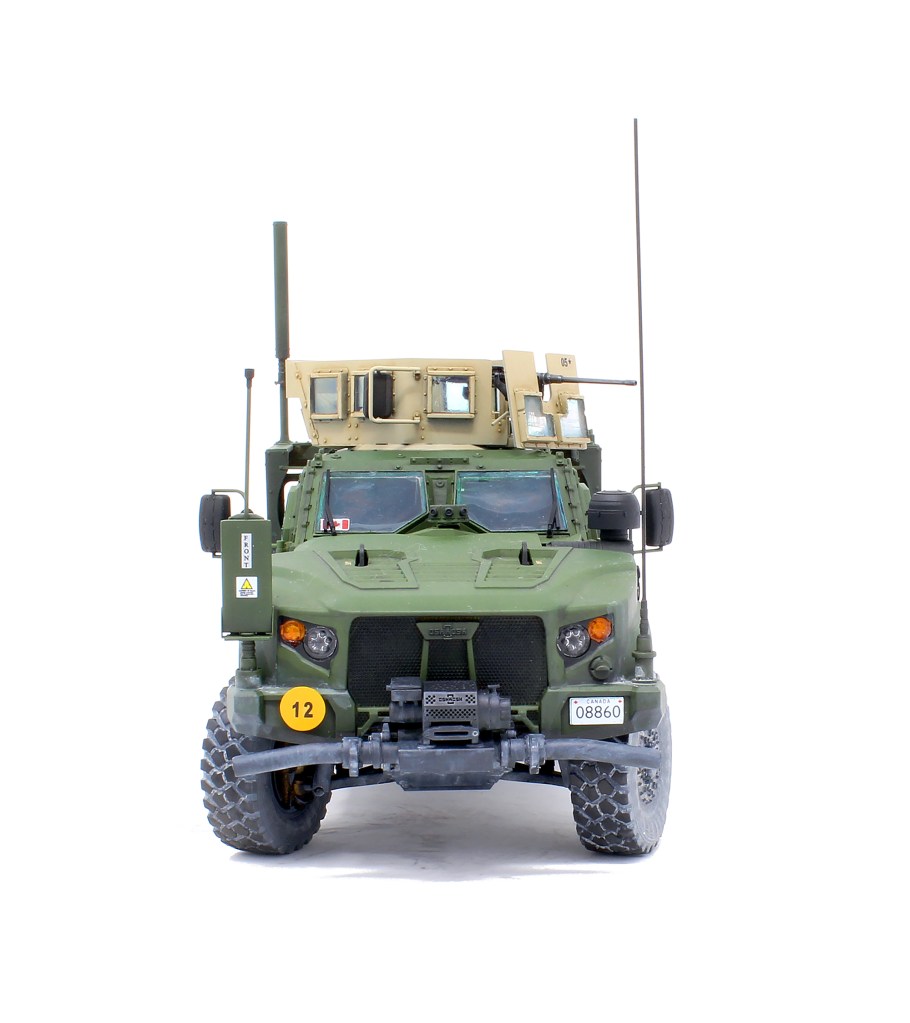
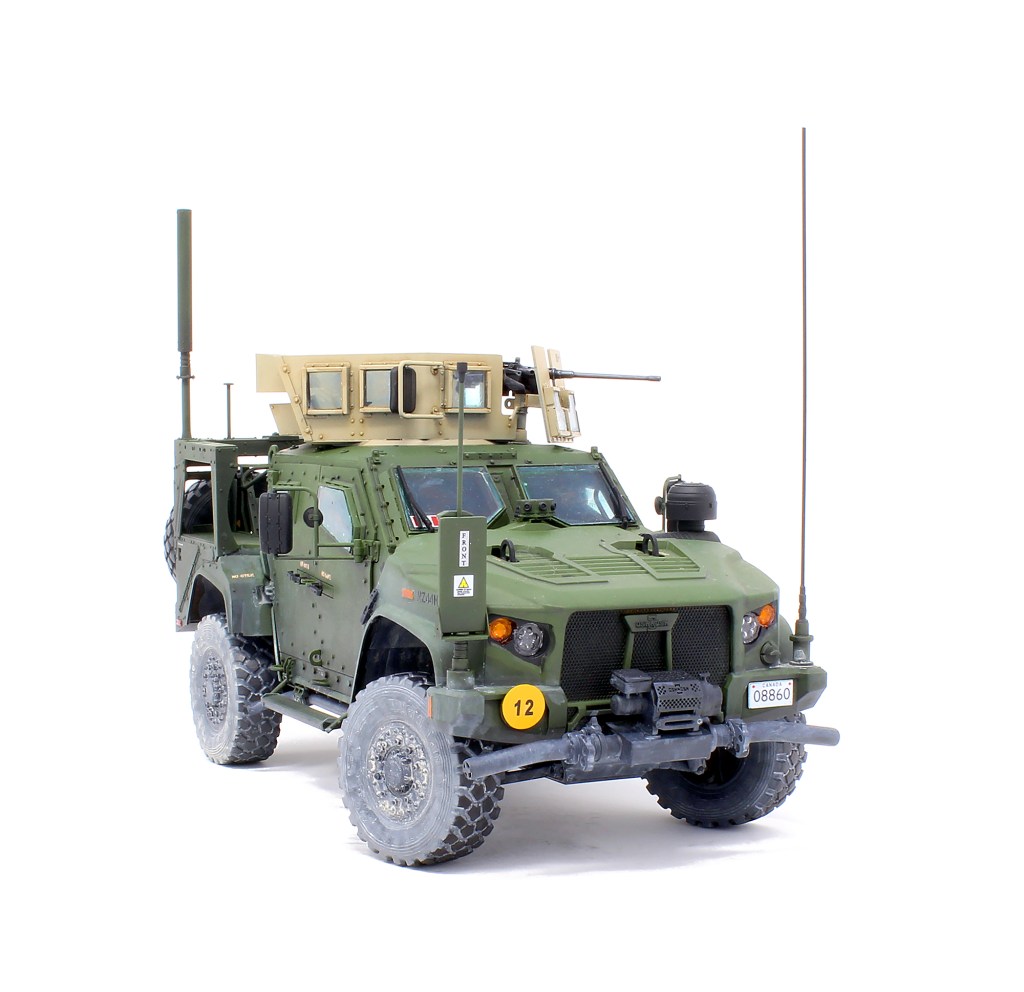
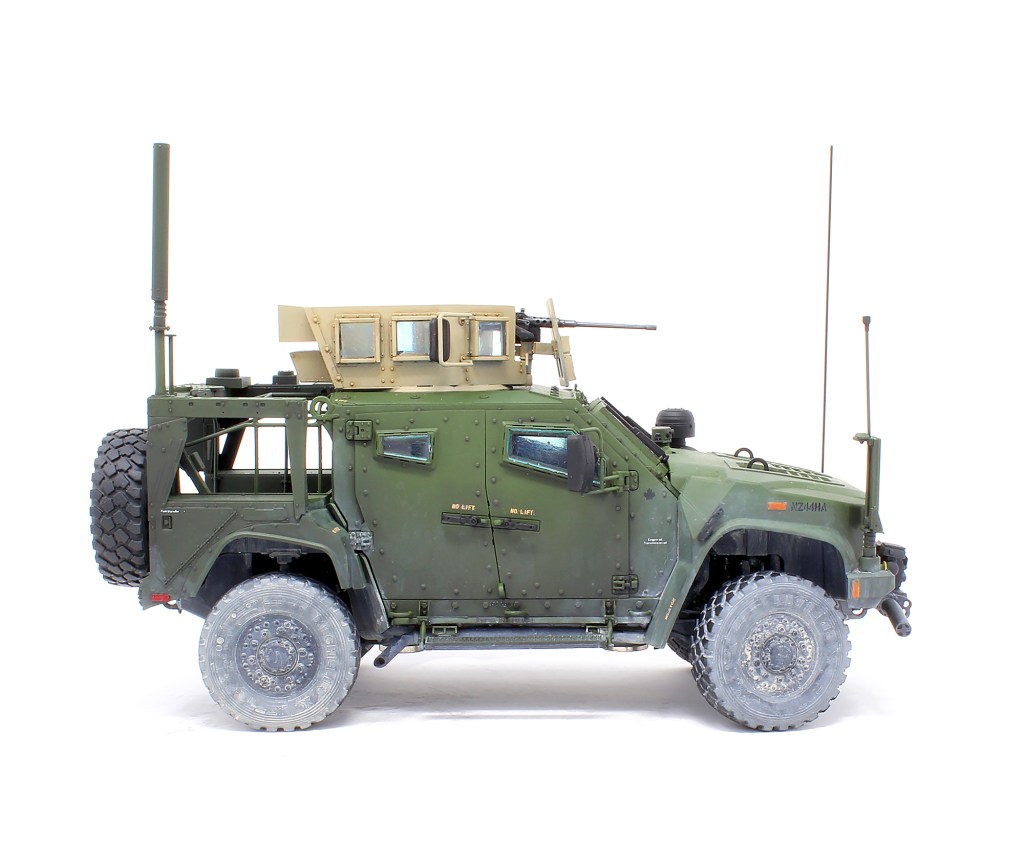
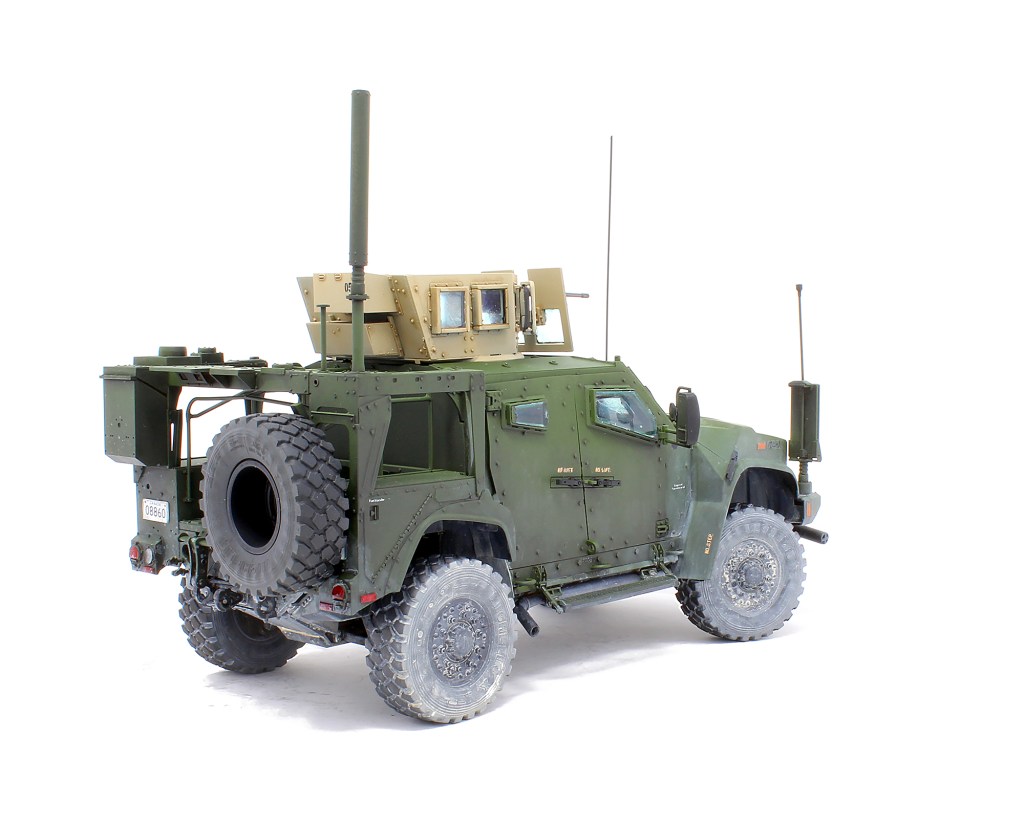
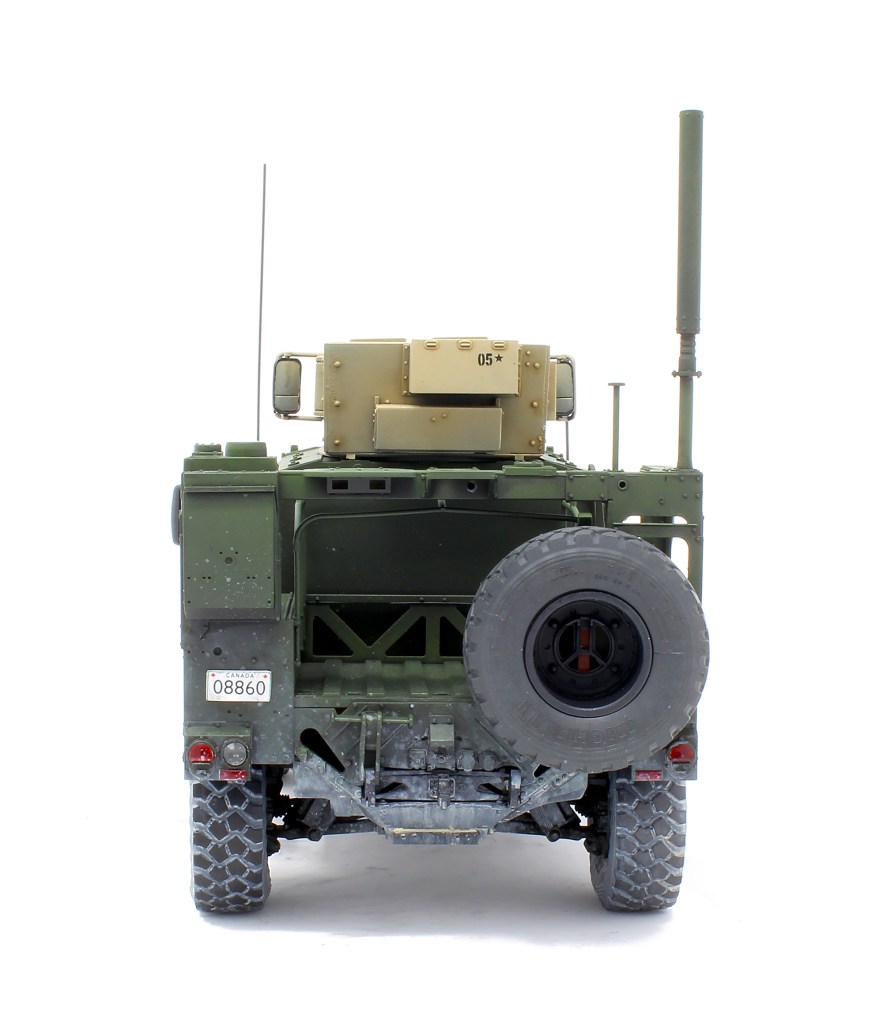
Here’s my most recent project, a kit that now claims the distinguished honor of being the best armor kit (actually, the best kit period that I’ve ever had the pleasure of building), a title that was previously held by Takom’s Merkava 1. Seriously, I’ve never experienced this level of sharp and crisp molding, ease of assembly, and parts that snap with authority. It’s almost embarrassing how everything goes together effortlessly.
I decided to finish this vehicle as a what-if (or, rather, a “when-if” ?) of the Canadian Armed Forces. It seems to me this may be a sound acquisition, but either way, it looks good with a Canadian Army license plate.
The feel of building that kit is more akin to an aircraft, as you first build and paint the interior, and there’s an abnormal amount of decals (for an armor kit, anyway!).
Project Specs
Rye Field Model Joint Light Tactical Vehicle (#5090) Rye Field Model JLTV 365/80R20 wheel set – sagged (#2052) DECIDED NOT TO USE –> Rye Field Model JLTV upgrade set (#2051) I felt it would only add a thin margin of accuracy compared to the amount of work required.
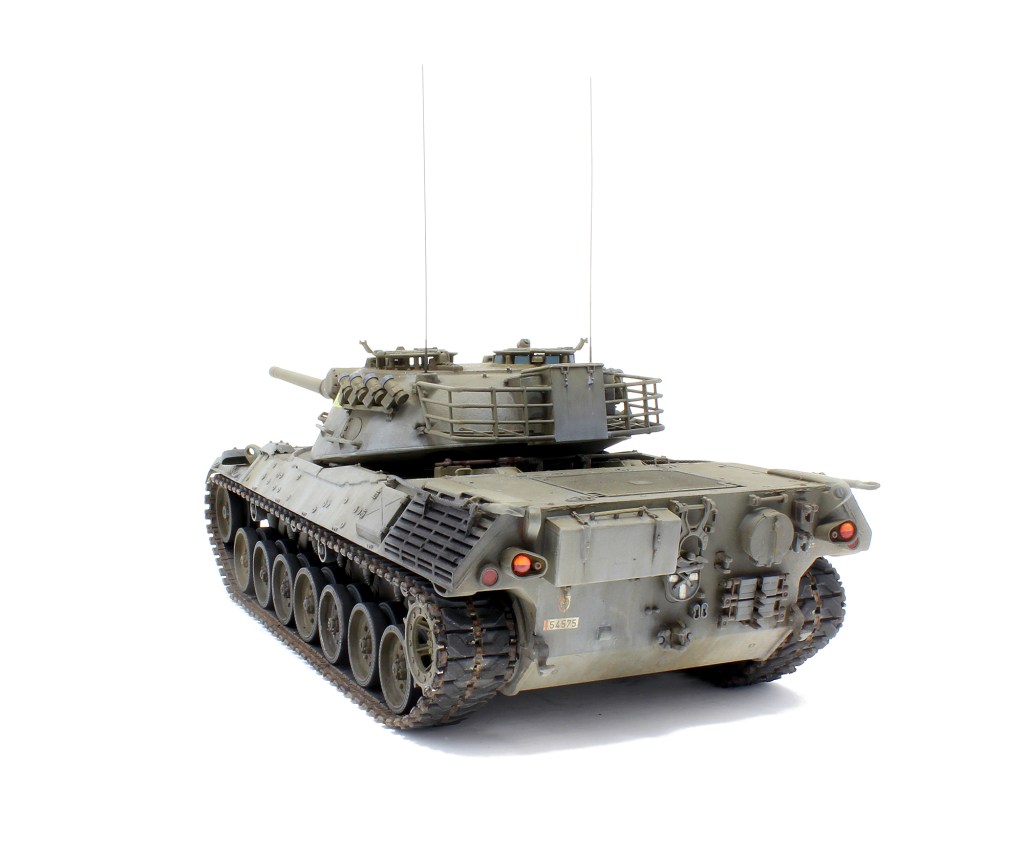
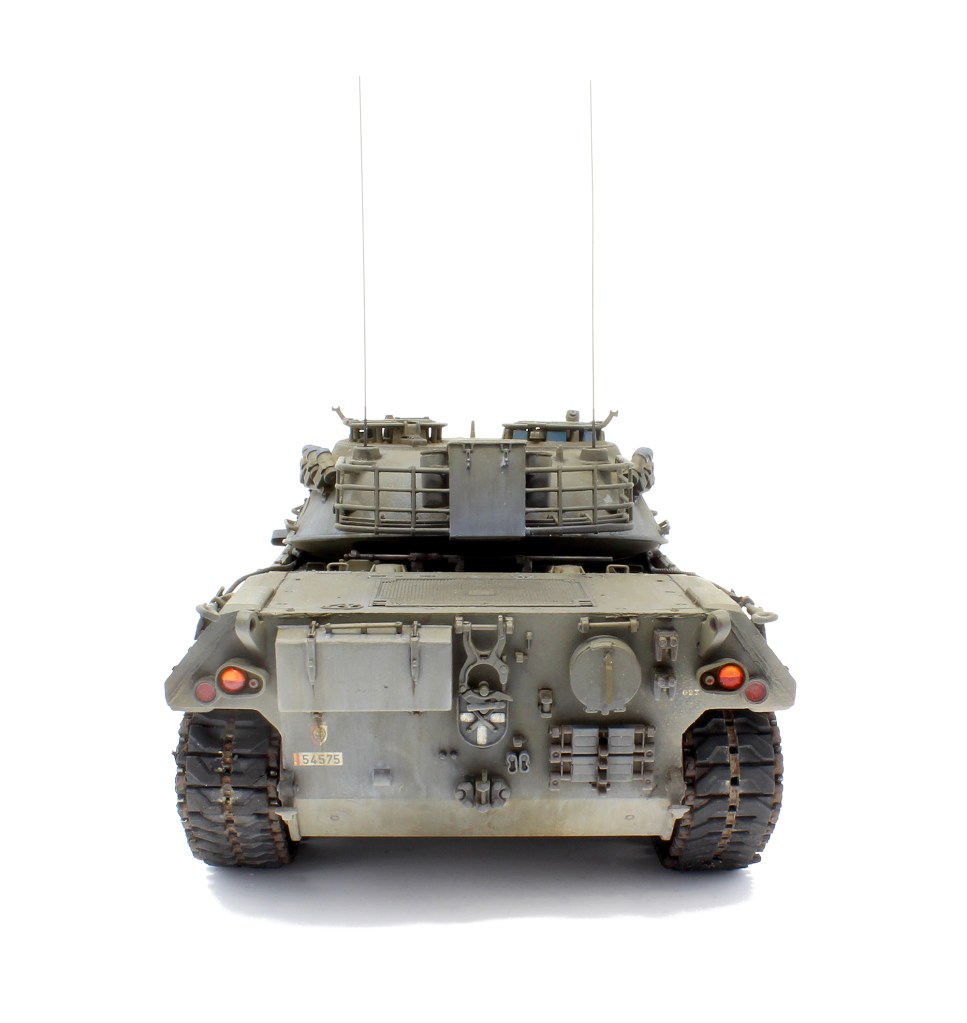
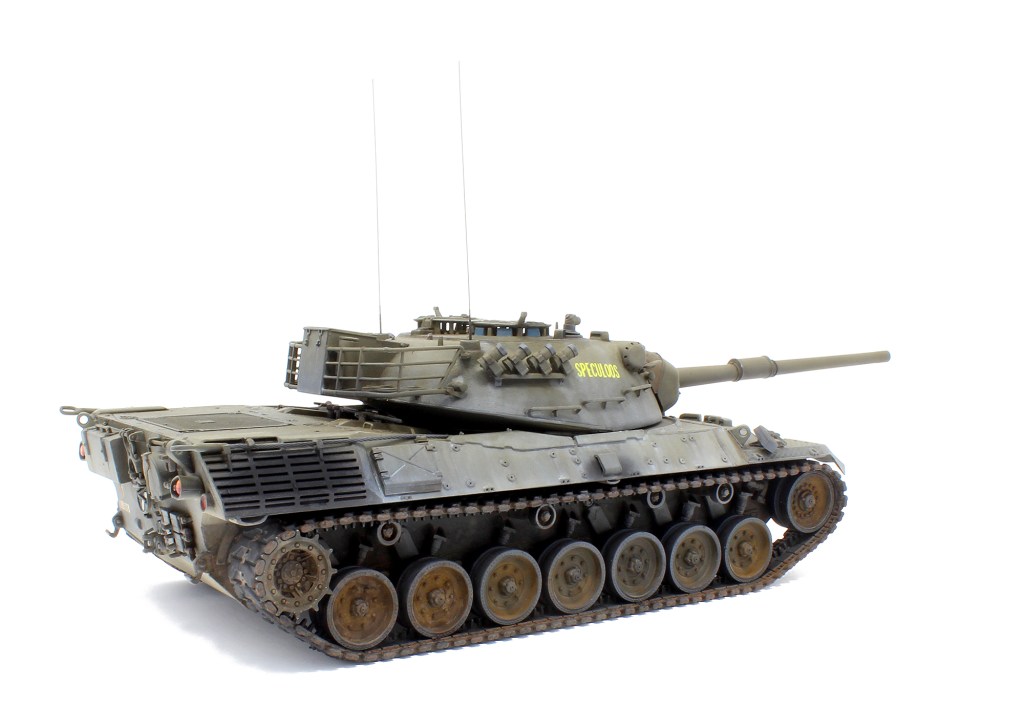
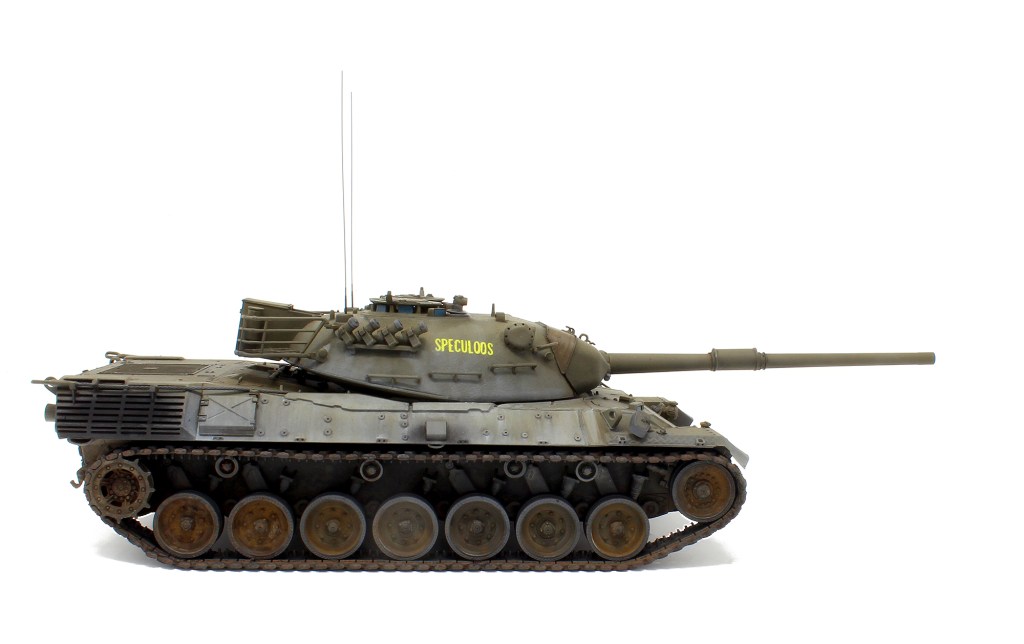
The Leopard 1 is thus completed. You can refer to part 1 and part 2 for some details about the project. Here are the final pictures of the completed build.
This project didn’t exactly go as planned. Well, it did, but I did not document it as I initially wanted to, so there is a bunch of info on the lower hull and not much for the turret. I do however have extensive comments to formulate on this kit, now that I have built it, so sit tight and read on.
As I mentioned in the first part of this construction blog, I am going to represent a Belgian batch 3 vehicle, (the first sixteen vehicles Belgium received were batch 3 ). Revell’s kit is intended to build the more common batch 4 tank, but for some reason, I’m particularly fond of the initial engine exhausts of the cast, raised type.
I intend on building a vehicle inspired by a picture I’ve seen in Patrick Winnepenninckx’s Leopard 1(BE) Belgium’s Last MBT. On page 4, you can see a vehicle that is soon to go through its first update. What is notable about this vehicle is that it has been stripped of its tool clamps in order to receive the typical toolboxes that Belgian vehicles will soon be easily recognized for. Instead, you only see round bolts where the tool clamps would have been affixed. Those bolts remained in place underneath the toolboxes for the duration of the Leopard service life in the Belgium army.
Above – This tank was the inspiration for this build. Here we can see it’s a Batch 4 vehicle with D640As. I decided to make a Batch 3 with the older D139E2 ones, figuring there might be a couple of those earlier tanks that went through the same clamp-stripping procedure. Picture used with permission from Trackpad Publishing.
The actual tank I’m building from the markings provided in Revell’s box is a tank that you can see on the same page of the aforementioned book, a tank from the 4 Lanciers stationed in Soest, Germany.
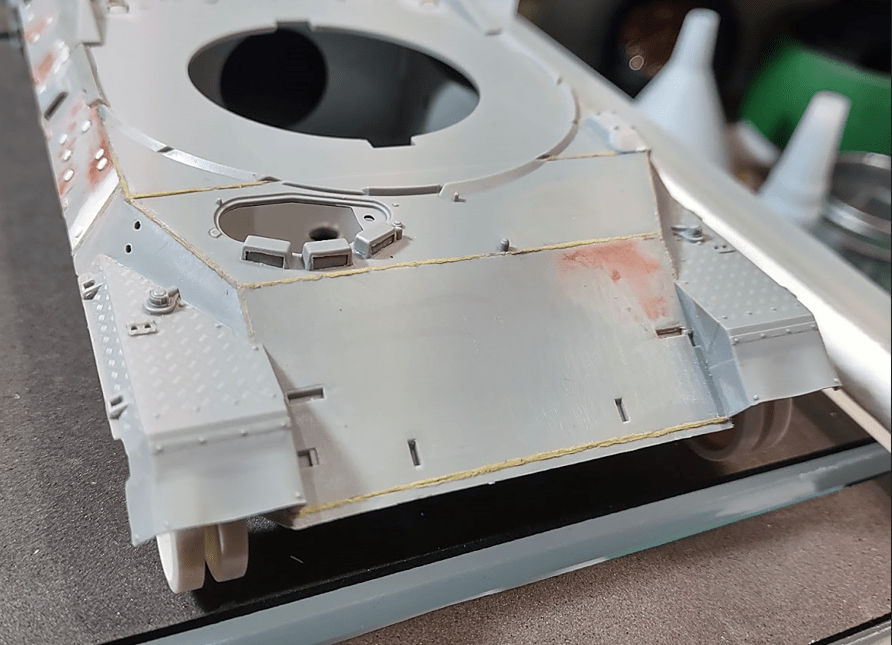
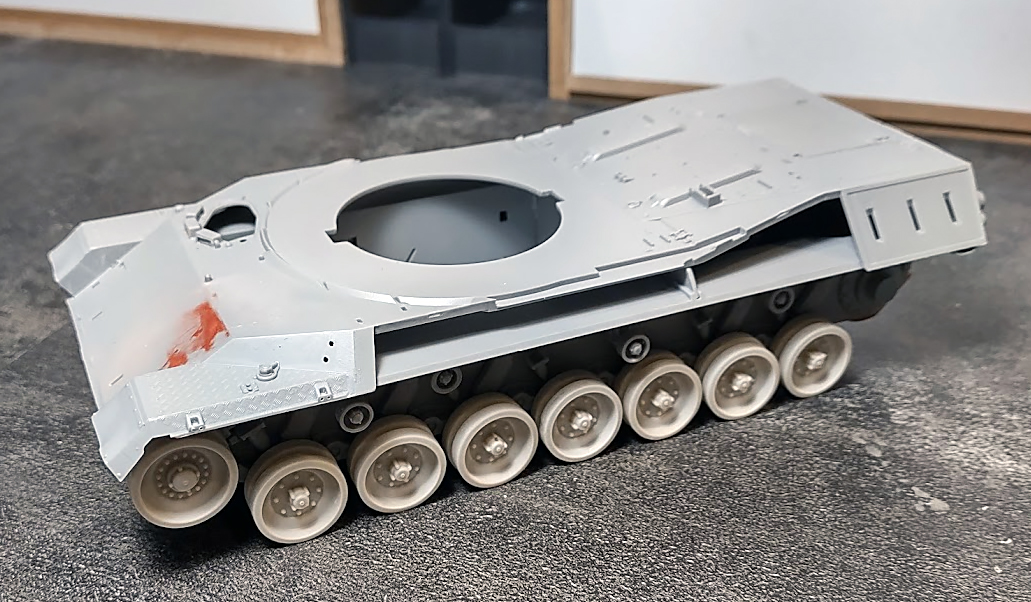
The Lower Hull & running gear – Nothing fits perfectly.
Having no previous experience with Revell, I didn’t know what to expect in terms of overall quality, engineering, and ease of build. I was aware, however, of a certain reputation for sometimes having sub-par kits. I soon found out working on the lower hull.
Basically, nothing fits perfectly. It all fits okay-ish, but there are gaps all over the place that you need to address, and few parts fit with any authority. The hull is a multipart affair for which I see no good reason.
I decided to at least smooth the sponsons’ undersides a little to avoid an unsightly step from the hull side to the sponson.
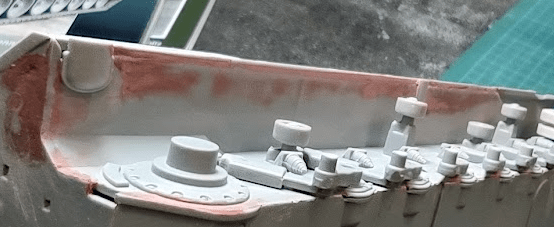
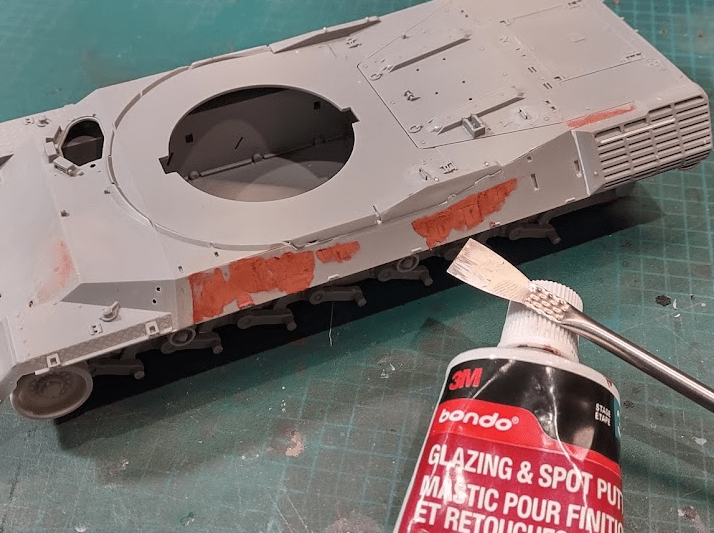
Upper hull – Unnecessary work.
This one pic that says it all. here again, you need to add separate hull side slabs. This is likely to allow for variants, but it induces substantial filling work.
Since I did not intend on mounting the tools, I also had to fill all those massive mating notches intended for the tool clamps.
Another addition you may consider is to add weld seams. I did that using the putty method, which I am still getting a hold of, and here they look slightly inconsistent, sometime slightly too prominent. Still, I consider this a great addition. I added them on most parts of the vehicle where necessary except on top of the exhaust grille.
On the picture below you may also notice that the driver’s periscopes are pretty thick. I left them as is, but this is another point that could benefit from being replaced. Note that I also removed the kit’s molded-on fording plug chains. They will be replaced with PE ones from Leopard Club.
Below, you can see the hull more or less finished, with the punched styrene round bolts in lieu of the tool clamps. Some filling and weld seams were added, too, especially the thicker beads on the forward hull side.
I also detailed the kit’s NBC intake (I only remembered I had one from Leopard Club after the work was done!). I simply added bolts on top and a grill on the inner side. On these pictures the round bolts are too thick and have been replaced since.
Hull Rear
I don’t have many pictures of the hull rear, only this one, at the beginning of the work there. I removed the rear light stubs in order to replace them with the much nicer ones from Leopard Club. I also added weld seams where necessary (not shown here). This portion of the build went relatively easily. The toolbox handle should really be replaced by a thinner handle, however.
Glacis – Getting rid of those pesky fording plug chains.
The fording plugs and the small chains that hold them are a constant characteristic of the Leopard 1, but are rarely present on a kit, and when they are, it’s a molded-on affair that doesn’t look very convincing. For good reason, I might say: it’s a hard thing to model.
I had Leopard Club replacements but I had doubts about my ability to install them convincingly. In the end, it went pretty well, as the final picture of the build will attest, and I must say, it adds a very nice detail. I should have done that on the Wegmann launchers as well!
Rear deck – Fuel and filter handle.
Some reviewers mentioned that the hull grill isn’t properly represented, and they are right. From a modeling perspective, however, I would say it looks nice and crisp so I decided to keep it, but if you are after a more accurate representation, consider swapping it for some PE one.
The only thing I did on the rear deck was to shave off the molded-on handles and replaced them with copper wire. On the air filter covers (the right-most one on the picture below), apparently, there are two such handles on earlier vehicles, but I couldn’t locate any reference for this and went with the more common single handle. I used 0.4mm copper wire but I think 0.3mm would be more in scale.
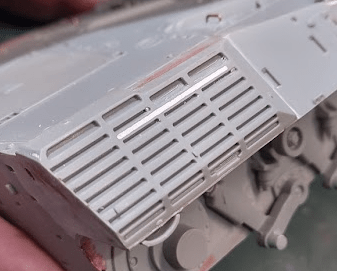
You also need to fill the curious and unnecessary groove on the exhaust grill.
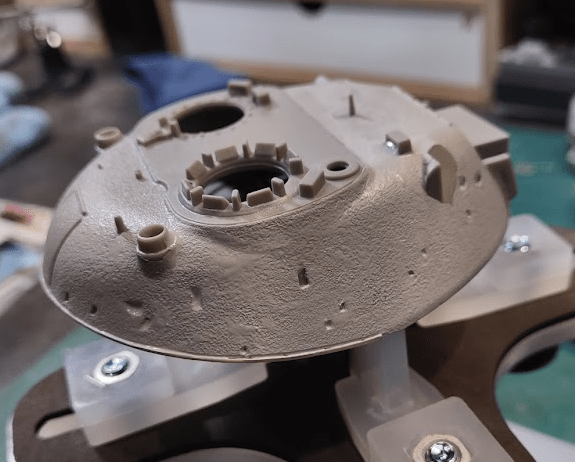
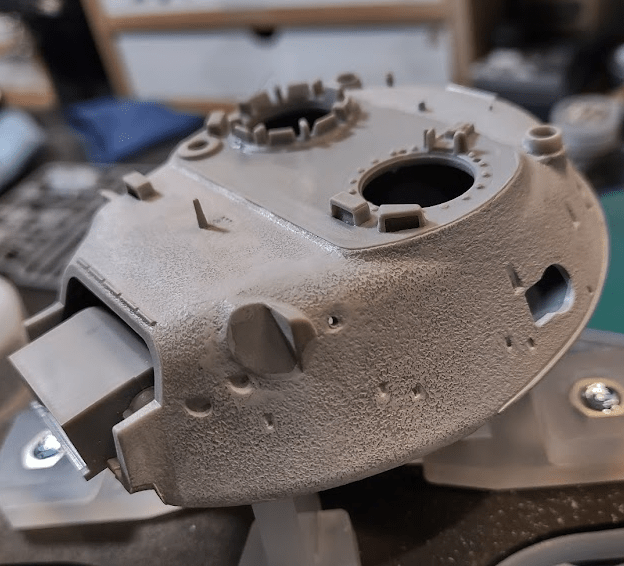
The Turret
One of the main things to correct on the turret is the cast texture which is both unrealistic and too coarse. This, however, can be easily fixed with Mr. Surfacer applied on the turret and some gentle sanding. This will tone done the kit’s original texture and make for a much more realistic result.
Another thing that may benefit from a little enhancement is to carve the turret rain gutter a tad to give it more volume.
My Impressions on Revell’s Kit.
Some noticeable errors.
In addition to the extensive list of items that some previous reviewers mentioned (see part one of this series for reference), there are a few other points that I feel the need to mention.
The Wegmann’s smoke launchers are MASSIVELY oversized. Judging from Michael Shackleton’s drawings (Leopard 1A5(BE) from The Leopard Trilogy, Volume 3, p. 441, the overall diameter should measure 2,40 mm at 1/35 scale. The kit’s sit at 3,03mm. It’s pretty obvious once they are mounted on the kit.
The same goes for the turret handrails and the rearview mirror posts. They are much too thick and I highly recommend you replace them. Both of these points make for a toyish look if you use the kit parts as I did. The turret basket bars are also too thick. In general, that’s the main thing about the kit: every bar and handle is always slightly out of scale, almost always on the thicker side. Consider replacing them all.
The periscope covers are too thick as well. A good PE replacement would be simple to procure or scratch build and would add a lot to the turret top and driver’s station.
I did not use the turret MG, as my target vehicle did not have one. I would have replaced it with an aftermarket one for sure, the kit ones are downright ugly!
Overall Thoughts
Revell’s Leopard 1 allows you to build an early Batch 3 or 4 Leopard 1, and it is the only mainstream kit out there that lets you do that. It’s also the only kit that lets you build a Dutch Leopard 1. With some work, you can obtain a pretty accurate replica, but by *some* work, I really mean a lot of work. Nothing is particularly complicated to do, but a lot of work nonetheless. There is a lot of things that you need to correct if you are after real accuracy. Some of those points are mentioned above.
As for me, I ran out of patience at some point and sprinted to the finish line, as I’m often prone to do, to get going on something else, and it shows. I did not take the time to address some of the more obvious issues and I’m left with a kit that looks okay-ish at most. I decided that my trajectory with it did not warrant the use of aftermarket tracks, but again, it shows. The kit tracks are not a good option. Vinyl tracks rarely are.
All this to say I did not find Revell kit a fun one. Not bad, but not fun. That’s mostly because I sit in a curious spot currently with my model building: As a busy father and professional, I do not have sufficient time to spend working on corrections, and I’m quite adamant when a kit requires me to do so. This is one of those kits.
Give it some real elbow juice and it holds the potential for a spectacular replica, but don’t cut corners!
Although the Leopard 1 is my favorite AFV of all time, I only ever built one, the old Tamiya kit, when I was something like 12 years old. During all these years, I’ve accumulated a pretty decent amount of references on this vehicle and its many variants, but I never actually got around to building one (although I have many projects in mind involving it).
So after completing the Fulcrum, I wanted to get back to armor for a bit and decided it was about time to build a Leopard seriously. But which one? It’s always been the main problem. I won’t get into all the reasons why I find the Leopard so interesting, but let’s just say that it stands as a true symbol of the Cold War, the continuation of Germany’s relative competence in designing tanks, and one of the first true MBT. Plus it looks awesome.
So yeah, all variants of the Leopard are interesting, as my own inventory of kits will attest.
In the end, I decided to go with Revell’s. Now, I hear you all scream: “WHAT? Revell?!? This has to be the worst possible option!“. And, as we’ll likely confirm in the second installment of this series, you’d be right. Apart from Italeri’s 1A5 (not bad per se, just old) and Elite’s Dachs (a fiddly, warpy resin affair), all other kits on that stack are superior.
Yet, much to Revell’s credit, their kit is the only “recent” one offering the possibility to build an early variant from the first four batches, and it is also the only mainstream kit in existence that allows for building a Dutch tank straight out of the box.
Thus, from a subject matter perspective, it’s a viable option. You have a bunch of things to correct if you are into getting really precise and accurate, however, and the finer details of Leopard variants and batches can be confusing at times. As usual, good references help. Since I’m planning for a Belgian vehicle, here are the references that I am going to use.
Trackpad Publishing Leopard 1(BE) Belgium’s Last MBT Part 1 by Patrick Winnepenninckx. This is the best possible reference you can get on batch 3 Belgian Leos. Everything is there for you to see clearly what to address on the kit.
And as usual, the Leopard Trilogy from Michael Shackleton (in this case, volumes 1 and 3) is never far.
As mentioned earlier, I’m getting serious with this build, at least for the construction part, and I decided to use a bunch of detailing sets to bring the kit to a more acceptable level of accuracy. Here are the sets I am going to use:
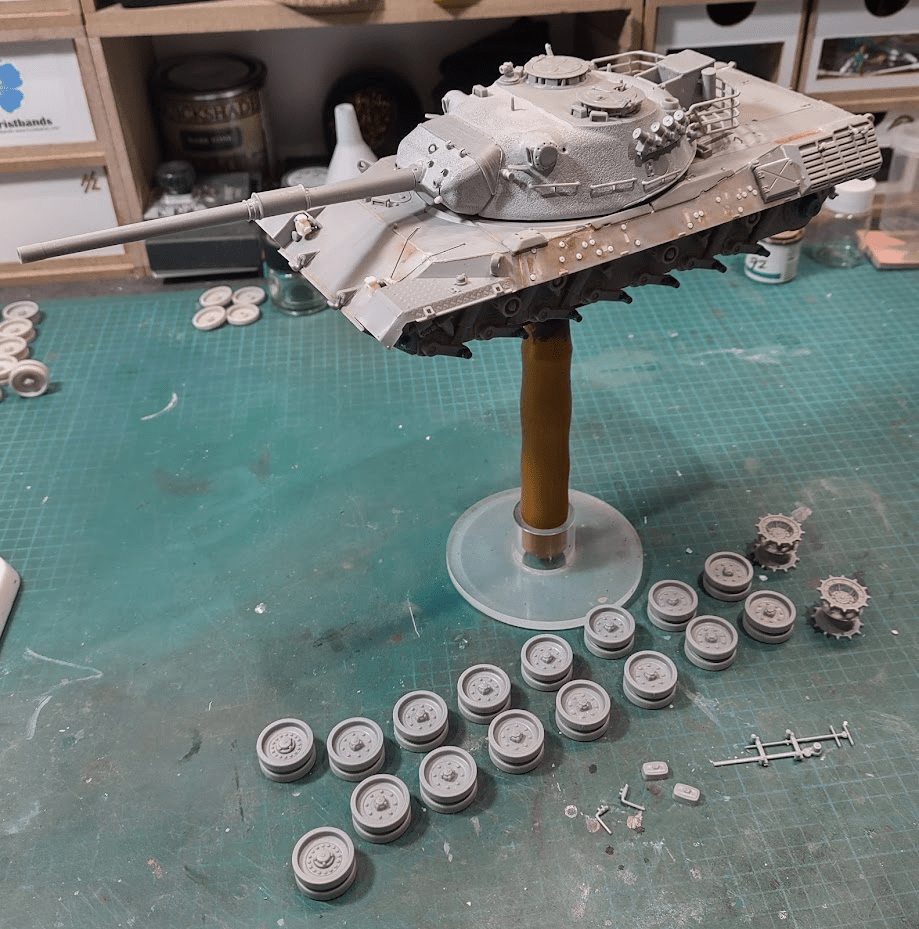
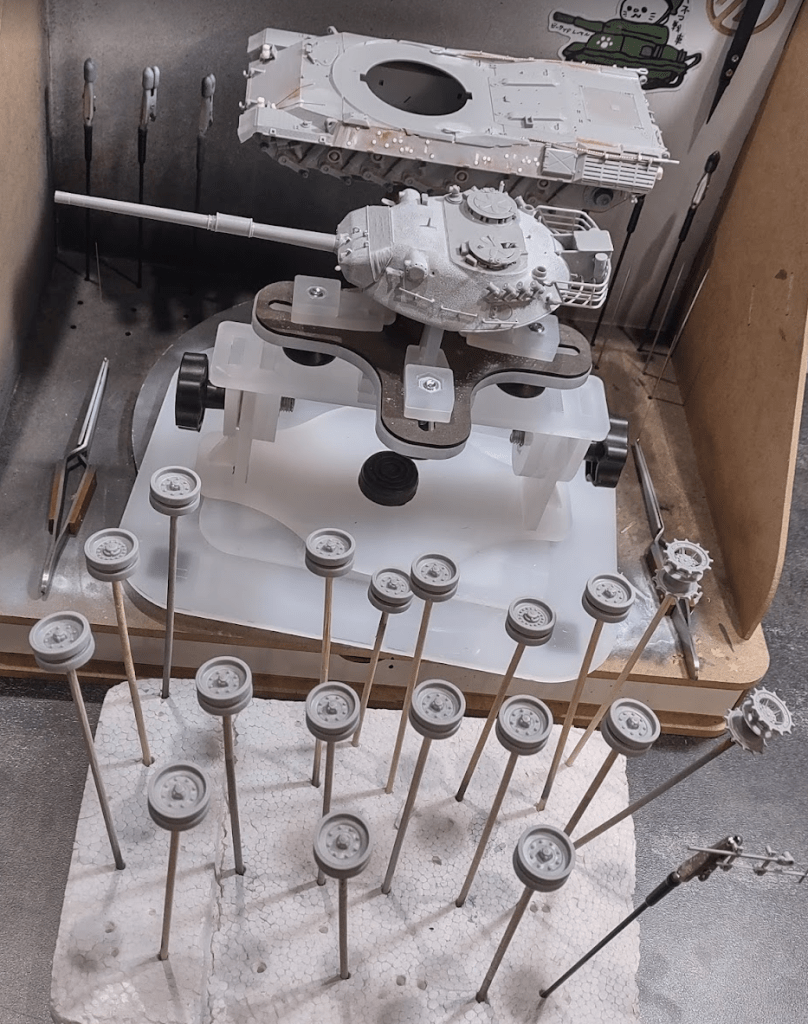
Leopard Workshop Leopard 1 Replacement Wheels LW001. One of the major bummers of this kit (and, in fact, a bunch of the better ones) is the roadwheel. It seems no one quite achieved getting the wheels right. Some have Italeri’s curious ribs on the rolling band, and others have the inner side entirely absent or plain wrong. In Revell’s case, the wheels’ profile is too squarish with too prominent pips all over. LW’s set is beautiful, but I suspect installing it will be challenging.
A bunch of other sets to address the stuff that is never convincing in styrene:
For the barrel, I wonder if I could get away with Barrel Depot’s M68 rifled Gun BD35009. It looks quite similar to the L7A3 without its thermal sleeve. This will need to be confirmed.
An interesting program, isn’t it?
Now, about those corrections, I could simply look carefully at Winnepenninckx’ book and infer what needs to be done. I will of course do that, but there are knowledgeable people out there that took the time to list a bunch of specific tweaks. Here they are if you fancy a project like this yourself.
Ok so with the specs of this project clearly set, let’s get going on the construction of this beast. This will form the basis of the second part of this blog.
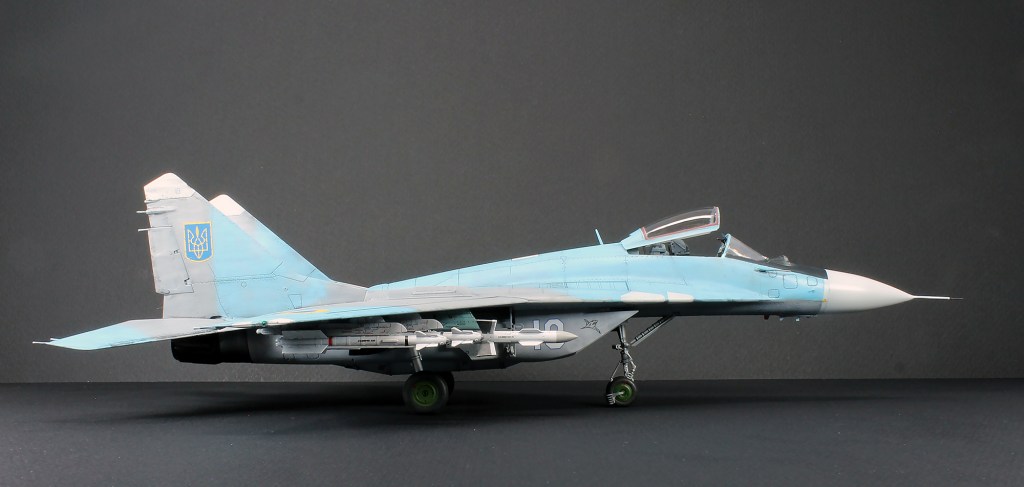
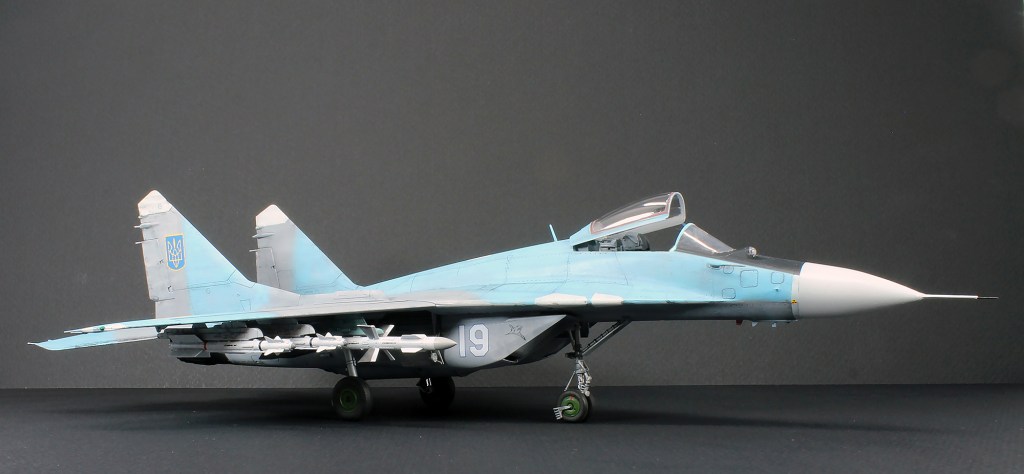
I recently bought Great Wall Hobby’s limited edition “Ghost of Kyiv” Fulcrum kit on a hunch. When I got the kit, I was so thrilled about the general shape of the plane I was seeing in the box that I decided to get started right away.
After the simple Spitfire summer project, I wanted to go a little further on this one. Still an OOB affair, I wanted to push finishing and experiment with Jarek Rydzy Rydzyski’s distressed pre-shading technique seen on the book he wrote with René Joyal, and that was the main purpose of this build.
The project went nicely. I would rate GWH’s kit as generally good. The base kit is from 2012, and while there were some surprising things, it went together well and any issues were dealt with relatively easily. I was surprised by the amount of mistakes in the instruction, though.
Honest Assessment
Things I’m happy with
Painting. Lots of pretty interesting learnings regarding painting into this build:
Distressed pre-shading, or “pre-shading texture” as Rydzyski calls it, is a pretty simple, and pretty fun technique. It yields good results with relatively quick execution.
I used Ammo paint from their Flanker set (AMM7280) and I experimented a bit with mixing it up with varnish and retarder. The result was quite interesting in that I managed to get a very sturdy, satin finish that was super easy to work with.
Painting a sky-blue fighter plane is awesome.
The Mig-29 is an incredibly cool-looking aircraft. Will build one again.
Things I’m okay with
Decaling went well. And it is much easier when said decals are of good quality. I’m starting to nail the technique not only to get good decal application but also in doing it at a good pace.
Landing gear. Didn’t prove too much of a PITA, but still, it amazes me just how sub-optimal any landing gear struts are every time. What’s so hard in getting that to fit snuggly?
Generally, weathering went well. But here again, I forgot one large segment (air intake left side)
Things I could do better
Jets are fiddly in the end. The further you get into a build, the harder it gets to manipulate, and the jig I’m using is not optimal. I need to get a better way to hold the plane at any angle.
Botched canopy. This is the single most important point I need to get better at. It’s not easy, but it’s pretty vital to get right, as it is one of the highlights of any plane, drawing your attention right away.
Project Specs
Great Wall Hobby Mig-29 Fulcrum-C “Ghost of Kyiv” Limited Edition #S4819 Foxbot Ukrainian Fulcrums markings #48076
As the saying goes, in Québec we have two seasons: Winter and July. So in July (say, June to August), we tend to leave the bench alone and go outside. This is particularly true for those who ride a motorcycle: we only get about five months of nice weather.
However, I often try to get at least one project going, just to keep busy, experiment a bit, and learn a thing or two in the process, but the main point is mostly to be doing some modeling in the summer. I usually don’t go nuts much and often leave some glaring mistakes because the fucks I have are generally in short supply. I often end up going for the glorified paint mule in the end. The project I select for this purpose is invariably a simple, worry-free affair, and as you can imagine, it’s often a Tamiya.
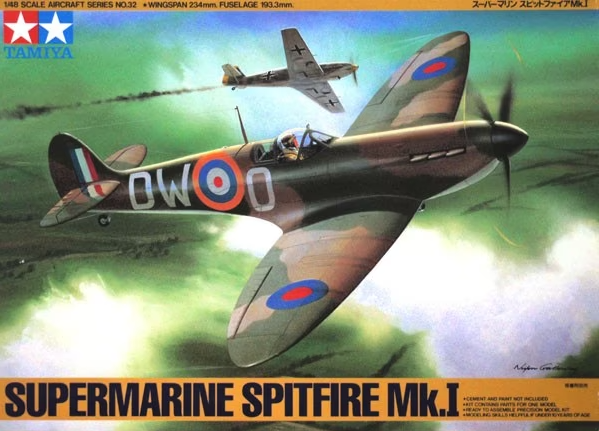
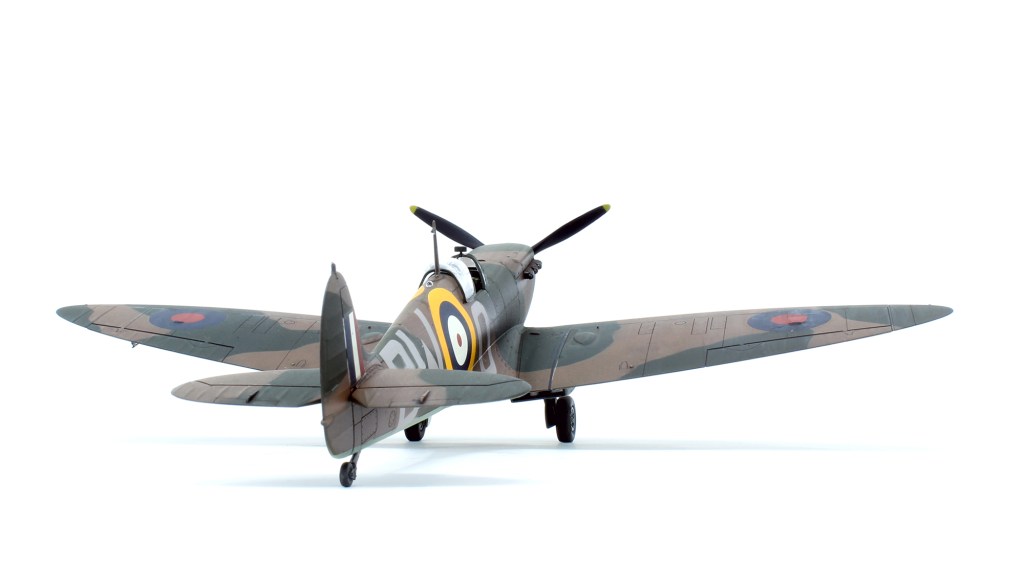
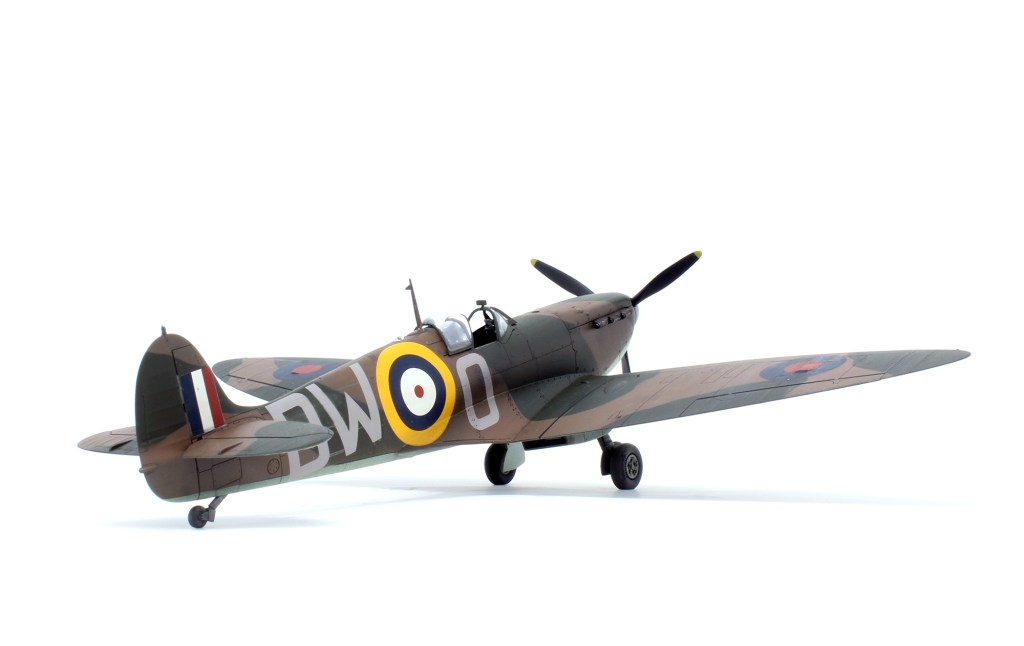
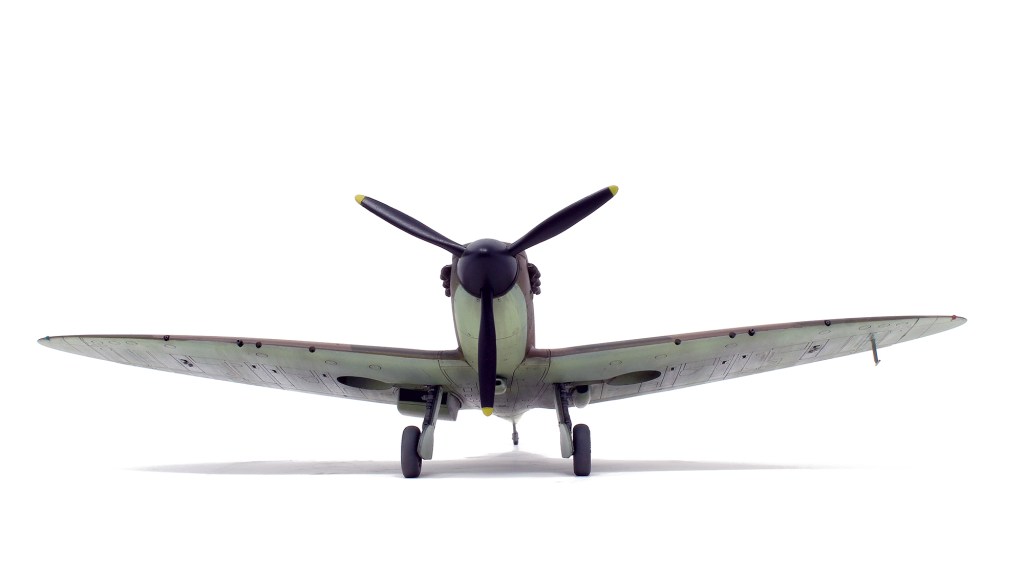
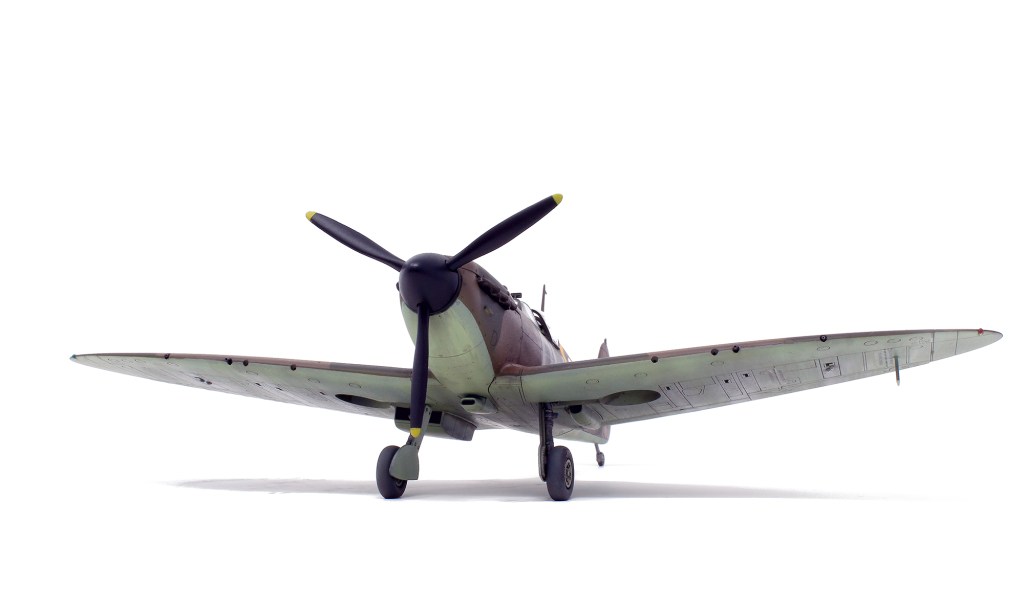
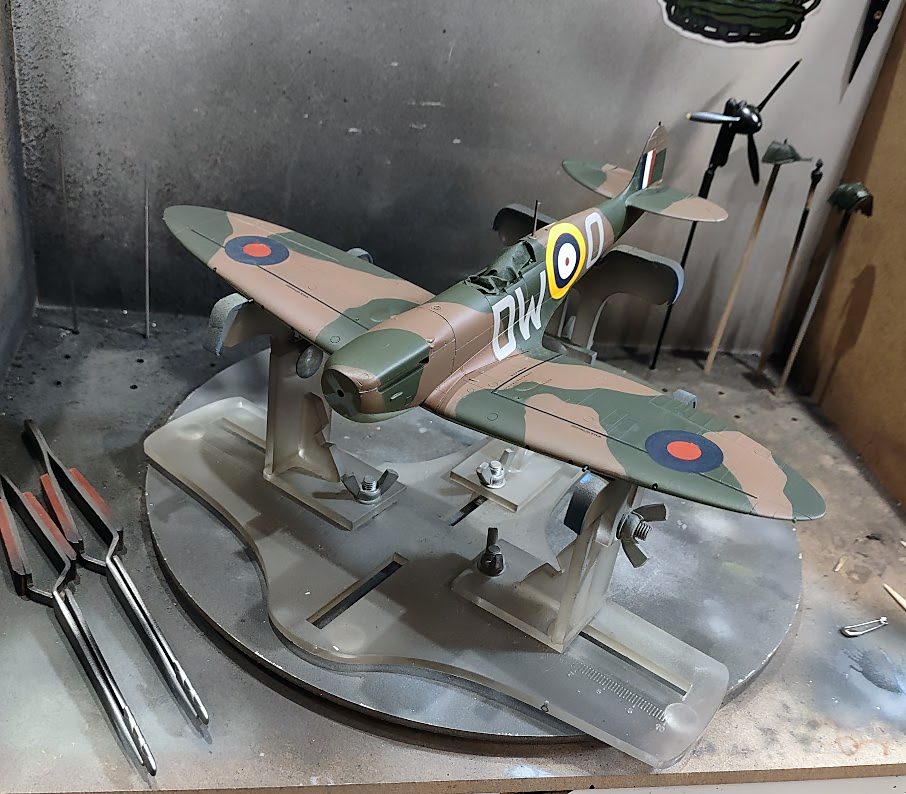
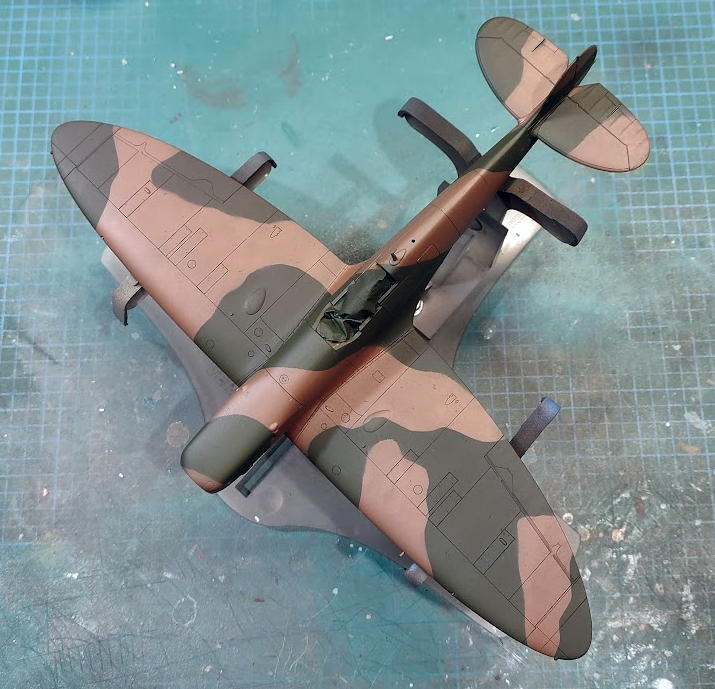
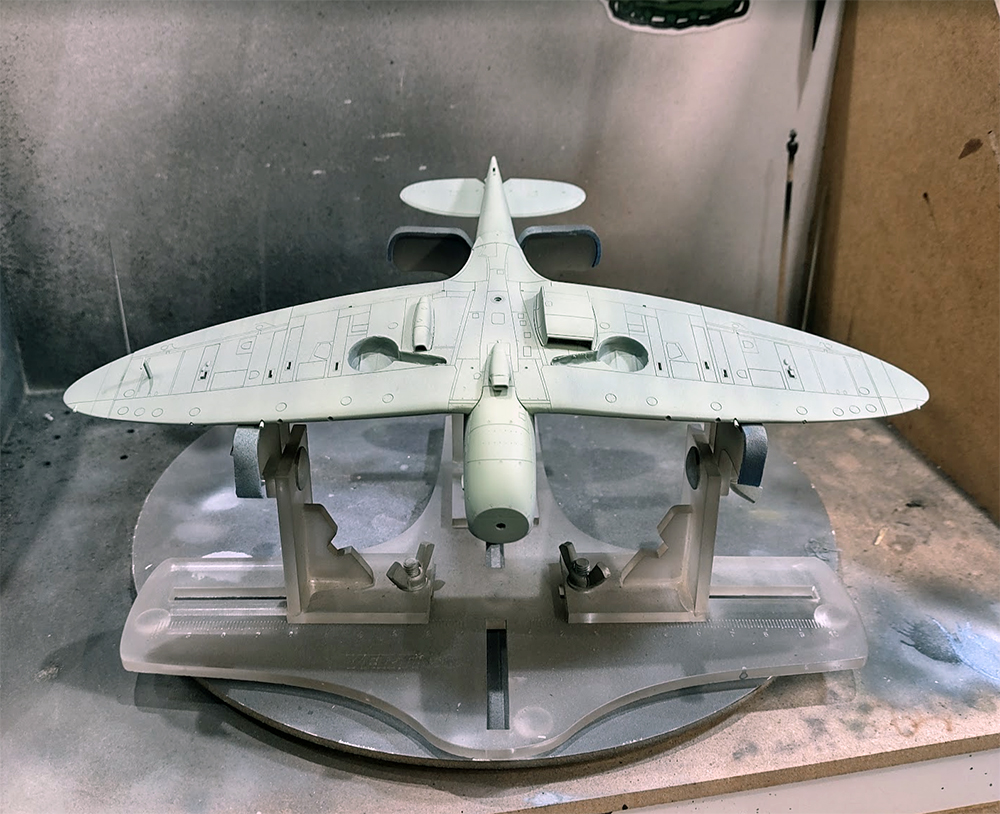
So this year’s summer build has been as simple as it could possibly get: an old, straight out-of-box Tamiya Spitfire: the old 1993 Tamiya Spitfire Mk.I.
There isn’t a whole lot to say about this project, really. It went together easily and quickly, with no fit issues to speak of, the paint job went okay and the decals, which I somewhat botched, were brittle but adhered nicely.
As a true out-of-box project, I didn’t add any radio antenna string, nor did I add the red MG tapes that are usually seen on and around the MG openings. This build is very strictly made with only what’s in the box.
Overall, I’m surprisingly happy with the result for such a simple, basic project. I like the final look of the aircraft. The build is clean and that huge yellow-outlined roundel is just great. In the end, this summer project fulfilled its mission admirably.
With Fall now well settled in, it is time to move on to more ambitious projects!
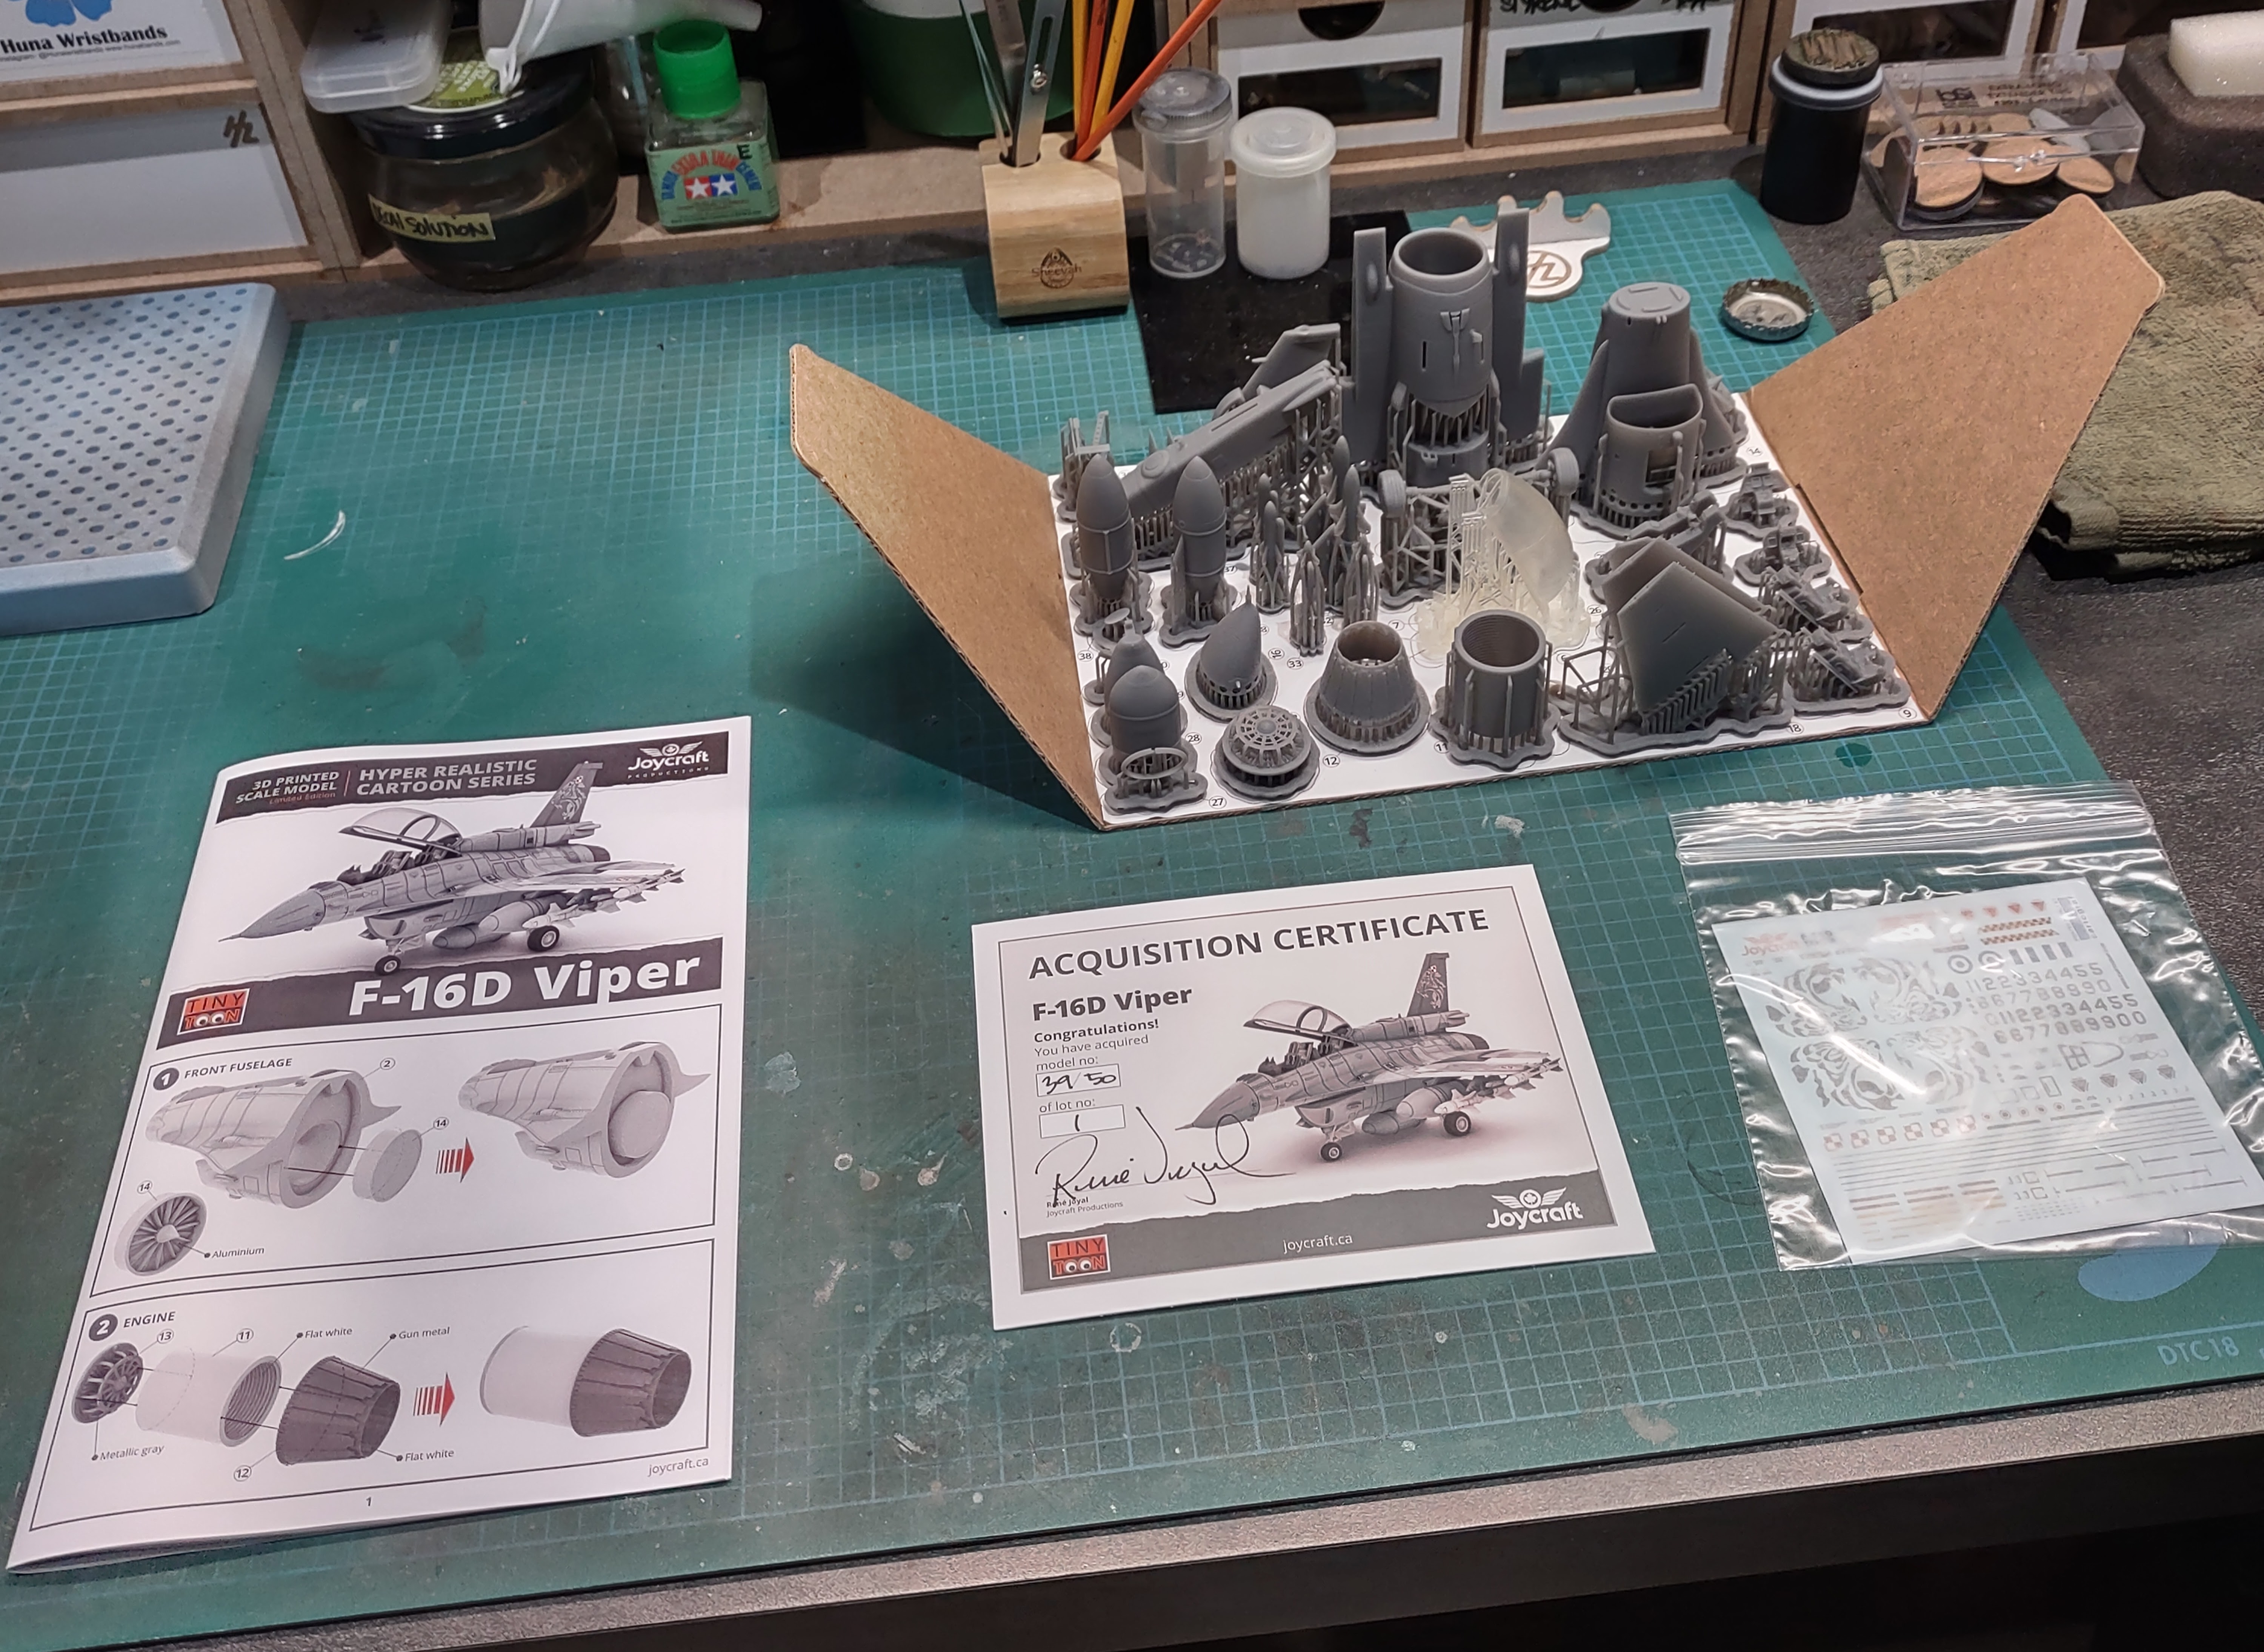
Last year, Joycraft launched a new series of products: fully 3D-printed aircraft kits. You may recall a review I posted here a while ago of a book from that company, written by master modelers René Joyal and Jarek Rydzyski.
When Joycraft announced its first kit, I jumped on it for a number of reasons. First, it was a fully 3D printed kit, and I wanted to see firsthand how they would go about producing that, Second, well, Joycraft is awesome and I was pretty sure anything it would come up with would be interesting. So I preordered a kit, got it, and built it. Here’s how it went.
What’s in the box?
The kit came in a super neat package, a work of art in itself (which apparently will change a bit in future offerings to make it more efficient). All the parts were neatly glued on a sturdy cardboard plate. Right away I could see that the definition of the print was pretty crisp.
Getting down to work
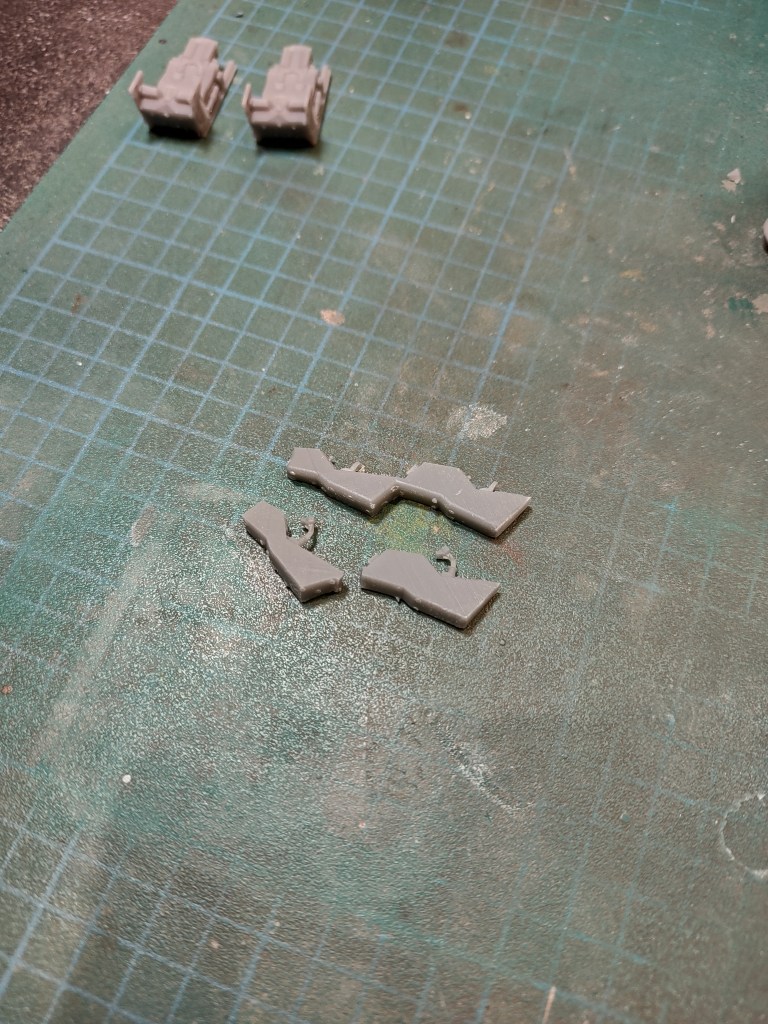
The first order of business was to clean the parts. Now, let me tell you right away, it looks much worse than it actually is. It took me about an hour to prepare all the parts down to basic cleanup so that I would only have to finish cleaning up each part more precisely once ready to put it into place.
You need to be extra careful, however, to avoid breaking parts. It’s not a huge deal, but this is not like cast resin, and certainly not like injected styrene. 3D printing resin is brittle and fragile. In the course of the project, I broke a number of parts that weren’t too complicated to fix, but it was self-inflicted pain nonetheless.
The Kit
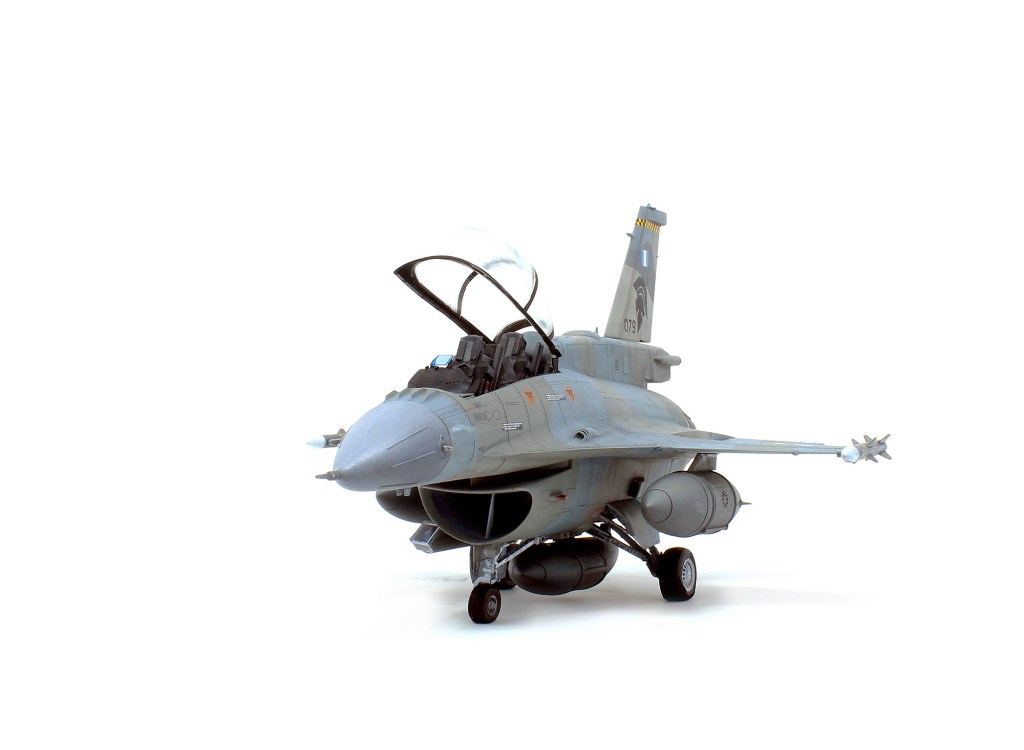
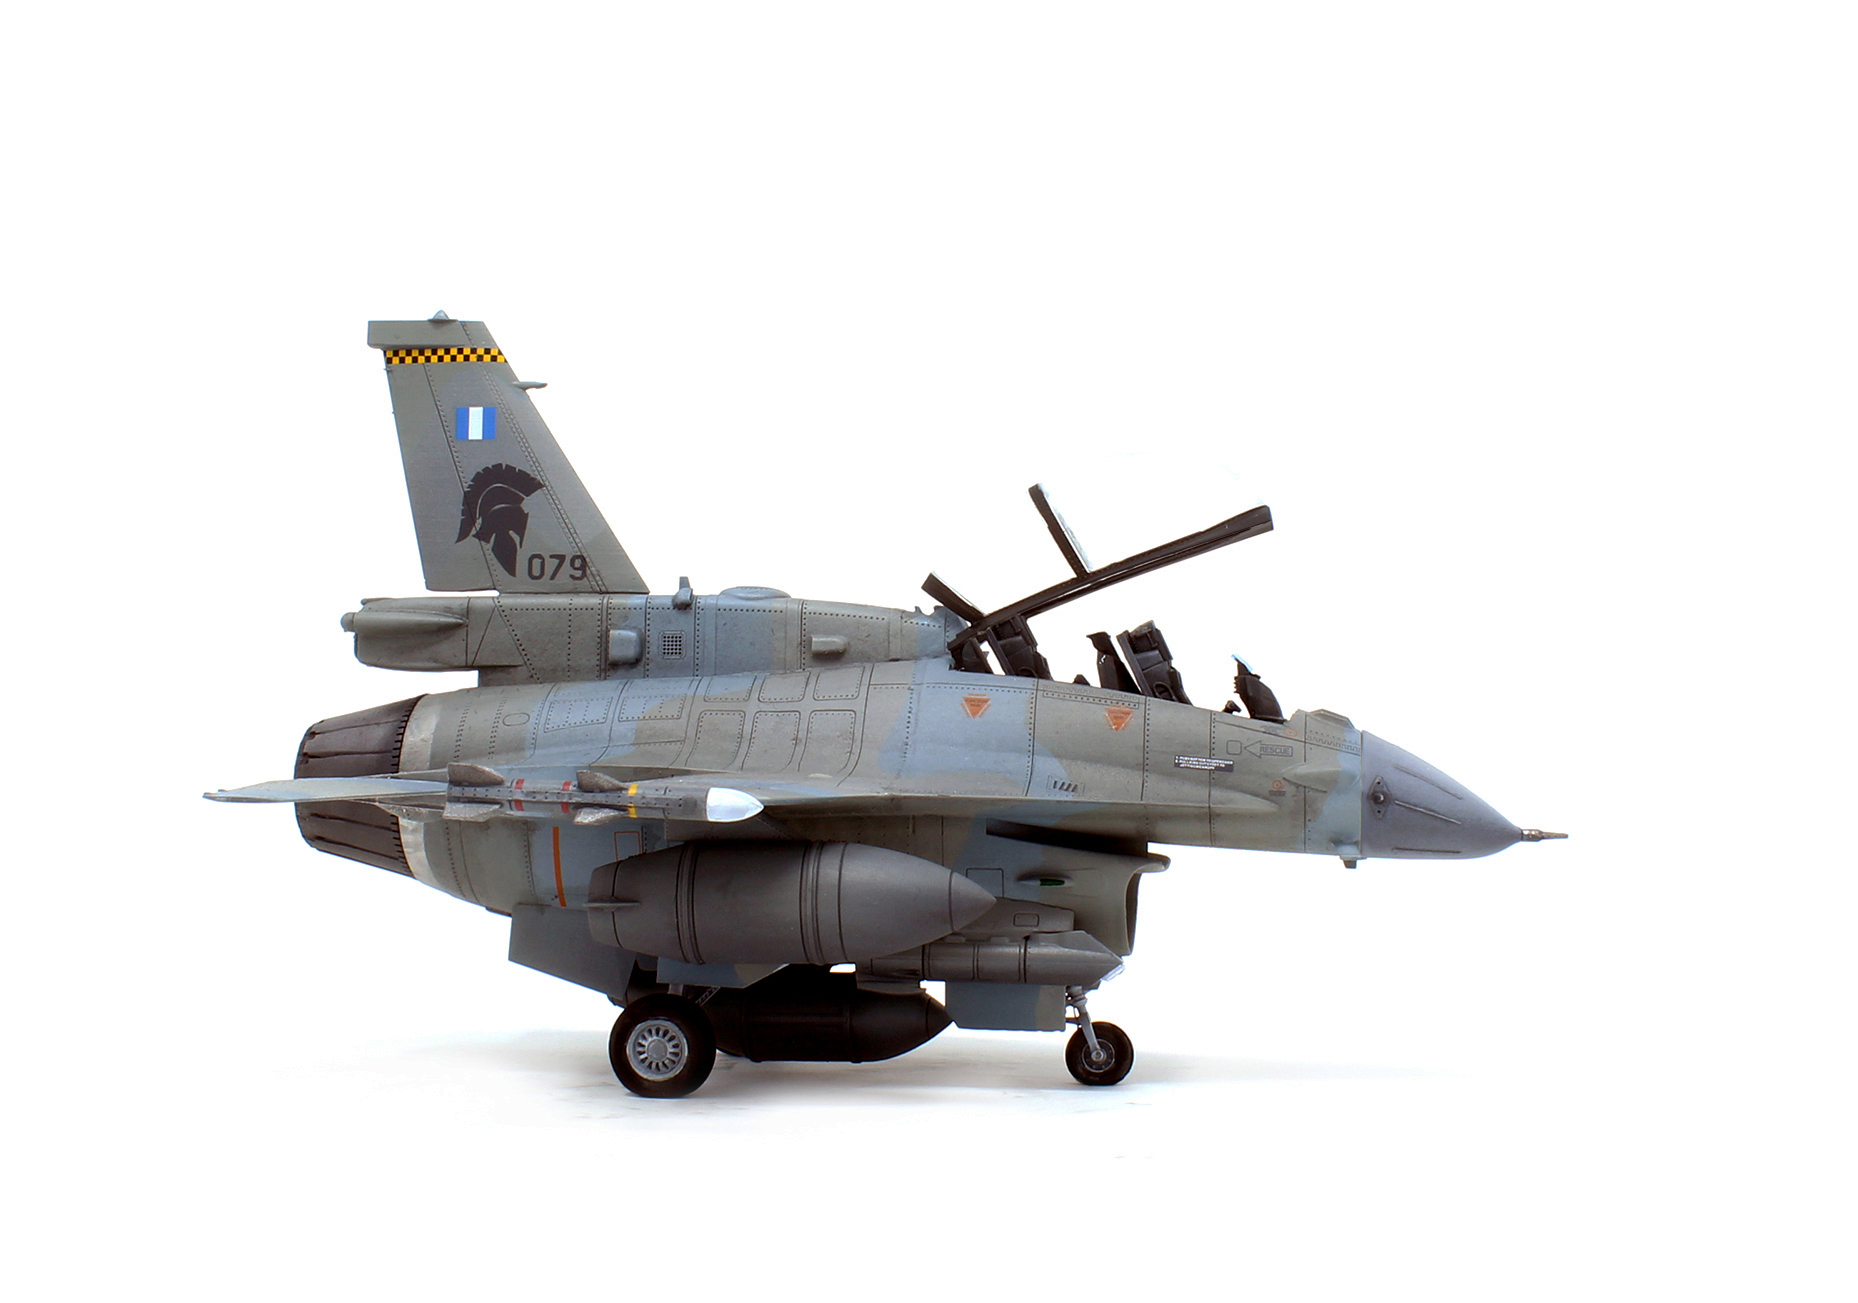
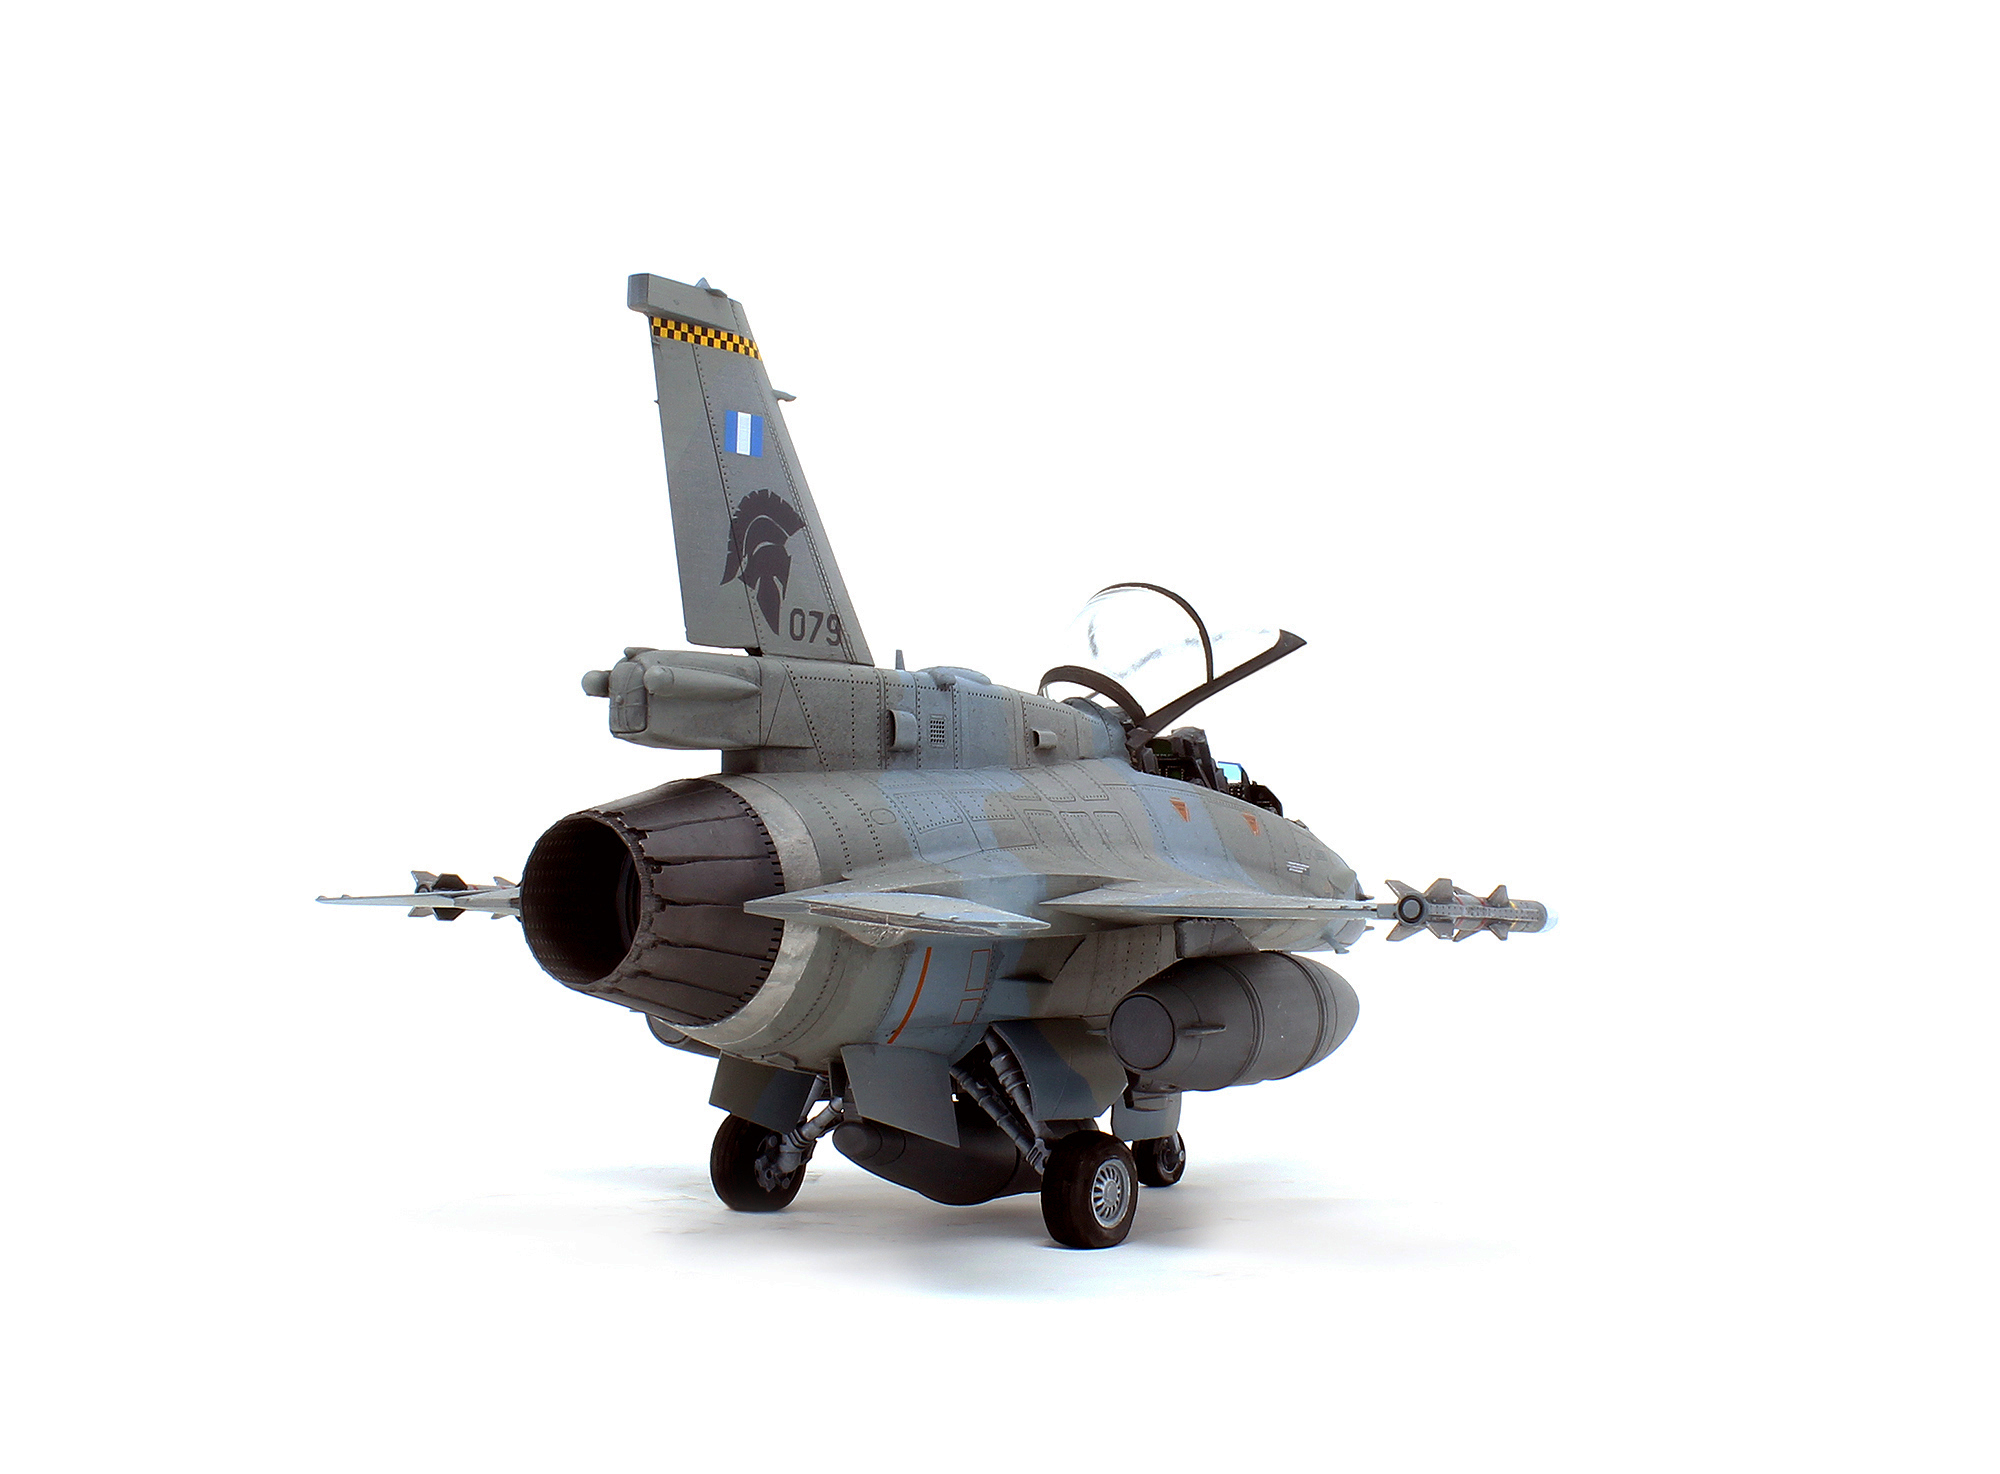
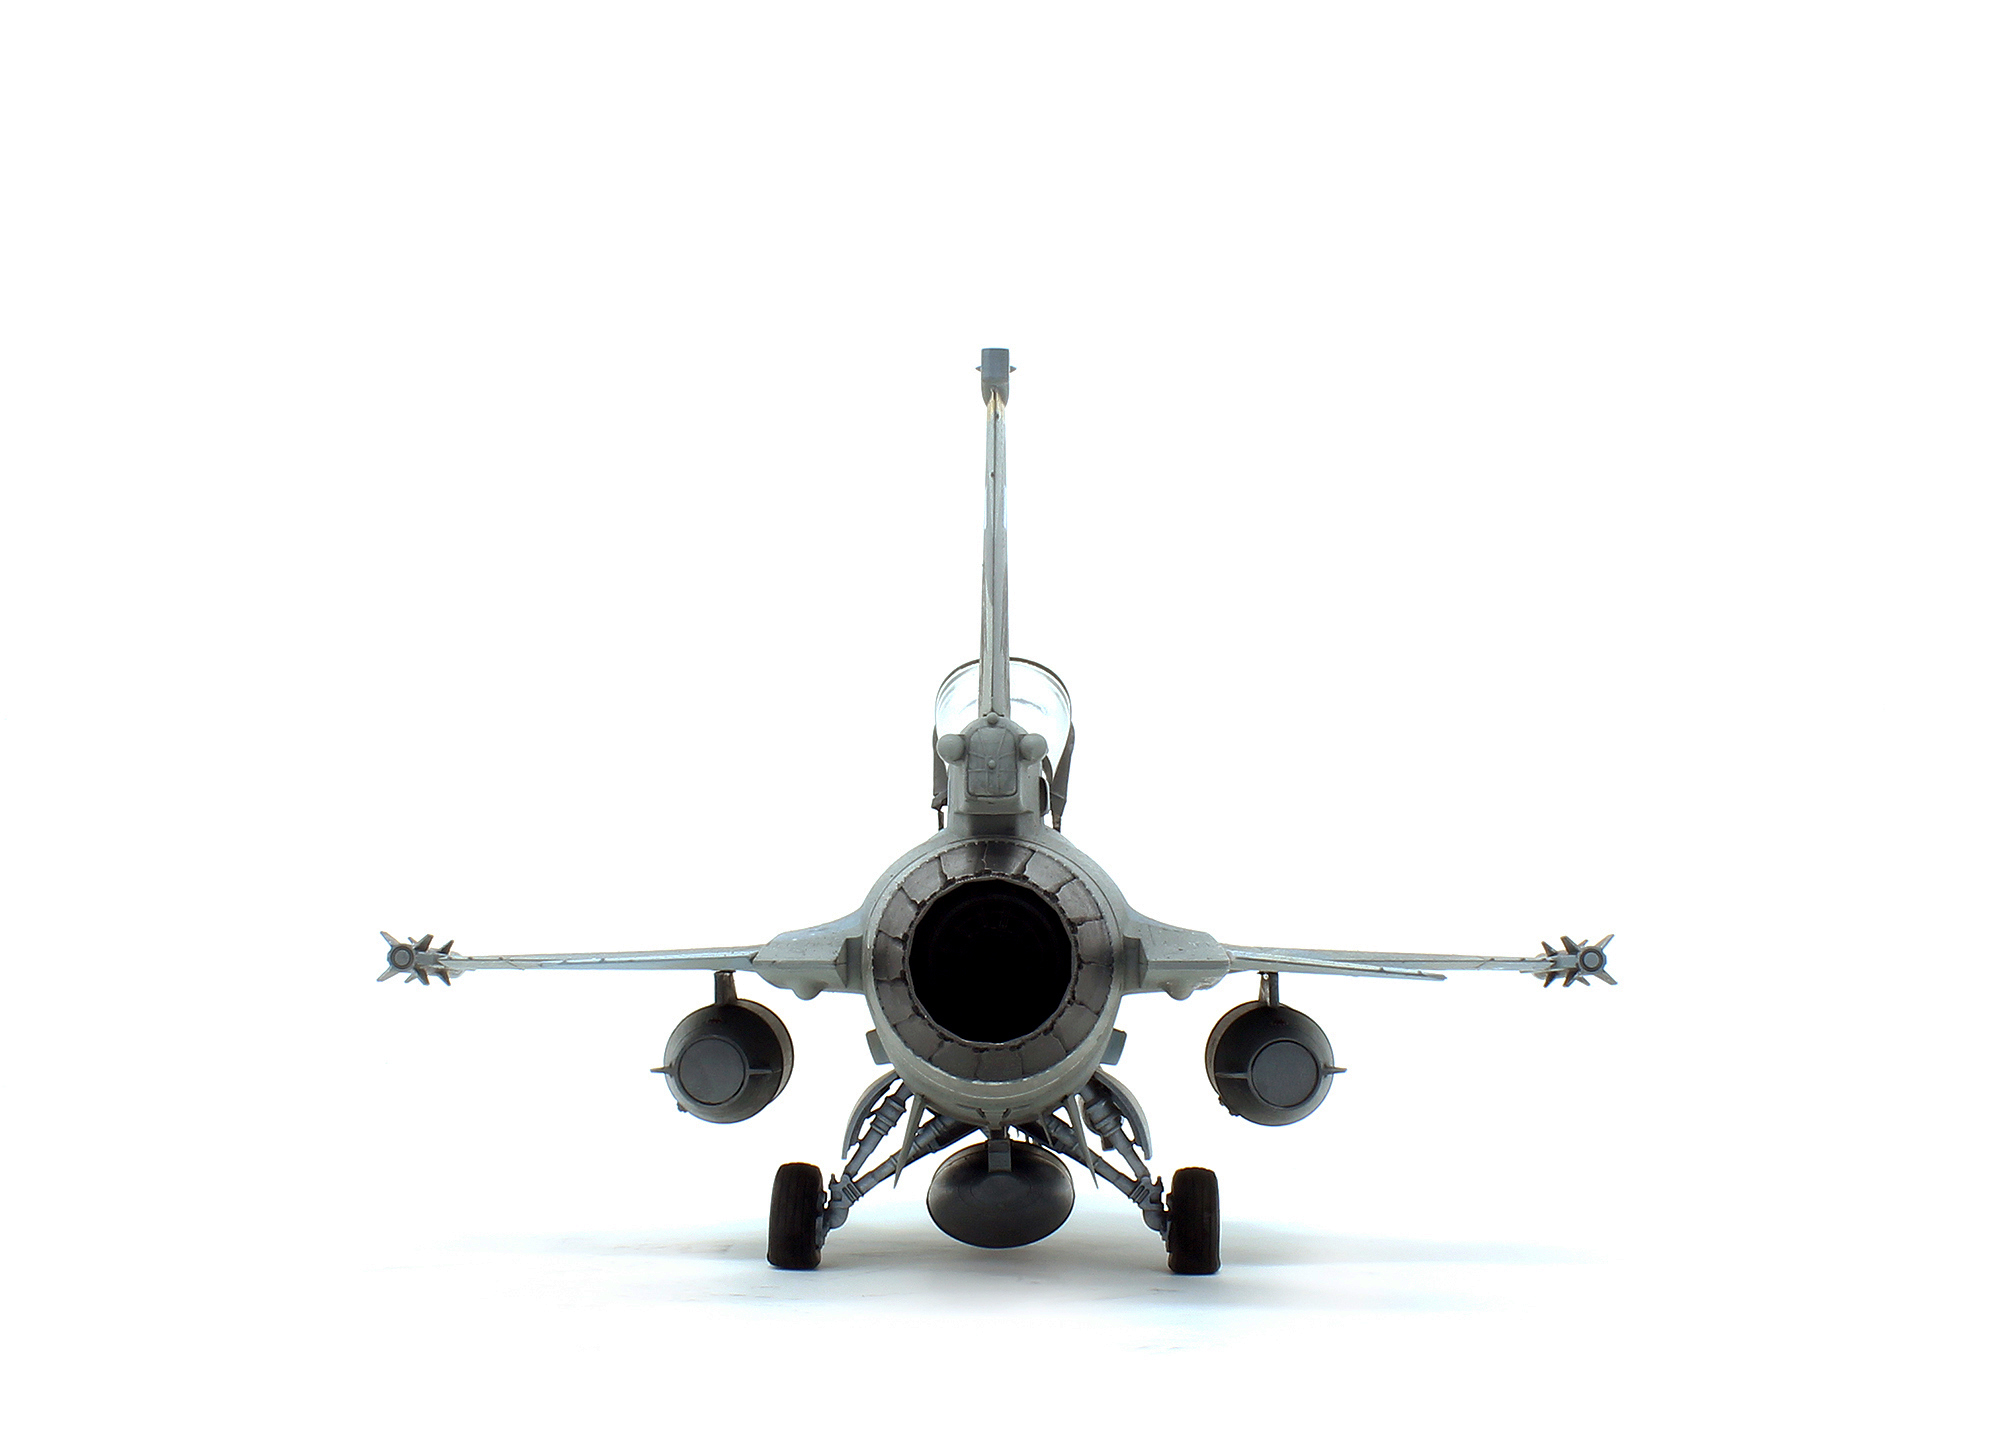
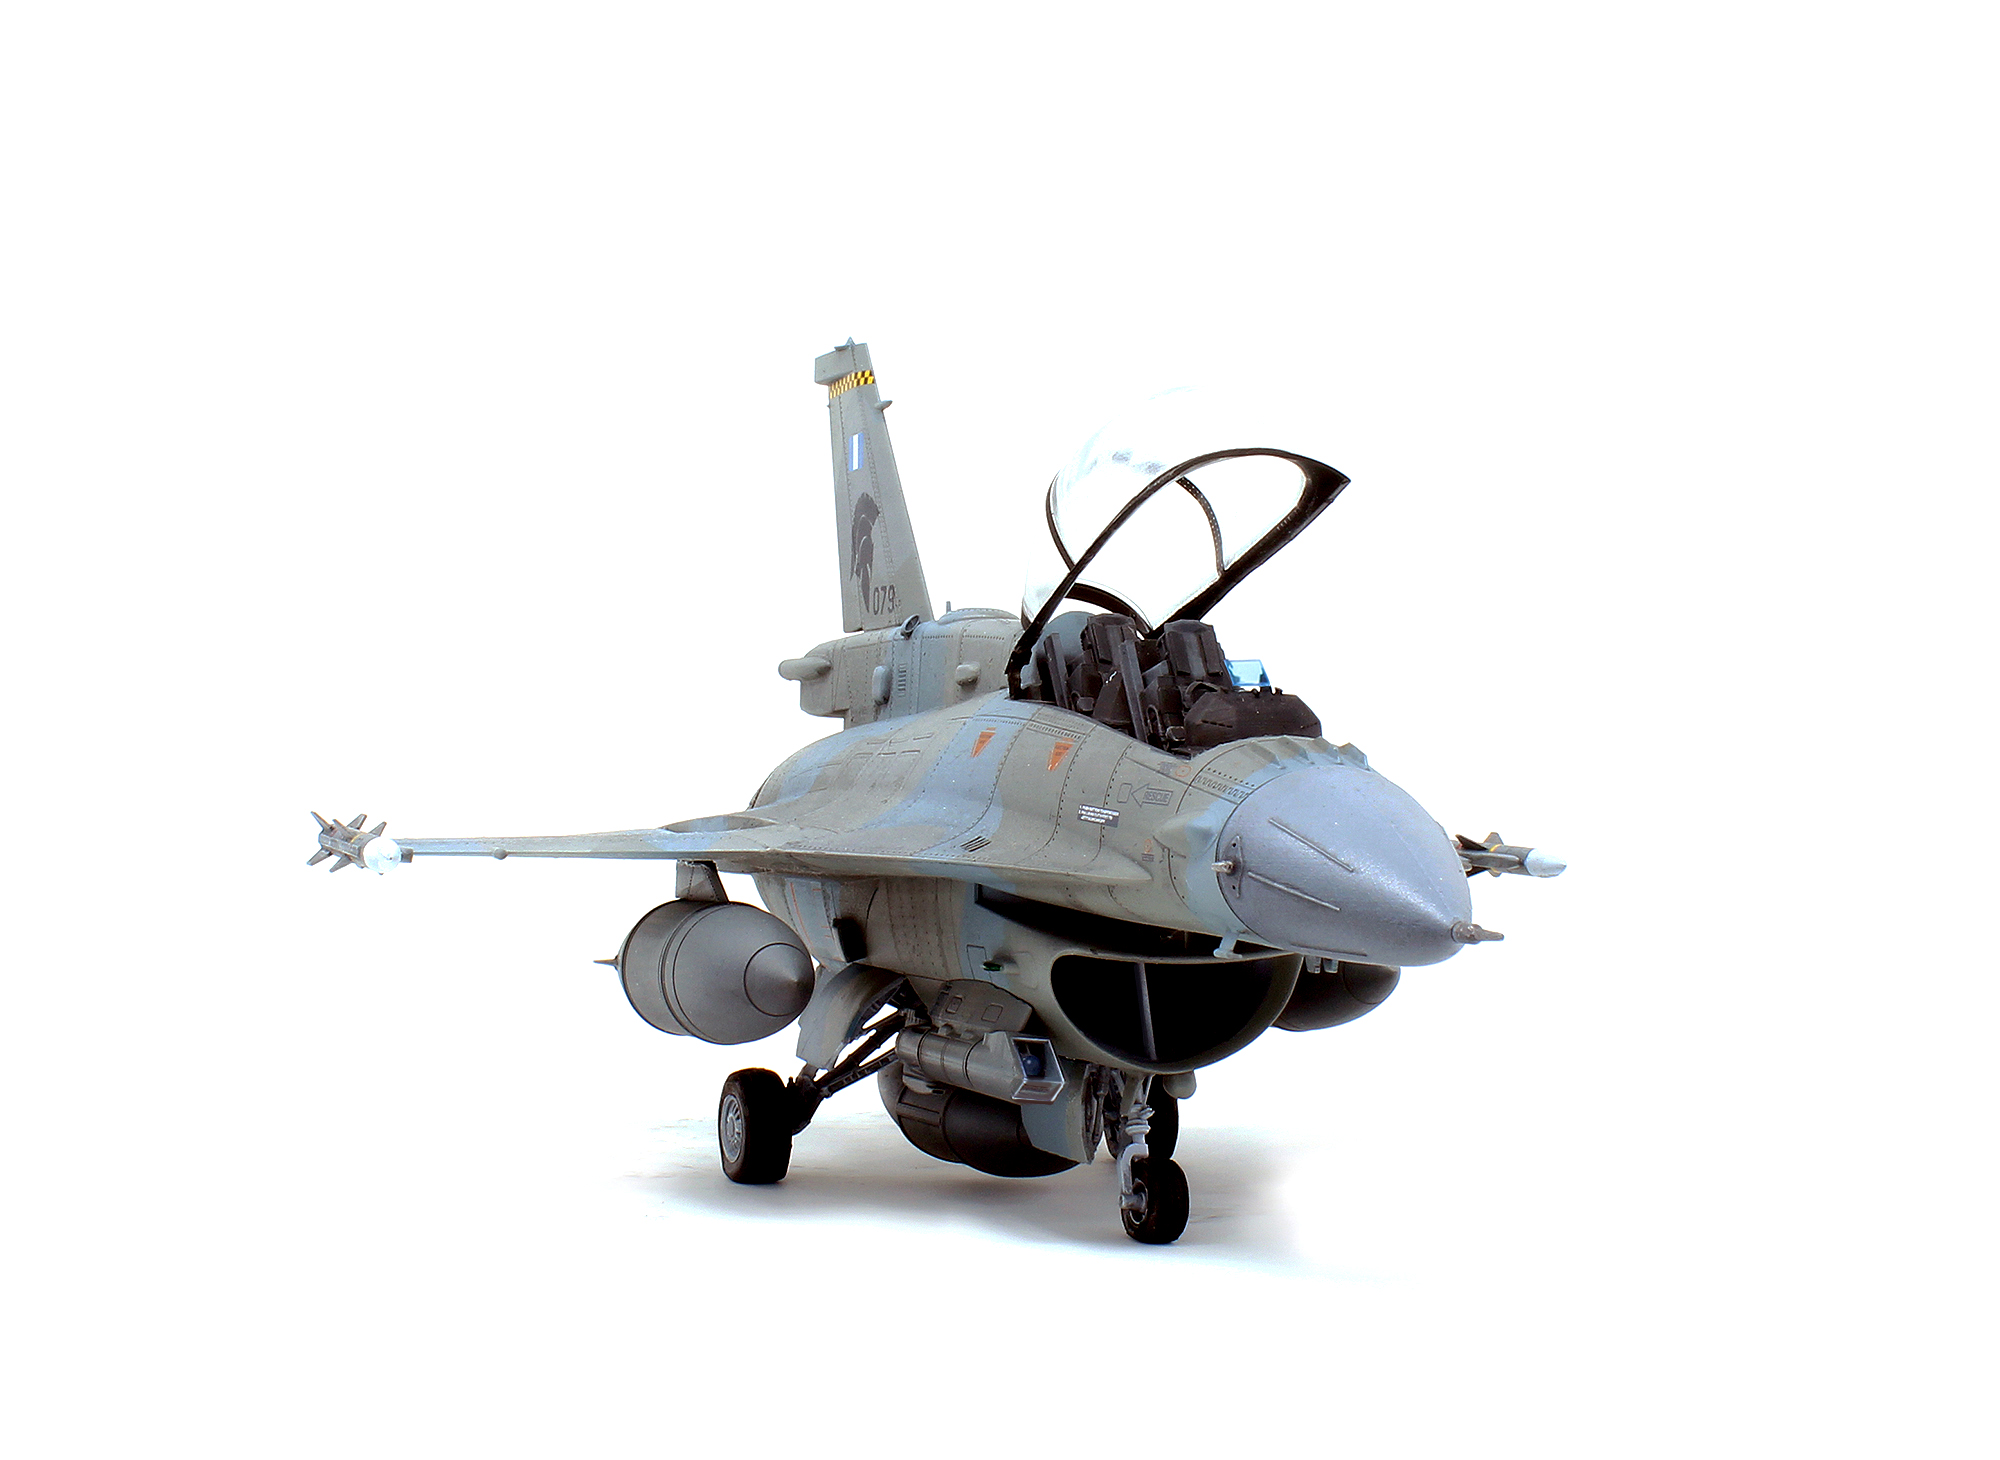
The kit is a pretty cool design of a pretty cool jet fighter. I am not, myself, a huge fan of toon planes, but this one struck a note and grabbed my attention. Contrary to most toon planes I’ve seen, this one keeps the right ‘vibe’ of the F-16, and even though it is a vastly simplified version of the original, it keeps its awesome aerodynamics and signature lines. It comes with a centerline tank and two wing tanks, two AIM-9M, two AIM-120C, and two AGM-88. In other words, it is armed to the teeth.
In the end, I went for a more sleek loadout, but that isn’t exactly a voluntary choice. Rather, I was the victim of my own inexperience.
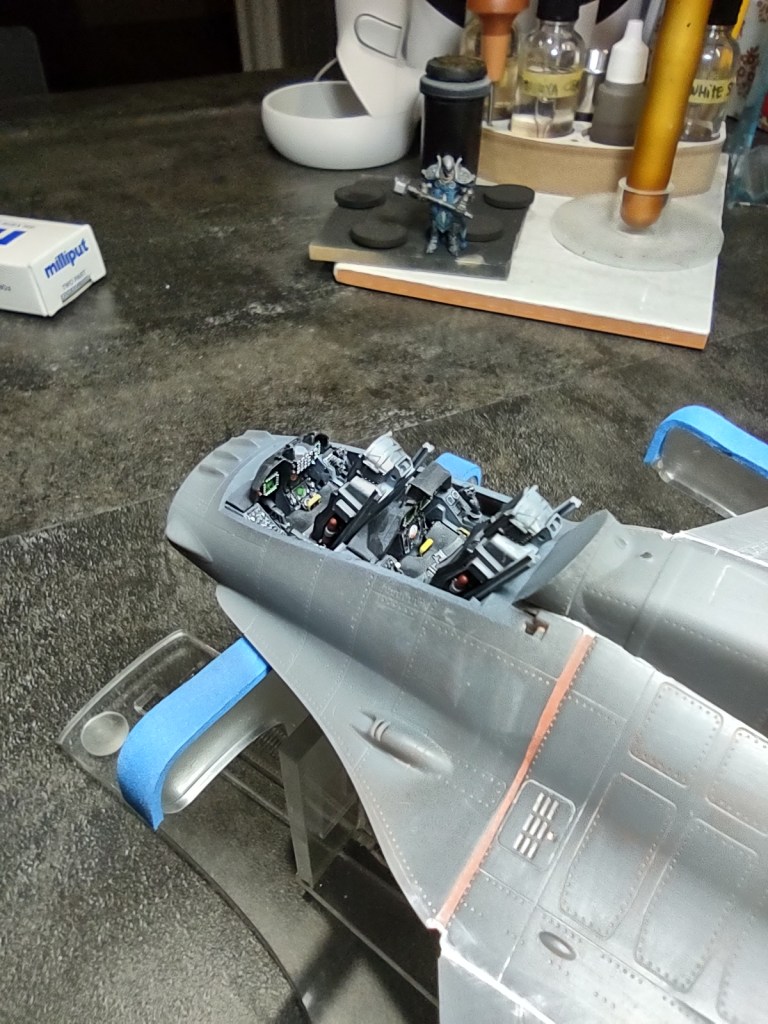
The kit is pretty well engineered. The cockpit is not only very detailed, but it fits pretty well without any issues to speak of. I didn’t take pictures of all the kit’s details, but the flight stick, the throttles, and a bunch of switches are all fully present. This level of detail and crispness makes it very promising for the future: a kit of this level of quality won’t require additions.
The instructions are pretty clear as well most of the time, and the decals are from Cartograf and are of excellent quality. You get two options in the kit: a Polish and a Greek aircraft. (I decided to add a fictional squadron insignia on mine and cut a Corinthian Helmet I found on the Internet. )
There are two things that aren’t quite awesome, though. The two-parts fuselage and the canopy. The former requires a pretty hefty putty job while the latter implies that your sanding and polishing chops are up there. I guess this had the benefit of forcing me to put those skills to practice. Joycraft told me that their next offering, the F-16I Sufa, will come with a one-piece fuselage.
In addition, I think it is fair to say that while a cute little toon plane, this kit isn’t for beginners. Like I said, parts are fragile to prepare and handle, you need a solid knowledge of CA glue handling, and PLEASE DRY-FIT EVERYTHING.
Yup, this is why you don’t see my ship bristling with missiles. You not only need to clean the wing hardpoints locators, but you need to make absolutely certain they will slip-fit in those slits. I didn’t do that and, right at the end of the project, I started to try and wrestle them in, coming dangerously close to some catastrophic breakage. I deemed it safer to leave those ordnances alone.
Oh well, some more experience.
In the end, this project was a very satisfying change of pace. It wasn’t as simple a build as I had expected. It drilled home some basics that I, as an armor modeler, am not often required to put into practice. It was also an excellent demo of what 3D-printed modeling is likely to look like in the future, and I cannot wait to see what Joycraft will come up with for their next kits. I was so impressed with the quality of their kit that I ordered their Sufa right away.
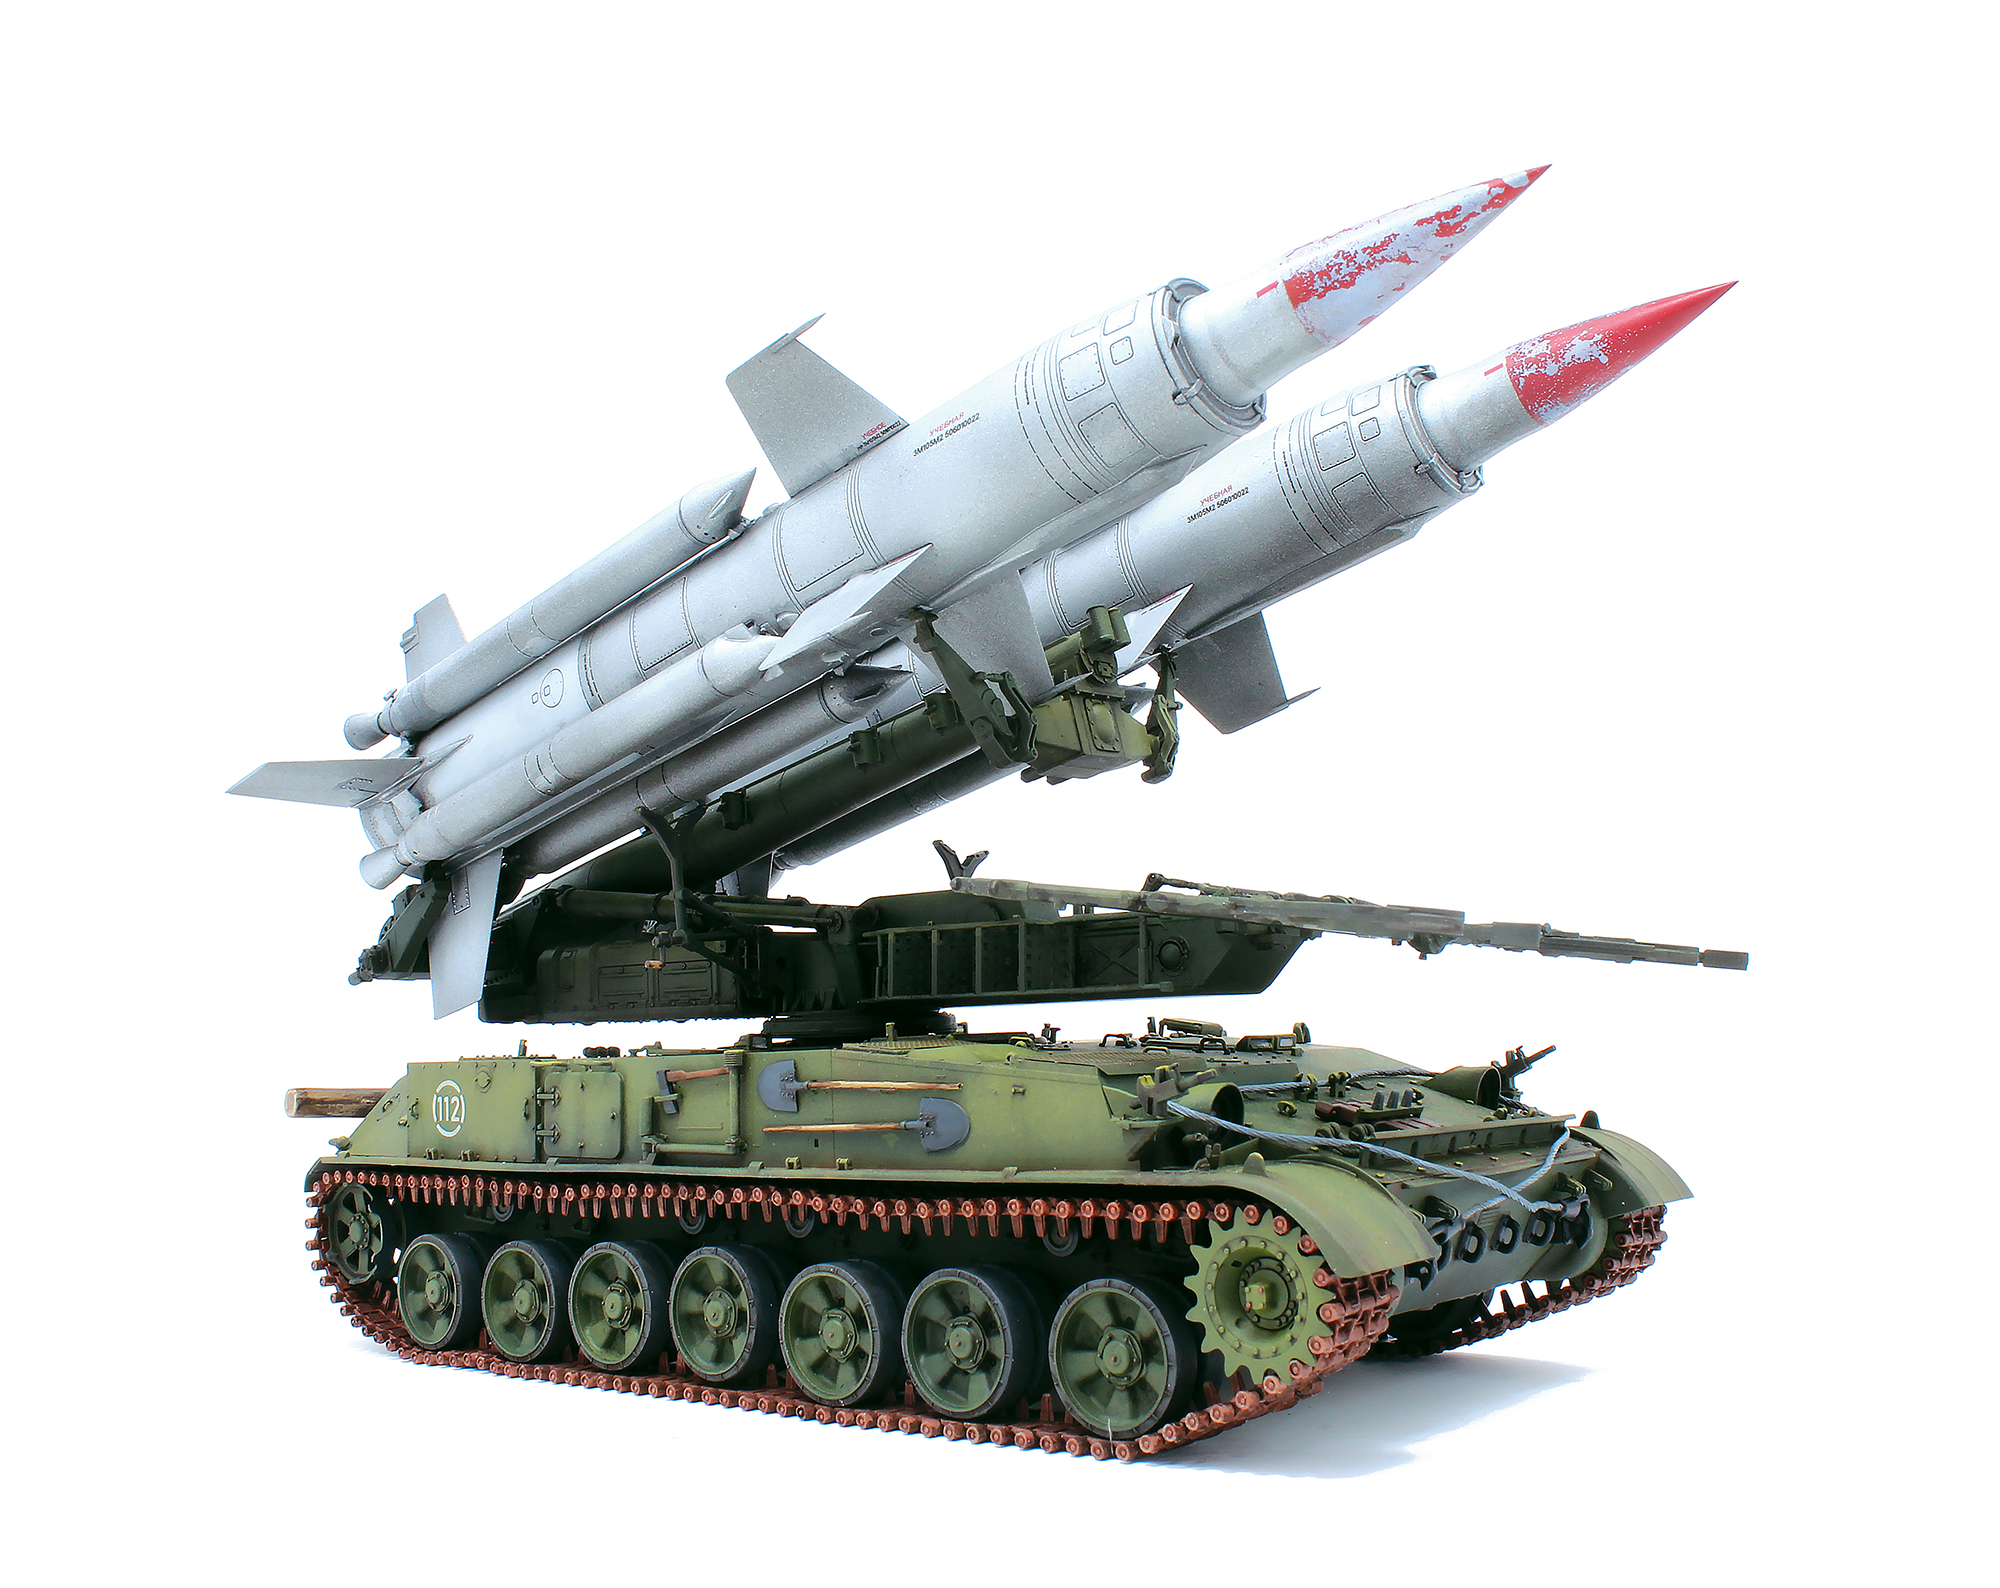
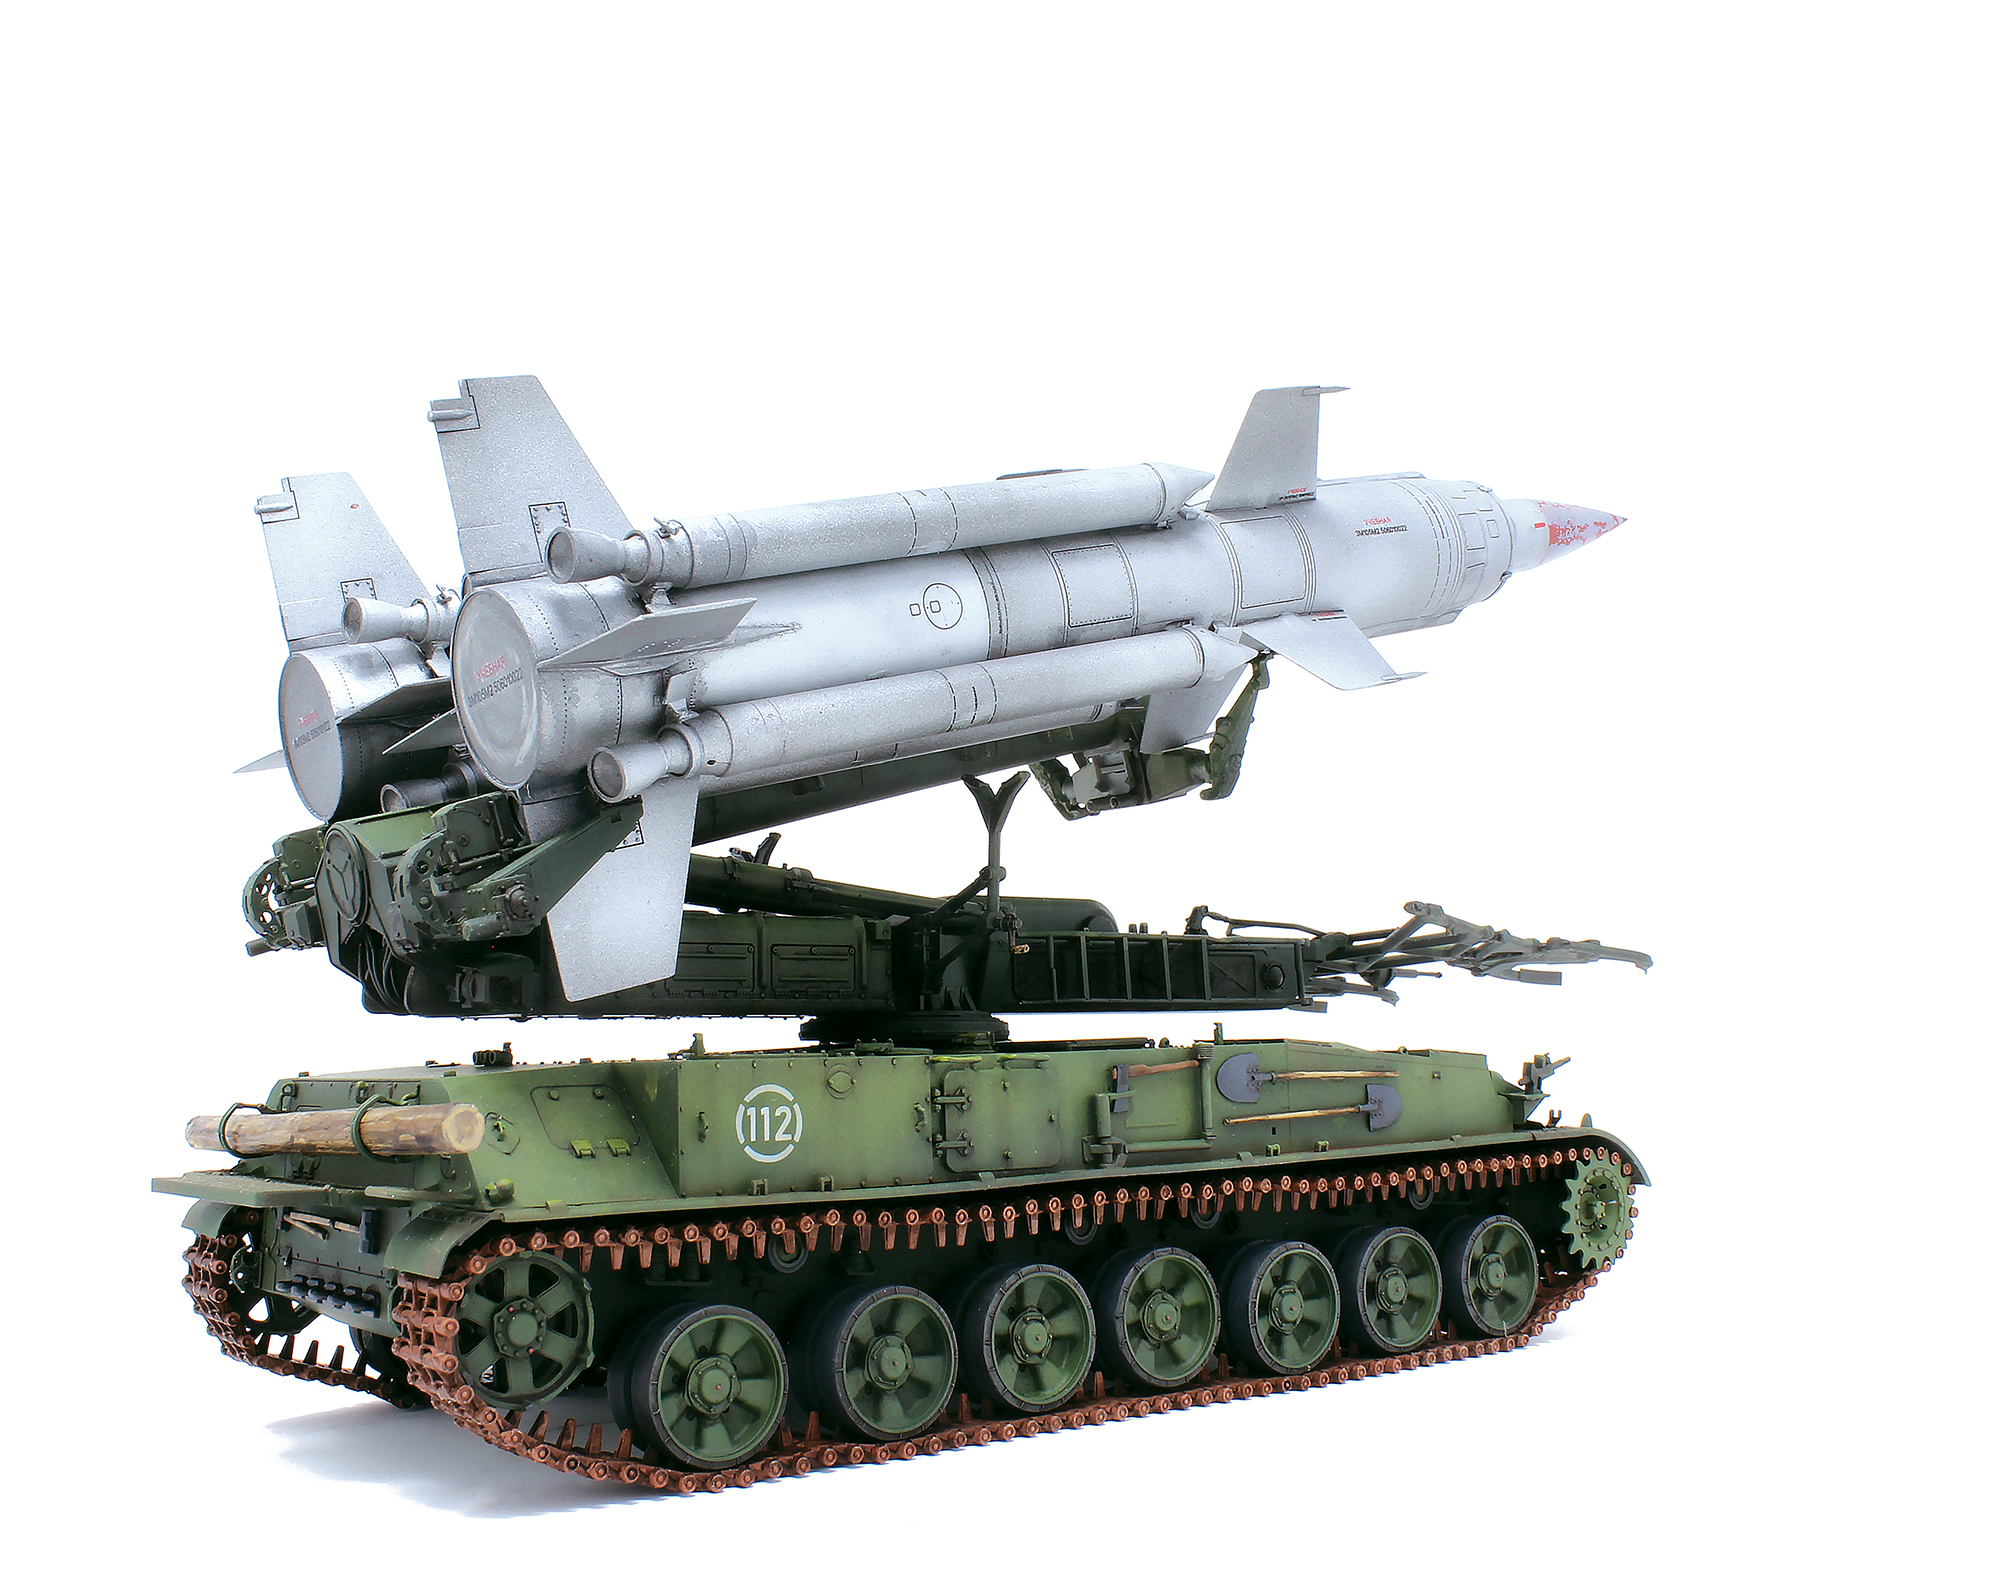
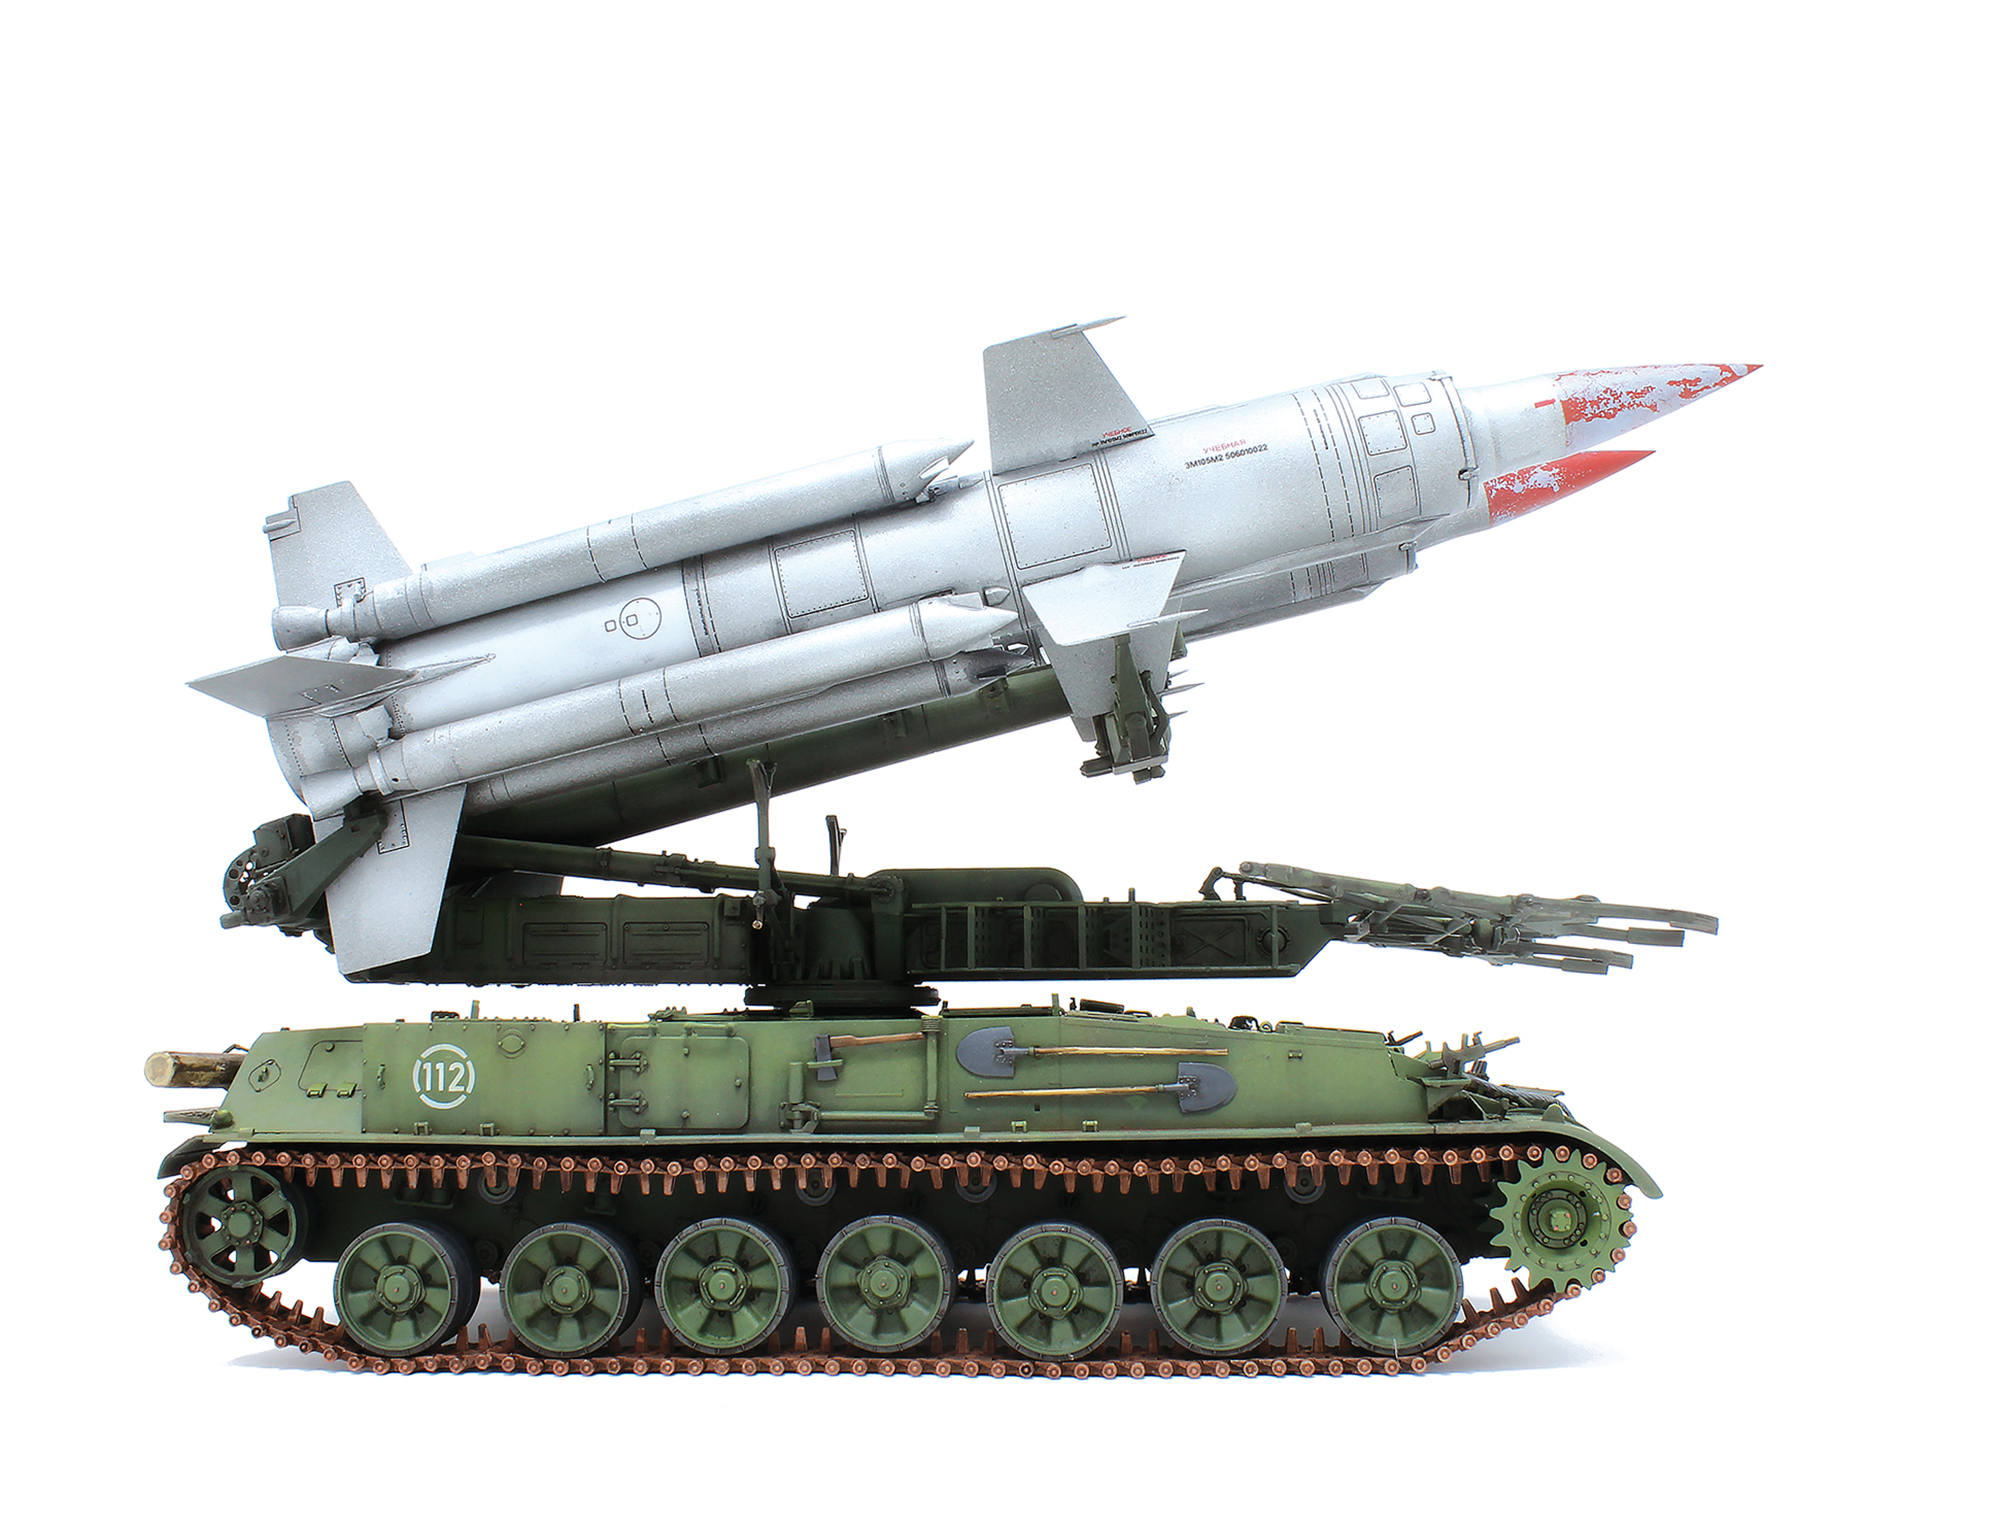
My good friend Vladimir Bocanin is a prolific builder. On a good year, he finishes more kits in a month than I build in a year. Lately, he’s been running a massive backlog of unpainted kits. Something like fifty-two. FIFTY-TWO. Let that sink in. He builds mostly weird middle-eastern field-modded armor and technicals as well as Eastern bloc armor and the occasional modern NATO subject.
I’ve been bugging him for years now to let me paint at least one of his numerous unpainted-yet builds. In January he finally agreed to let me paint this humongous SAM launcher.
I’ve opted for a museum vehicle, inspired partly by a picture taken by Massimo Foti, though I made it slightly less distressed and weathered than I would have liked and kept it a bit cleaner. I also somewhat limited the weathering passes to get it done asap.
An interesting project on many counts, my thanks to Vlad for letting me have a go at one of his kits!
Project Specs
Trumpeter Soviet 2K11A TEL with 9M8M Missile Krug-A (SA-4 Ganef) (Ref #09523) built by Vladimir Bocanin.