
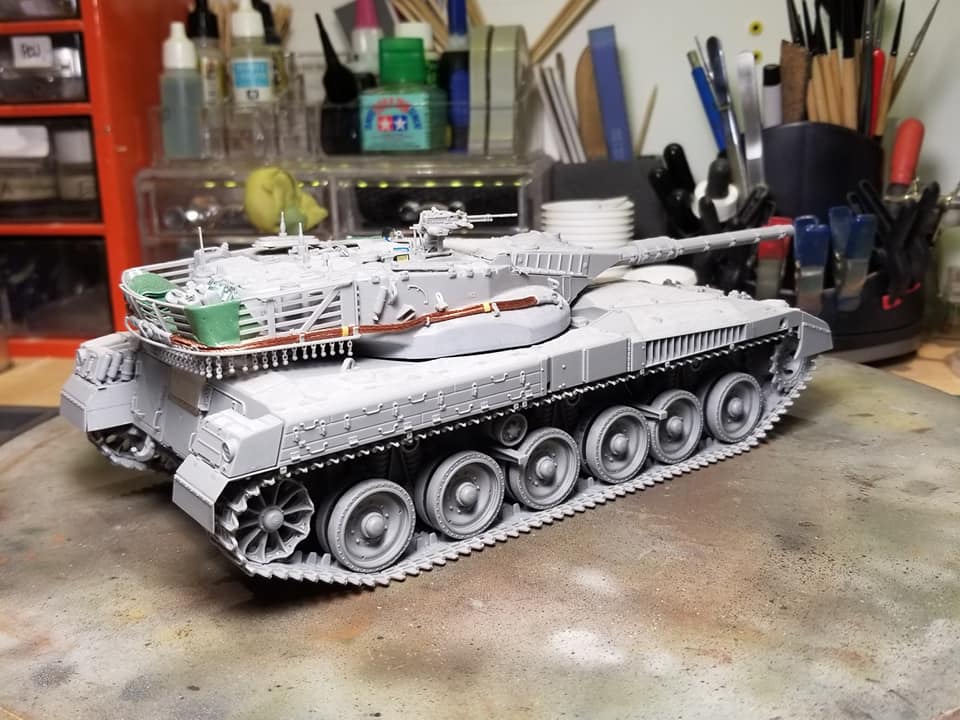
I have had the chance to build Takom’s Merkava I in the last few months. The actual result of this endeavor may end up here on the blog eventually, but I thought I should definitely say a thing or two about this formidable kit.
Because formidable it is. Instructions are clear, molding is crisp, enginering is smart, part fit tolerance is stunning. Overall, although a complex and intricate vehicle, it builds easily into a sharp rendition of the Merkava.
However, it is not perfect (what kit is, anyway?). There are a number of little issues about it, and this is what prompted me to get this list of points so that anyone contemplating it as a project may benefit from my experience with it.
So, emm, this is not a formal *review* per se. These are merely my impressions on this kit along with some observations regarding accuracy, ease of construction, etc.
Overall Engineering of this kit is stunning…
The way the suspension is built is simple, resulting in a tight assembly, quite true to the original and makes for a super stable base for the trackwork. Takom also provides this neat jig to assemble the suspension, check alignment, and assemble the tracks.

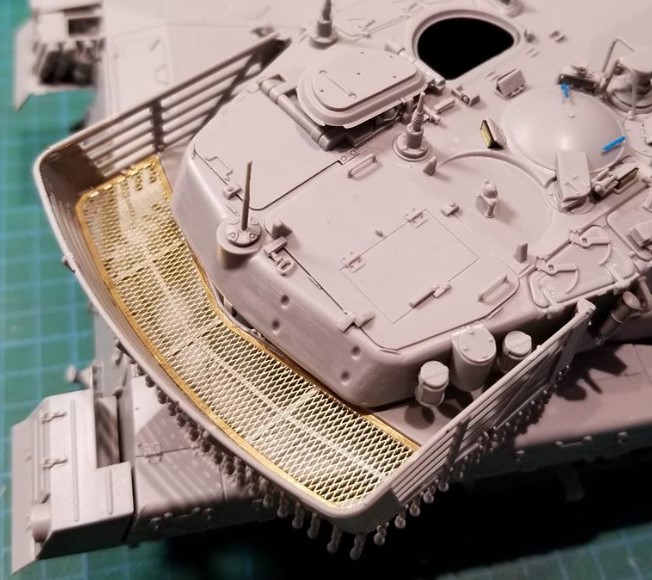
The turret basket, which is always a fiddly affair, is pretty nicely done here. It is still somewhat delicate, but it’s fairly easy to get it done nicely.
… with One Issue
One point that is suboptimal: Takom chose to have the front side rubber skirt molded on. This limits your options on how to tackle the tracks.
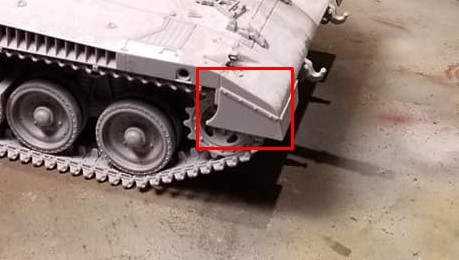
It would not be hard for Takom to have this part molded separately. As it stands I would suggest its careful removal to be glued back on once you’re done with the lower hull. If you have the armored skirts on, this ain’t so bad, but without them, it forces you to assemble the tracks prior to painting (if you don’t want to run the risk of breaking them after painting installing them back), or find alternate ways to leave them off for sub-assemblies painting.
Tolerance on part fit is great, sometimes extraordinary.
You know the feeling. You slip a part into position and it fits so snugly that it just doesn’t need any glue. In this case, no glue was needed on multiple occasions.
Not the most common Mk 1.
The kit is marketed as a Mk.1. While technically true, the actual vehicle you can build straight out of the box could be described as a “late” mk. 1.
Why? Well, the kit comes with a [resonably well-represented] molded version of the ball-and-chain curtain. This is misleading because while there were indeed some early mk1 equipped with this feature, it isn’t the majority, and, more importantly, it was installed post-Lebanon, so if you want to represent a Peace for Galilee operations vehicle, you need to remove the curtain. Takom would have been better to provide the turret basket without the ball and chain curtain, especially since it’s a standard feature of the Mk Ib, also produced by Takom. *Cough* Of course the best option would have been to provide both options.*cough*
Consider Getting Takom’s Merkava Mk.1b

If you are into accuracy and detailing, you may consider getting Takom’s Merkava Mk.1b or “hybrid” version instead. I haven’t seen the kit per se, and only *assume* it to be as good as the straight Mk.1, but you get one considerable advantage going with the 1b. You get EXCELLENT references in the form of Desert Eagle’s awesome books on the Merkava I by Michael Mass.

These books are everything you need to get high-resolution images on most parts of the Merkava Mk.1b. But be aware, however, that although the subtitles simply state “Merkava MK 1 in IDF Service“, 99% of the images actually shows MK.1b.
If you do decide to go with the Mk.1 and are looking for references for it, here are some publications you should look for (my thanks to my friend Karl Ratté for lending them to me for this project):
- Israeli God’s Chariots Volume 1: Merkava Siman 1 Tanks in IDF Service by Robert Dr. Manasherob.
- Merkava I, II, III: Israel’s Chariot of Fire. Samuel M. Katz from Concord Publications. This is the only book that shows ‘late’ mk.1s with the ball-and-chain curtain in substantial quantity.
- Tank Battles of the Mid East Wars: (2) The Wars of 1973 to the Present from Steven J. Zaloga. Few images of Merkavas and some color profiles.
- Israel’s Armor Might. Concord Publications. An old one from Samuel M. Katz.
Construction Note: The Hull.
Assembling the hull, pay attention to how the lower and upper rear plates joint up. I ended up with a very slight misalignment that won’t jump at you, but it’s there. If you perform the assembly all at once, you can certainly secure it so as to avoid that gap forming.

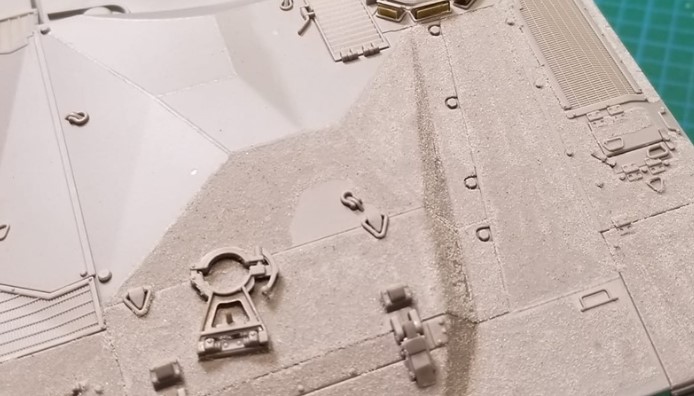
Antislip or not antislip?
Common wisdom states this tank should normally NOT sport antislip surface texture. It is not 100% clear if no early mkI ever received it though. The Mk.1 at Latrun’s museum has it, and Mk 1b Merkavas have it. I went for it because I wanted to try a new technique to achieve that effect (and mostly because I wasn’t sure at the time whether this was realistic or not to have it).
Tracks, Mortar and MGs.
Spare tracks are molded in one piece with the brackets and securing bolts plates. While the part themselves aren’t too bad, I would have much preferred to get the option to show them dismounted.
The 60mm mortar is also molded in one solid piece, with the barrel and the securing bracket. Again, this is not always mounted, and in fact most refs I had shown the mortar to be stowed away. It would have been a great thing to get options to show that on or off.
MAG machineguns are represented without their carrying handle. However, in most refs this feature is present.
Markings
Takom provides the basic markings, but if you are interested in getting more detailed ones, consider getting Echelon’s neat Merkava 1 sheet. You get marking for the fire extinguishers, roadwheel hubs, and most of it in double so you have enough for two vehicles.
To Conclude
So there you have it, my impressions on the single best scale model kit I’ve assembled to date. Takom’s Merkava Mk.1 is an excellent kit, and I’m getting their Mk.2b right away to build another Merkava.

Pingback: Takom T-55AM | The Other Means
Pingback: Merkava 1 | The Other Means
Nice job, I have just finished construction / assembly of this very kit. I am getting over the track / front skirt molded on issue by painting the lower hull and tracks first then cementing the upper hull and bottom together. However it never fails ! I seem to lose one tiny part ( in this case, one of the u brackets on the side of the turret / basket.). I found your website while looking for pictures of the wheels.
LikeLike
Pingback: RFM’s Joint Light Tactical Vehicle | The Other Means